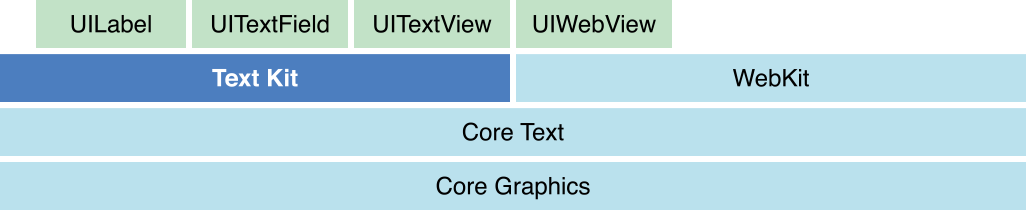
CoreText是iOS/macOS中的文字排版引擎,提供了一系列对文本精确操作的API;UIKit中UILabel、UITextView等文本组件底层都是基于CoreText的,可以看官方提供的层级图:
CoreText中有几个重要概念:CTTypesetter、CTFramesetter、CTFrame、CTLine、CTRun;它们之间的关系可以看官方提供的层级图:
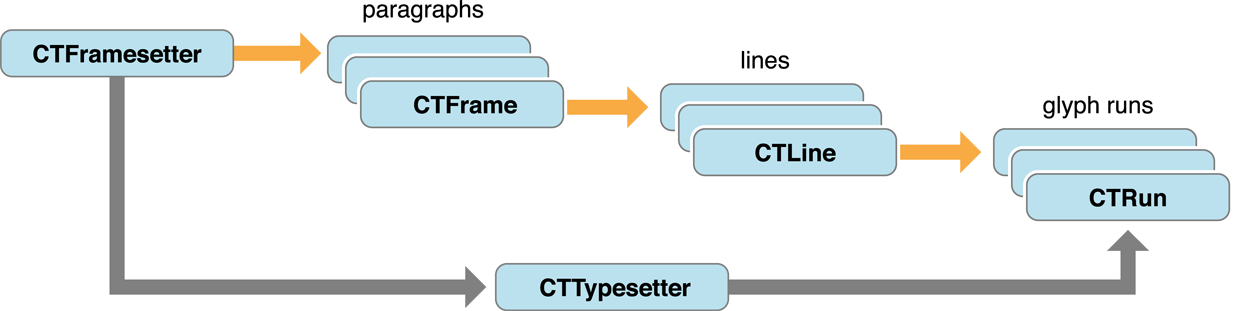
一篇文档可以分为:文档 -> 段落 -> 段落中的行 -> 行中的文字,类似的,CoreText也是按这个结构来组织和管理API的,我们也可以根据诉求来选择不同层级的API。
CTFramesetter类似于文档的概念,它负责将多段文本进行排版,管理多个段落(CTFrame)。
CTFramesetter的输入是属性字符串(NSAttributedString)和路径(CGPath),负责将文本在指定路径上进行排版。
CTFrame类似于段落的概念,其中包含了若干行(CTLine)以及对应行的位置、方向、行间距等信息。
CTLine类似于行的概念,其中包含了若干个字形(CTRun)以及对应字形的位置等信息。
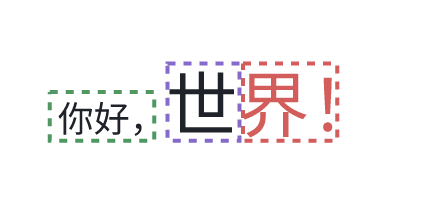
需要注意CTRun不是单个的字符,而是一段连续的且具有相同属性(字体、颜色等)的字形(Glyph)。
如下,每个虚线框都代表一个CTRun:
CTTypesetter支持对属性字符串进行换行,可以通过CTTypesetter来自定义换行(比如按word换行、按char换行等)或控制每行的内容,可以理解成更精细化的控制。
1)CTFramesetterCreateWithAttributedString
func CTFramesetterCreateWithAttributedString(_ attrString: CFAttributedString) -> CTFramesetter通过属性字符串来创建CTFramesetter。
我们可以构造不同字体、颜色、大小的属性字符串,然后从属性字符串构造CTFramesetter,之后可以继续往下拆分得到段落、行、字形等信息,这样可以实现自定义排版、图文混排等复杂富文本样式。
2)CTFramesetterCreateWithTypesetter
func CTFramesetterCreateWithTypesetter(_ typesetter: CTTypesetter) -> CTFramesetter通过CTTypesetter来创建CTFramesetter,当我们需要对文本实现更精细控制,比如自定义换行时,可以自己构造CTTypesetter。
3)CTFramesetterCreateFrame
func CTFramesetterCreateFrame(
    _ framesetter: CTFramesetter,
    _ stringRange: CFRange,
    _ path: CGPath,
    _ frameAttributes: CFDictionary?
) -> CTFrame
生成CTFrame:在指定路径(path)为属性字符串的指定范围(stringRange)生成CTFrame。
framesetterstringRange:字符范围,注意需要以UTF-16编码格式计算;当 stringRange.length = 0 时,表示从起点(stringRange.location)到字符结束为止;比如当 CFRangeMake(0, 0) 表示全字符范围path:排版路径,可以是不规则矩形,这意味着可以传入不规则图形来实现文字环绕等高级效果frameAttributes:一个可选的字典,可以用于控制段落级别的布局行为,比如行间距等,一般用不到,可传 nil
4)CTFramesetterSuggestFrameSizeWithConstraints
func CTFramesetterSuggestFrameSizeWithConstraints(
    _ framesetter: CTFramesetter,
    _ stringRange: CFRange,
    _ frameAttributes: CFDictionary?,
    _ constraints: CGSize,
    _ fitRange: UnsafeMutablePointer<CFRange>?
) -> CGSize
计算文本宽高:在给定约束尺寸(constraints)下计算文本范围(stringRange)的实际宽高。
如下,我们可以计算出在宽高 100 x 100 的范围内排版,实际能放下的文本范围(fitRange)以及实际的文本尺寸:
let attr = NSAttributedString(string: "这是一段测试文本,通过调用CTFramesetterSuggestFrameSizeWithConstraints来计算文本的宽高信息,并返回实际的range", attributes: [
    .font: UIFont.systemFont(ofSize: 16),
    .foregroundColor: UIColor.black
])
let framesetter = CTFramesetterCreateWithAttributedString(attr)
var fitRange = CFRange(location: 0, length: 0)
let size = CTFramesetterSuggestFrameSizeWithConstraints(
    framesetter,
    CFRangeMake(0, 0),
    nil,
    CGSize(width: 100, height: 100),
    &fitRange
)
print(size, fitRange, attr.length)
这个API在分页时非常有用,比如微信读书的翻页效果,需要知道在哪个地方截断,PDF的分页排版等。
1)实现一个支持AutoLayout且高度靠内容撑开的富文本View
import UIKit
import CoreText

class DynamicHeightTextView: UIView {
    var attributedText: NSAttributedString? {
        didSet {
            // 当文本改变时,需要重绘并重新计算固有内容大小
            setNeedsDisplay()
            invalidateIntrinsicContentSize()
            setNeedsLayout()
            layoutIfNeeded()
        }
    }

    override var bounds: CGRect {
        didSet {
            if needRelayout {
                setNeedsDisplay()
                invalidateIntrinsicContentSize()
                setNeedsLayout()
                layoutIfNeeded()
            }
        }
    }

    var needRelayout = false

    // 1. 使用 CTFramesetter 计算固有内容大小
    override var intrinsicContentSize: CGSize {
        guard let attributedText = attributedText else {
            return .zero
        }

        // 创建 CTFramesetter
        let framesetter = CTFramesetterCreateWithAttributedString(attributedText as CFAttributedString)

        // 我们需要一个宽度约束来计算高度。这里我们使用视图的 bounds.width。
        // 如果 bounds.width 是 0,我们使用一个很大的宽度。
        let width = bounds.width > 0 ? bounds.width : CGFloat.greatestFiniteMagnitude

        // autolayout时,初始bounds宽度为0,计算出的高度有问题,需要等bounds宽度确定再重布局
        needRelayout = bounds.width <= 0

        // 设置约束尺寸,宽度固定,高度不限
        let constraints = CGSize(width: width, height: .greatestFiniteMagnitude)

        // 声明一个 CFRange 变量来接收实际适应的范围
        var fitRange = CFRange(location: 0, length: 0)

        // 调用 CTFramesetterSuggestFrameSizeWithConstraints 来获取建议的尺寸
        let suggestedSize = CTFramesetterSuggestFrameSizeWithConstraints(
            framesetter,
            CFRange(location: 0, length: attributedText.length), // 整个字符串
            nil, // 框架属性,这里不需要
            constraints,
            &fitRange // 接收实际排版范围
        )

        // 返回计算出的尺寸。我们给高度增加 1 点来避免可能的截断。
        return CGSize(width: suggestedSize.width, height: ceil(suggestedSize.height) + 1)
    }

    // 2. 使用 CTFramesetter 和 CTFrame 绘制
    override func draw(_ rect: CGRect) {
        guard let context = UIGraphicsGetCurrentContext(),
              let attributedText = attributedText else {
            return
        }

        // --- 坐标系翻转 ---
        context.translateBy(x: 0, y: bounds.height)
        context.scaleBy(x: 1.0, y: -1.0)

        // 创建 CTFramesetter
        let framesetter = CTFramesetterCreateWithAttributedString(attributedText as CFAttributedString)

        // 创建用于绘制的路径,这里就是整个视图的 bounds
        let path = CGPath(rect: bounds, transform: nil)

        // 使用 CTFramesetterCreateFrame 创建 CTFrame
        // CFRange(location: 0, length: 0) 表示 "整个字符串"
        let frame = CTFramesetterCreateFrame(
            framesetter,
            CFRange(location: 0, length: 0),
            path,
            nil // 框架属性
        )

        // 使用 CTFrameDraw 将框架绘制到上下文中
        CTFrameDraw(frame, context)
    }

    // 初始化时设置背景色为透明,以便看到绘制内容
    override init(frame: CGRect) {
        super.init(frame: frame)
        backgroundColor = .clear
    }

    required init?(coder: NSCoder) {
        super.init(coder: coder)
        backgroundColor = .clear
    }
}
2)在圆形路径中绘制文本
import UIKit
import CoreText

class CircularTextView: UIView {
    let attributedText: NSAttributedString = {
        let text = "Lorem ipsum dolor sit amet, consectetur adipiscing elit. Sed non risus. Suspendisse lectus tortor, dignissim sit amet, adipiscing nec, ultricies sed, dolor. Cras elementum ultrices diam. Maecenas ligula massa, varius a, semper congue, euismod non, mi. Proin porttitor, orci nec nonummy molestie, enim est eleifend mi, non fermentum diam nisl sit amet erat. Duis semper. Duis arcu massa, scelerisque vitae, consequat in, pretium a, enim. Pellentesque congue. Ut in risus volutpat libero pharetra tempor. Cras vestibulum bibendum augue."
        return NSAttributedString(string: text, attributes: [
            .font: UIFont(name: "TimesNewRomanPS-ItalicMT", size: 14) ?? .systemFont(ofSize: 14),
            .foregroundColor: UIColor.black
        ])
    }()

    override init(frame: CGRect) {
        super.init(frame: frame)
        backgroundColor = .white
    }

    required init?(coder: NSCoder) {
        super.init(coder: coder)
        backgroundColor = .white
    }

    override func draw(_ rect: CGRect) {
        guard let context = UIGraphicsGetCurrentContext() else { return }

        // --- 坐标系翻转 ---
        context.translateBy(x: 0, y: bounds.height)
        context.scaleBy(x: 1.0, y: -1.0)

        // 1. 创建 CTFramesetter
        let framesetter = CTFramesetterCreateWithAttributedString(attributedText as CFAttributedString)

        // 2. 创建一个圆形的 CGPath (在 bounds 内部留出 10pt 的边距)
        let path = CGPath(
            ellipseIn: bounds.insetBy(dx: 10, dy: 10),
            transform: nil
        )

        // (可选) 绘制圆形路径,以便我们能看到边界
        context.addPath(path)
        context.setStrokeColor(UIColor.lightGray.cgColor)
        context.setLineWidth(1.0)
        context.strokePath()

        // 3. 使用 CTFramesetterCreateFrame 在该圆形路径中创建 CTFrame
        let frame = CTFramesetterCreateFrame(
            framesetter,
            CFRange(location: 0, length: 0),
            path,
            nil
        )

        // 4. 绘制 CTFrame
        CTFrameDraw(frame, context)
    }
}
3)文本分页:模拟微信读书的分页逻辑
import UIKit
import CoreText

class MultiColumnView: UIView {
    let attributedText: NSAttributedString = {
        // ... (使用一个很长的 NSAttributedString) ...
        let longText = String(repeating: "这是一个分栏布局的例子。Core Text 允许我们将一个长的属性字符串(CFAttributedString)流动到多个不同的路径(CGPath)中。我们只需要创建一个 CTFramesetter,然后循环调用 CTFramesetterCreateFrame。每次调用后,我们使用 CTFrameGetStringRange 来找出有多少文本被排入了当前的框架,然后将下一个框架的起始索引设置为这个范围的末尾。 ", count: 10)
        return NSAttributedString(string: longText, attributes: [
            .font: UIFont.systemFont(ofSize: 12),
            .foregroundColor: UIColor.darkText
        ])
    }()

    override init(frame: CGRect) {
        super.init(frame: frame)
        backgroundColor = .white
    }

    required init?(coder: NSCoder) {
        super.init(coder: coder)
        backgroundColor = .white
    }

    override func draw(_ rect: CGRect) {
        guard let context = UIGraphicsGetCurrentContext() else { return }

        // --- 坐标系翻转 ---
        context.translateBy(x: 0, y: bounds.height)
        context.scaleBy(x: 1.0, y: -1.0)

        // 模拟微信读书的分页效果
        // 1. 定义两个分栏的路径
        let columnWidth = (bounds.width - 10) / 2
        let columnRect1 = CGRect(x: 0, y: 0, width: columnWidth, height: bounds.height)
        let columnRect2 = CGRect(x: columnWidth + 10, y: 0, width: columnWidth, height: bounds.height)

        let paths = [
            CGPath(rect: columnRect1, transform: nil),
            CGPath(rect: columnRect2, transform: nil)
        ]

        // (可选) 绘制边框
        context.setStrokeColor(UIColor.gray.cgColor)
        context.addPath(paths[0])
        context.addPath(paths[1])
        context.strokePath()

        // 2. 创建 CTFramesetter
        let framesetter = CTFramesetterCreateWithAttributedString(attributedText as CFAttributedString)

        // 3. 循环布局
        var currentStringIndex = 0
        let totalLength = attributedText.length

        for path in paths {
            // 如果所有文本都已排版,就停止
            guard currentStringIndex < totalLength else { break }

            // 4. 创建 CTFrame,注意 CFRange 的 location 是变化的
            let frame = CTFramesetterCreateFrame(
                framesetter,
                CFRange(location: currentStringIndex, length: 0), // length 为 0 表示 "排到末尾"
                path,
                nil
            )

            // 5. 绘制
            CTFrameDraw(frame, context)

            // 6. 更新索引!
            // 获取这个 frame 实际排版了多少字符
            let frameRange = CTFrameGetVisibleStringRange(frame)
            currentStringIndex += frameRange.length
        }
    }
}1)CTFramesetterCreateFrame
func CTFramesetterCreateFrame(
    _ framesetter: CTFramesetter,
    _ stringRange: CFRange,
    _ path: CGPath,
    _ frameAttributes: CFDictionary?
) -> CTFrame
创建CTFrame,在CTFramesetter一节中有介绍过,这是创建CTFrame的唯一方式。
2)CTFrameGetStringRange
func CTFrameGetStringRange(_ frame: CTFrame) -> CFRange获取CTFrame包含的字符范围。
我们在调用CTFramesetterCreateFrame创建CTFrame时,会传入一个 stringRange 的参数,CTFrameGetStringRange也可以理解成获取这个 stringRange,区别是处理了当 stringRange.length 为0的情况。
3)CTFrameGetVisibleStringRange
func CTFrameGetVisibleStringRange(_ frame: CTFrame) -> CFRange获取CTFrame实际可见的字符范围。
我们在调用CTFramesetterCreateFrame创建CTFrame时,会传入path,可能会把字符截断,CTFrameGetVisibleStringRange返回的就是可见的字符范围。
需要注意和CTFrameGetStringRange进行区分,可以用如下Demo验证:
let longText = String(repeating: "这是一个分栏布局的例子。Core Text 允许我们将一个长的属性字符串(CFAttributedString)流动到多个不同的路径(CGPath)中。我们只需要创建一个 CTFramesetter,然后循环调用 CTFramesetterCreateFrame。每次调用后,我们使用 CTFrameGetStringRange 来找出有多少文本被排入了当前的框架,然后将下一个框架的起始索引设置为这个范围的末尾。 ", count: 10)
let attributedText = NSAttributedString(string: longText, attributes: [
    .font: UIFont.systemFont(ofSize: 12),
    .foregroundColor: UIColor.darkText
])
let framesetter = CTFramesetterCreateWithAttributedString(attributedText as CFAttributedString)
let path = CGPath(rect: .init(x: 10, y: 100, width: 400, height: 200), transform: nil)
let frame = CTFramesetterCreateFrame(
    framesetter,
    CFRange(location: 100, length: 0),
    path,
    nil
)
// 输出:CFRange(location: 100, length: 1980)
print(CTFrameGetStringRange(frame))
// 输出:CFRange(location: 100, length: 584)
print(CTFrameGetVisibleStringRange(frame))
4)CTFrameGetPath
func CTFrameGetPath(_ frame: CTFrame) -> CGPath获取创建CTFrame时传入的path。
5)CTFrameGetLines
func CTFrameGetLines(_ frame: CTFrame) -> CFArray获取CTFrame中所有的行(CTLine)。
6)CTFrameGetLineOrigins
func CTFrameGetLineOrigins(
    _ frame: CTFrame,
    _ range: CFRange,
    _ origins: UnsafeMutablePointer<CGPoint>
)
获取每一行的起点坐标。
用法示例:
let lines = CTFrameGetLines(frame) as! [CTLine]
var origins = [CGPoint](repeating: .zero, count: lines.count)
CTFrameGetLineOrigins(frame, CFRangeMake(0, 0), &origins)
7)CTFrameDraw
func CTFrameDraw(
    _ frame: CTFrame,
    _ context: CGContext
)
绘制CTFrame。
1)绘制CTFrame
import UIKit
import CoreText

class BasicFrameView: UIView {

    private let attributedText: NSAttributedString = {
        let string = "你好,世界!\n这是一个 CTFrameDraw 的基础示例。\n它简单地将整个框架一次性绘制出来。"
        let attributes: [NSAttributedString.Key: Any] = [
            .font: UIFont.systemFont(ofSize: 20),
            .foregroundColor: UIColor.blue,
            .paragraphStyle: {
                let style = NSMutableParagraphStyle()
                style.lineSpacing = 8
                return style
            }()
        ]
        return NSAttributedString(string: string, attributes: attributes)
    }()

    override init(frame: CGRect) {
        super.init(frame: frame)
        backgroundColor = .white
    }

    required init?(coder: NSCoder) {
        super.init(coder: coder)
        backgroundColor = .white
    }

    override func draw(_ rect: CGRect) {
        // --- 1. 通用设置 (翻转坐标系) ---
        guard let context = UIGraphicsGetCurrentContext() else { return }
        context.translateBy(x: 0, y: bounds.height)
        context.scaleBy(x: 1.0, y: -1.0)

        // --- 2. 准备工作:创建 CTFrame ---
        // (这一步是 CTFramesetter 的工作, 但它是获取 CTFrame 的前提)
        let framesetter = CTFramesetterCreateWithAttributedString(attributedText as CFAttributedString)

        // 我们在视图内留出 10pt 的边距
        let drawRect = bounds.insetBy(dx: 10, dy: 10)
        let path = CGPath(rect: drawRect, transform: nil)

        let ctFrame = CTFramesetterCreateFrame(
            framesetter,
            CFRange(location: 0, length: 0),
            path,
            nil
        )

        // --- 3. 核心 API:CTFrameDraw ---
        // 这一行代码就会将所有排版好的文本绘制到上下文中
        CTFrameDraw(ctFrame, context)

        // (可选) 绘制出我们用于布局的路径边框,以便观察
        context.setStrokeColor(UIColor.red.cgColor)
        context.addPath(path)
        context.strokePath()
    }
}
2)高亮某一行
import UIKit
import CoreText

class CustomLineDrawView: UIView {

    private let attributedText: NSAttributedString = {
        let string = "第一行:没有高亮。\n第二行:有黄色高亮背景。\n第三行:也没有高亮。"
        let attributes: [NSAttributedString.Key: Any] = [
            .font: UIFont.systemFont(ofSize: 24),
            .foregroundColor: UIColor.darkGray,
            .paragraphStyle: {
                let style = NSMutableParagraphStyle()
                style.lineSpacing = 10
                return style
            }()
        ]
        return NSAttributedString(string: string, attributes: attributes)
    }()

    override init(frame: CGRect) {
        super.init(frame: frame)
        backgroundColor = .white
    }
    required init?(coder: NSCoder) { super.init(coder: coder); backgroundColor = .white }

    override func draw(_ rect: CGRect) {
        // --- 1. 通用设置 (翻转坐标系) ---
        guard let context = UIGraphicsGetCurrentContext() else { return }
        context.translateBy(x: 0, y: bounds.height)
        context.scaleBy(x: 1.0, y: -1.0)

        // --- 2. 准备工作:创建 CTFrame ---
        let framesetter = CTFramesetterCreateWithAttributedString(attributedText as CFAttributedString)
        let path = CGPath(rect: bounds.insetBy(dx: 10, dy: 10), transform: nil)
        let ctFrame = CTFramesetterCreateFrame(
            framesetter,
            CFRange(location: 0, length: 0),
            path,
            nil
        )

        // --- 3. 核心 API:CTFrameGetLines 和 CTFrameGetLineOrigins ---

        // 3a. 获取 CTLine 数组
        guard let lines = CTFrameGetLines(ctFrame) as? [CTLine] else { return }

        // 3b. 获取 CTLine 的原点 (CGPoint) 数组
        var lineOrigins = [CGPoint](repeating: .zero, count: lines.count)
        CTFrameGetLineOrigins(ctFrame, CFRange(location: 0, length: 0), &lineOrigins)

        // 3c. 遍历每一行并自定义绘制
        // 注意:我们不再调用 CTFrameDraw(ctFrame, context)
        // 而是手动绘制每一行 CTLineDraw(line, context)

        for (index, line) in lines.enumerated() {

            // 获取这一行的原点
            let origin = lineOrigins[index]

            // 计算高亮矩形
            var ascent: CGFloat = 0
            var descent: CGFloat = 0
            var leading: CGFloat = 0
            let lineWidth = CTLineGetTypographicBounds(line, &ascent, &descent, &leading)

            // lineOrigin.y 是基线 (baseline) 的位置
            // ascent 是基线之上的高度
            // descent 是基线之下的高度
            let highlightRect = CGRect(
                x: origin.x,
                y: origin.y - descent, // 从基线向下 descent 开始
                width: CGFloat(lineWidth),
                height: ascent + descent // 高度为 ascent + descent
            )

            // --- 自定义绘制逻辑 ---
            if index == 1 { // 只高亮第二行 (索引为 1)
                context.saveGState()
                context.setFillColor(UIColor.yellow.cgColor)
                context.fill(highlightRect)
                context.restoreGState()
            }

            // --- 绘制文本 ---
            // 必须设置文本的绘制位置
            context.textPosition = CGPoint(x: origin.x, y: origin.y)
            CTLineDraw(line, context)
        }
    }
}
3)检测点击字符
import UIKit
import CoreText

class HitTestableFrameView: UIView {

    private var ctFrame: CTFrame?
    private let attributedText: NSAttributedString = {
        let string = "点击我!\n你可以点击这个视图中的任何一个字符,\n控制台会打印出你点击的字符索引。\n试试看吧!"
        let attributes: [NSAttributedString.Key: Any] = [
            .font: UIFont.systemFont(ofSize: 42),
            .foregroundColor: UIColor.black
        ]
        return NSAttributedString(string: string, attributes: attributes)
    }()

    override init(frame: CGRect) {
        super.init(frame: frame)
        backgroundColor = .white

        let tapGesture = UITapGestureRecognizer(target: self, action: #selector(handleTap(_:)))
        addGestureRecognizer(tapGesture)
    }
    required init?(coder: NSCoder) { fatalError("init(coder:) has not been implemented") }

    override func draw(_ rect: CGRect) {
        guard let context = UIGraphicsGetCurrentContext() else { return }

        // --- 1. 坐标系翻转 ---
        context.translateBy(x: 0, y: bounds.height)
        context.scaleBy(x: 1.0, y: -1.0)

        // --- 2. 创建并存储 CTFrame ---
        let framesetter = CTFramesetterCreateWithAttributedString(attributedText as CFAttributedString)
        let path = CGPath(rect: bounds, transform: nil)

        // 创建 CTFrame 并将其存储在属性中,以便手势处理器可以访问它
        let frame = CTFramesetterCreateFrame(
            framesetter,
            CFRange(location: 0, length: 0),
            path,
            nil
        )
        self.ctFrame = frame

        // --- 3. 绘制 ---
        CTFrameDraw(frame, context)
    }

    @objc private func handleTap(_ gesture: UITapGestureRecognizer) {
        guard let ctFrame = self.ctFrame else { return }

        // --- 1. 获取点击位置 (UIKit) ---
        let tapLocationInView = gesture.location(in: self)

        // --- 2. 转换为 CoreText 坐标 (左下角原点) ---
        let tapLocationInCT = CGPoint(
            x: tapLocationInView.x,
            y: bounds.height - tapLocationInView.y
        )

        // --- 3. 获取所有行和它们的原点 ---
        guard let lines = CTFrameGetLines(ctFrame) as? [CTLine] else { return }
        var lineOrigins = [CGPoint](repeating: .zero, count: lines.count)
        // 注意:CTFrameGetLineOrigins 是相对于 CTFrame 的 path 原点的
        // 因为我们的 path 是从 (10, 10) 开始的 (insetBy),所以原点坐标会包含这个偏移
        CTFrameGetLineOrigins(ctFrame, CFRange(location: 0, length: 0), &lineOrigins)

        // --- 4. 遍历每一行,找到被点击的行 ---
        for (index, line) in lines.enumerated() {
            let lineOrigin = lineOrigins[index]

            // 获取行边界
            var ascent: CGFloat = 0, descent: CGFloat = 0, leading: CGFloat = 0
            let lineWidth = CTLineGetTypographicBounds(line, &ascent, &descent, &leading)

            // 构造行的 bounding box (使用 CoreText 坐标系)
            // 注意:lineOrigin.y 是基线 (baseline)
            let lineRect = CGRect(
                x: lineOrigin.x,
                y: lineOrigin.y - descent, // 矩形底部
                width: CGFloat(lineWidth),
                height: ascent + descent   // 矩形高度
            )

            // 检查 Y 坐标是否在行内
            if tapLocationInCT.y >= lineRect.minY && tapLocationInCT.y <= lineRect.maxY {

                // --- 5. 【修正的核心逻辑】 ---
                // 遍历行内的每一个字符索引,检查 X 坐标

                let lineRange = CTLineGetStringRange(line)

                // 遍历从第一个字符到最后一个字符
                for i in lineRange.location..<(lineRange.location + lineRange.length) {
                    let charIndex = i
                    let nextCharIndex = i + 1

                    // 获取当前字符的左边界 (leading offset)
                    let leadingOffset = CTLineGetOffsetForStringIndex(line, charIndex, nil)

                    // 获取下一个字符的左边界 (即当前字符的右边界, trailing offset)
                    let trailingOffset = CTLineGetOffsetForStringIndex(line, nextCharIndex, nil)

                    // 将偏移量转换成 CTFrame 的坐标
                    let charLeftEdge = lineOrigin.x + leadingOffset
                    let charRightEdge = lineOrigin.x + trailingOffset

                    // 检查点击的 X 坐标是否落在这个字符的宽度范围内
                    if tapLocationInCT.x >= charLeftEdge && tapLocationInCT.x < charRightEdge {
                        // 找到了!
                        if let char = self.character(at: charIndex) {
                            print("点击了第 \(index) 行, 字符索引: \(charIndex), 字符: '\(char)'")
                        }
                        return
                    }
                }

                // 如果循环结束还没找到 (可能点击了行尾的空白处),
                // 我们可以认为点击了最后一个字符,但这取决于业务逻辑。
                // 为清晰起见,这里我们只处理精确落在字符边界内的情况。
            }
        }

        print("点击位置在文本之外")
    }

    // 辅助函数:根据索引获取字符
    private func character(at index: Int) -> Character? {
        let string = attributedText.string
        guard index >= 0 && index < string.count else { return nil }
        let stringIndex = string.index(string.startIndex, offsetBy: index)
        return string[stringIndex]
    }
}1)CTLineCreateWithAttributedString
func CTLineCreateWithAttributedString(_ attrString: CFAttributedString) -> CTLine从属性字符串创建单行CTLine,如果字符串中有换行符(\n)的话,换行符会被转换成空格,如下:
let line = CTLineCreateWithAttributedString(
    NSAttributedString(string: "Hello CoreText\nWorld", attributes: [.font: UIFont.systemFont(ofSize: 16)])
)
2)CTLineCreateTruncatedLine
func CTLineCreateTruncatedLine(
    _ line: CTLine,
    _ width: Double,
    _ truncationType: CTLineTruncationType,
    _ truncationToken: CTLine?
) -> CTLine?
创建一个被截断的新行。
line:待截断的行width:在多少宽度截断truncationType:start/end/middle,截断类型- truncationToken:在截断处添加的字符,nil表示不添加,一般使用省略符(...)
let truncationToken = CTLineCreateWithAttributedString(
    NSAttributedString(string: "…", attributes: [.font: UIFont.systemFont(ofSize: 16)])
)
let truncated = CTLineCreateTruncatedLine(line, 100, .end, truncationToken)
3)CTLineCreateJustifiedLine
func CTLineCreateJustifiedLine(
    _ line: CTLine,
    _ justificationFactor: CGFloat,
    _ justificationWidth: Double
) -> CTLine?
创建一个两端对齐的新行,类似书籍或报纸中两端对齐的排版效果。
line:原始行justificationFactor:justificationFactor <= 0表示不缩放,即与原始行相同;justificationFactor >= 1表示完全缩放到指定宽度;0 < justificationFactor < 1表示部分缩放到指定宽度,可以看示例代码justificationWidth:缩放指定宽度
示例:
import Foundation
import UIKit
import CoreText

class LineJustifyView: UIView {
    override init(frame: CGRect) {
        super.init(frame: frame)
        backgroundColor = .white
    }

    required init?(coder: NSCoder) {
        super.init(coder: coder)
        backgroundColor = .white
    }

    override func draw(_ rect: CGRect) {
        guard let context = UIGraphicsGetCurrentContext() else { return }
        context.translateBy(x: 0, y: bounds.height)
        context.scaleBy(x: 1, y: -1)

        let text = "Justified text using Core Text."
        let attrs: [NSAttributedString.Key: Any] = [
            .font: UIFont.systemFont(ofSize: 20)
        ]
        let attrString = NSAttributedString(string: text, attributes: attrs)
        let line = CTLineCreateWithAttributedString(attrString)

        // 计算原宽度
        let width = CTLineGetTypographicBounds(line, nil, nil, nil)
        print("original width = ", width)

        // 创建对齐后的行(目标宽度 400)
        let justifiedLine = CTLineCreateJustifiedLine(line, 1.0, 400)!
//        let justifiedLine = CTLineCreateJustifiedLine(line, 0, 400)!
//        let justifiedLine = CTLineCreateJustifiedLine(line, 0.5, 400)!

        // 绘制原始行
        context.textPosition = .init(x: 10, y: 200)
        CTLineDraw(line, context)

        // 绘制对齐后的行
        context.textPosition = .init(x: 10, y: 150)
        CTLineDraw(justifiedLine, context)
    }
}
4)CTLineDraw
func CTLineDraw(
    _ line: CTLine,
    _ context: CGContext
)
绘制行。
5)CTLineGetGlyphCount
func CTLineGetGlyphCount(_ line: CTLine) -> CFIndex获取行内字形总数。
6)CTLineGetGlyphRuns
func CTLineGetGlyphRuns(_ line: CTLine) -> CFArray获取行内所有的CTRun。
7)CTLineGetStringRange
func CTLineGetStringRange(_ line: CTLine) -> CFRange获取该行对应的字符范围。
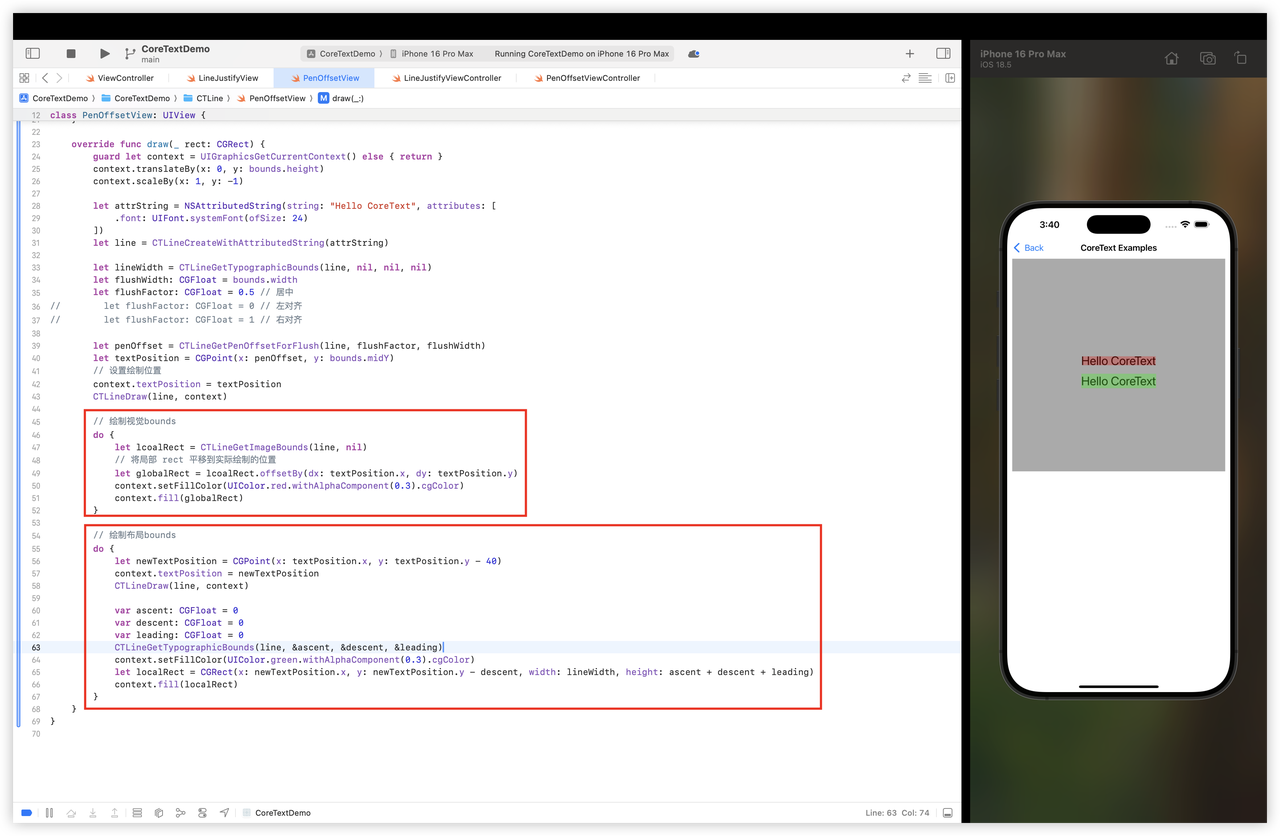
8)CTLineGetPenOffsetForFlush
func CTLineGetPenOffsetForFlush(
    _ line: CTLine,
    _ flushFactor: CGFloat,
    _ flushWidth: Double
) -> Double
获取在指定宽度绘制时的水平偏移,一般配合 CGContext.textPosition 使用,可用于实现在固定宽度下文本的左对齐、右对齐、居中对齐及自定义水平偏移等。
示例:
import Foundation
import UIKit
import CoreText

class PenOffsetView: UIView {
    override init(frame: CGRect) {
        super.init(frame: frame)
        backgroundColor = .lightGray
    }

    required init?(coder: NSCoder) {
        super.init(coder: coder)
        backgroundColor = .lightGray
    }

    override func draw(_ rect: CGRect) {
        guard let context = UIGraphicsGetCurrentContext() else { return }
        context.translateBy(x: 0, y: bounds.height)
        context.scaleBy(x: 1, y: -1)

        let attrString = NSAttributedString(string: "Hello CoreText", attributes: [
            .font: UIFont.systemFont(ofSize: 24)
        ])
        let line = CTLineCreateWithAttributedString(attrString)

        let lineWidth = CTLineGetTypographicBounds(line, nil, nil, nil)
        let flushWidth: CGFloat = bounds.width
        let flushFactor: CGFloat = 0.5 // 居中
//        let flushFactor: CGFloat = 0 // 左对齐
//        let flushFactor: CGFloat = 1 // 右对齐

        let penOffset = CTLineGetPenOffsetForFlush(line, flushFactor, flushWidth)
        let textPosition = CGPoint(x: penOffset, y: bounds.midY)
        // 设置绘制位置
        context.textPosition = textPosition
        CTLineDraw(line, context)

        // 绘制视觉bounds
        do {
            let lcoalRect = CTLineGetImageBounds(line, nil)
            // 将局部 rect 平移到实际绘制的位置
            let globalRect = lcoalRect.offsetBy(dx: textPosition.x, dy: textPosition.y)
            context.setFillColor(UIColor.red.withAlphaComponent(0.3).cgColor)
            context.fill(globalRect)
        }

        // 绘制布局bounds
        do {
            let newTextPosition = CGPoint(x: textPosition.x, y: textPosition.y - 40)
            context.textPosition = newTextPosition
            CTLineDraw(line, context)

            var ascent: CGFloat = 0
            var descent: CGFloat = 0
            var leading: CGFloat = 0
            CTLineGetTypographicBounds(line, &ascent, &descent, &leading)
            context.setFillColor(UIColor.green.withAlphaComponent(0.3).cgColor)
            let localRect = CGRect(x: newTextPosition.x, y: newTextPosition.y - descent, width: lineWidth, height: ascent + descent + leading)
            context.fill(localRect)
        }
    }
}
9)CTLineGetImageBounds
func CTLineGetImageBounds(
    _ line: CTLine,
    _ context: CGContext?
) -> CGRect获取行的视觉边界;注意 CTLineGetImageBounds 获取的是相对于CTLine局部坐标系的矩形,即以textPosition为原点的矩形。
视觉边界可以看下面的例子,与之相对的是布局边界;这个API在实际应用中不常见,除非有特殊诉求,比如要检测精确的内容点击范围,给行绘制紧贴背景等。
10)CTLineGetTypographicBounds
func CTLineGetTypographicBounds(
    _ line: CTLine,
    _ ascent: UnsafeMutablePointer<CGFloat>?,
    _ descent: UnsafeMutablePointer<CGFloat>?,
    _ leading: UnsafeMutablePointer<CGFloat>?
) -> Double
获取上行(ascent)、下行(descent)、行距(leading)。
这几个概念不熟悉的可以参考:一文读懂字符、字形、字体
想了解这几个数值最终是从哪个地方读取的可以参考:一文读懂字体文件
通过这个API我们可以手动构造布局边界(见上面的例子),一般用于点击检测、绘制行背景等。
11)CTLineGetTrailingWhitespaceWidth
func CTLineGetTrailingWhitespaceWidth(_ line: CTLine) -> Double获取行尾空白字符的宽度(比如空格、制表符 (\t) 等),一般用于实现对齐时基于可见文本对齐等。
示例:
let line = CTLineCreateWithAttributedString(
    NSAttributedString(string: "Hello  ", attributes: [.font: UIFont.systemFont(ofSize: 16)])
)

let totalWidth = CTLineGetTypographicBounds(line, nil, nil, nil)
let trailingWidth = CTLineGetTrailingWhitespaceWidth(line)

print("总宽度: \(totalWidth)")
print("尾部空白宽度: \(trailingWidth)")
print("可见文字宽度: \(totalWidth - trailingWidth)")
12)CTLineGetStringIndexForPosition
func CTLineGetStringIndexForPosition(
    _ line: CTLine,
    _ position: CGPoint
) -> CFIndex
获取给定位置处的字符串索引。
注意:虽然官方文档说这个API一般用于点击检测,但实际测试下来这个API返回的点击索引不准确,比如虽然点击的是当前字符,但实际返回的索引是后一个字符的,如下:
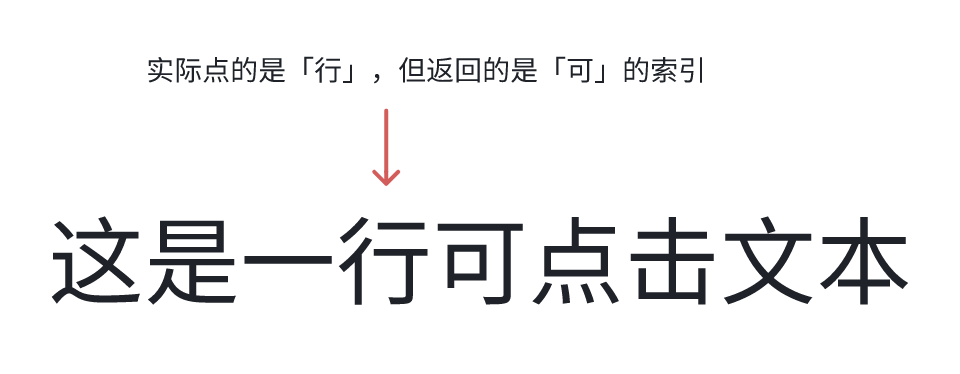
查了下,发现这个API一般是用于计算光标位置的,比如点击「行」的左半部分,希望光标出现在「行」左侧,如果点击「行」的右半部分,希望光标出现在「行」的右侧。
如果我们想精确做字符的点击检测,推荐使用字符/行的bounds来计算,参考「CTFrame使用示例-3」例子。
13)CTLineGetOffsetForStringIndex
func CTLineGetOffsetForStringIndex(
    _ line: CTLine,
    _ charIndex: CFIndex,
    _ secondaryOffset: UnsafeMutablePointer<CGFloat>?
) -> CGFloat
获取指定字符索引相对于行的 x 轴偏移量。
line:待查询的行charIndex:要查询的字符在原始属性字符串中的索引secondaryOffset:次要偏移值,在简单的LTR文本中,可以忽略(传nil即可),但在复杂的双向文本(BiDi)中会用到
使用场景:
- 字符点击检测:见「CTFrame使用示例-3」例子
- 给某段字符绘制高亮和下划线
- 定位某个字符:比如想在一段文本中的某个字符上方显示弹窗,可以用这个API先定位该字符
14)CTLineEnumerateCaretOffsets
func CTLineEnumerateCaretOffsets(
    _ line: CTLine,
    _ block: @escaping (Double, CFIndex, Bool, UnsafeMutablePointer<Bool>) -> Void
)
遍历一行中光标所有的有效位置。
lineblock- Double:offset,相对于行的 x 轴偏移
- CFIndex:与此光标位置相关的字符串索引
- Bool:true 表示光标位于字符的前边(在 LTR 中即左侧),false 表示光标位于字符的后边(在 LTR 中即右侧);在 BiDi 中需要特殊同一个字符可能会回调两次(比如 BiDi 边界的地方),需要用这个值区分前后
- UnsafeMutablePointer:stop 指针,赋值为 true 会停止遍历
使用场景:
- 绘制光标:富文本选区或者文本编辑器中,要绘制光标时,可以先通过 CTLineGetStringIndexForPosition 获取字符索引,再通过这个函数或者 CTLineGetOffsetForStringIndex 获取光标偏移
- 实现光标的左右键移动:可以用这个API将所有的光标位置存储到数组,并按offset排序,当用户按下右箭头 -> 时,可以找到当前光标index,将index + 1即是下一个光标位置
除了上面例子,再举一个:
1)高亮特定字符
import Foundation
import UIKit
import CoreText

class RunHighlightView: UIView {

    let attributedString: NSAttributedString = {
        let string = NSMutableAttributedString(string: "点击 ", attributes: [
            .font: UIFont.systemFont(ofSize: 24)
        ])

        // 添加一个 "这里"
        string.append(NSAttributedString(string: "这里", attributes: [
            .font: UIFont.boldSystemFont(ofSize: 24),
            .foregroundColor: UIColor.blue,
            kCTUnderlineStyleAttributeName as NSAttributedString.Key: NSNumber(value: CTUnderlineStyle.single.rawValue)
        ]))

        string.append(NSAttributedString(string: " 来查看详情。", attributes: [
            .font: UIFont.systemFont(ofSize: 24)
        ]))

        return string
    }()

    override init(frame: CGRect) {
        super.init(frame: frame)
        backgroundColor = .white
    }
    required init?(coder: NSCoder) { super.init(coder: coder); backgroundColor = .white }

    override func draw(_ rect: CGRect) {
        // --- 1. 通用设置 (翻转坐标系) ---
        guard let context = UIGraphicsGetCurrentContext() else { return }
        context.translateBy(x: 0, y: bounds.height)
        context.scaleBy(x: 1.0, y: -1.0)

        // --- 2. 创建 CTLine ---
        let line = CTLineCreateWithAttributedString(attributedString)

        // --- 3. 测量与定位 ---
        let drawPosition = CGPoint(x: 20, y: bounds.midY)
        var ascent: CGFloat = 0
        var descent: CGFloat = 0
        CTLineGetTypographicBounds(line, &ascent, &descent, nil)

        // --- 4. 遍历 CTLine 中的所有 CTRun ---
        guard let runs = CTLineGetGlyphRuns(line) as? [CTRun] else { return }

        for run in runs {
            // 4a. 获取 run 的属性,检查是不是我们想要的那个
            guard let attributes = CTRunGetAttributes(run) as? [NSAttributedString.Key: Any],
                  let font = attributes[.font] as? UIFont else {
                continue
            }

            // 4b. 检查是否为粗体 (这是我们用来识别 "这里" 的方法)
            if font.fontDescriptor.symbolicTraits.contains(.traitBold) {

                // 4c. 找到了!现在测量这个 run
                let runRange = CTRunGetStringRange(run)

                // 4d. 获取 run 的 X 轴起始位置 (相对于 line 的 0 点)
                let xStart = CTLineGetOffsetForStringIndex(line, runRange.location, nil)

                // 4e. 获取 run 的 X 轴结束位置
                // (注意:是 run 范围的 location + length)
                let xEnd = CTLineGetOffsetForStringIndex(line, runRange.location + runRange.length, nil)

                // 4f. 构建高亮矩形 (坐标是局部的)
                let highlightRect = CGRect(
                    x: xStart,
                    y: -descent, // Y 轴从基线向下 descent 开始
                    width: xEnd - xStart,
                    height: ascent + descent
                )

                // 4g. 将局部矩形平移到全局绘制位置
                let globalRect = highlightRect.offsetBy(dx: drawPosition.x, dy: drawPosition.y)

                // 4h. 绘制高亮
                context.setFillColor(UIColor.yellow.withAlphaComponent(0.5).cgColor)
                context.fill(globalRect)
            }
        }

        // --- 5. 最后,在顶部绘制整行文本 ---
        context.textPosition = drawPosition
        CTLineDraw(line, context)
    }
}CTRun相关API比较基础,这里主要介绍常用的。
1)CTLineGetGlyphRuns
func CTLineGetGlyphRuns(_ line: CTLine) -> CFArray获取CTRun的唯一方式。
2)CTRunGetAttributes
func CTRunGetAttributes(_ run: CTRun) -> CFDictionary获取CTRun的属性;比如想知道这个CTRun是不是粗体,是不是链接,是不是目标Run等,都可以通过这个API。
示例:
guard let attributes = CTRunGetAttributes(run) as? [NSAttributedString.Key: Any] else { continue }
// 现在你可以检查属性
if let color = attributes[.foregroundColor] as? UIColor {
    // ...
}
if let font = attributes[.font] as? UIFont {
    // ...
}
if let link = attributes[NSAttributedString.Key("my_custom_link_key")] {
    // 这就是那个可点击的 run!
}
3)CTRunGetStringRange
func CTRunGetStringRange(_ run: CTRun) -> CFRange获取CTRun对应于原始属性字符串的哪个范围。
4)CTRunGetTypographicBounds
func CTRunGetTypographicBounds(
    _ run: CTRun,
    _ range: CFRange,
    _ ascent: UnsafeMutablePointer<CGFloat>?,
    _ descent: UnsafeMutablePointer<CGFloat>?,
    _ leading: UnsafeMutablePointer<CGFloat>?
) -> Double
获取CTRun的度量信息,同上面许多API一样,当 range.length 为0时表示直到CTRun文本末尾。
5)CTRunGetPositions
func CTRunGetPositions(
    _ run: CTRun,
    _ range: CFRange,
    _ buffer: UnsafeMutablePointer<CGPoint>
)获取CTRun中每一个字形的位置,注意这里的位置是相对于CTLine原点的。
6)CTRunDelegate
CTRunDelegate允许为属性字符串中的一段文本提供自定义布局测量信息,一般用于在文本中插入图片、自定义View等非文本元素。
比如在文本中间插入图片:
//

import Foundation
import UIKit
import CoreText

// 阶段一,步骤 1:定义你的数据 (必须是 Class)
// 这个对象将被 Core Text 持有
class ImageInfo {
    let image: UIImage
    let ascent: CGFloat
    let descent: CGFloat
    let width: CGFloat

    init(image: UIImage, font: UIFont) {
        self.image = image

        // 简单的对齐:让图片底部和字体基线对齐
        // 你可以根据需求实现更复杂的对齐
        self.ascent = image.size.height
        self.descent = 0
        self.width = image.size.width * (image.size.height / font.lineHeight) // 简单缩放
    }
}


// 阶段一,步骤 2:定义回调函数
// 这些必须是 C 风格的函数,通常定义在全局或静态上下文中

// dealloc 回调:当 CTRunDelegate 被销毁时,释放 refCon
private let deallocCallback: CTRunDelegateDeallocateCallback = { refCon in
    print("Delegate dealloc")
    // 从 refCon (void*) 转回 Unmanaged,然后释放它
    Unmanaged<ImageInfo>.fromOpaque(refCon).release()
}

// Ascent 回调:返回上行高度
private let ascentCallback: CTRunDelegateGetAscentCallback = { refCon in
    // 从 refCon 获取 Swift 对象 (不增加引用计数)
    let info = Unmanaged<ImageInfo>.fromOpaque(refCon).takeUnretainedValue()
    return info.ascent
}

// Descent 回调:返回下行深度
private let descentCallback: CTRunDelegateGetDescentCallback = { refCon in
    let info = Unmanaged<ImageInfo>.fromOpaque(refCon).takeUnretainedValue()
    return info.descent
}

// Width 回调:返回宽度
private let widthCallback: CTRunDelegateGetWidthCallback = { refCon in
    let info = Unmanaged<ImageInfo>.fromOpaque(refCon).takeUnretainedValue()
    return info.width
}


// --- 视图实现 ---

class MixedTextImageView: UIView {

    private var attributedText: NSAttributedString

    // 用于绘制图片的数据
    private var imageDrawInfos: [(image: UIImage, rect: CGRect)] = []

    override init(frame: CGRect) {
        // --- 准备工作:创建带 CTRunDelegate 的属性字符串 ---
        let finalString = NSMutableAttributedString()
        let font = UIFont.systemFont(ofSize: 24)

        // 1. 添加一些文本
        finalString.append(NSAttributedString(string: "这是一些文字, ", attributes: [.font: font]))

        // 2. 准备图片和 Delegate
        let image = UIImage(systemName: "star.fill")!
        let imageInfo = ImageInfo(image: image.withRenderingMode(.alwaysOriginal), font: font)

        // 3. 阶段一,步骤 3:创建 CTRunDelegate
        var callbacks = CTRunDelegateCallbacks(
            version: kCTRunDelegateVersion1,
            dealloc: deallocCallback,
            getAscent: ascentCallback,
            getDescent: descentCallback,
            getWidth: widthCallback
        )

        // 3a. 将 Swift 对象转换为 void* (refCon)
        // Unmanaged.passRetained() 增加引用计数,Core Text 会持有它
        let refCon = Unmanaged.passRetained(imageInfo).toOpaque()

        // 3b. 创建 delegate
        guard let delegate = CTRunDelegateCreate(&callbacks, refCon) else {
            fatalError("Could not create CTRunDelegate")
        }

        // 4. 阶段一,步骤 4:附加 Delegate
        // 4a. 创建占位符 \uFFFC
        let placeholderString = NSAttributedString(string: "\u{FFFC}", attributes: [
            kCTRunDelegateAttributeName as NSAttributedString.Key: delegate,
            // 存储一份引用,方便阶段二(绘制)时快速访问
            NSAttributedString.Key("MyImageInfo"): imageInfo
        ])

        finalString.append(placeholderString)

        // 5. 添加更多文本
        finalString.append(NSAttributedString(string: " 这是一个图标。", attributes: [.font: font]))

        self.attributedText = finalString

        super.init(frame: frame)
        self.backgroundColor = .white
    }

    required init?(coder: NSCoder) { fatalError("init(coder:) has not been implemented") }


    override func draw(_ rect: CGRect) {
        // --- 通用设置 (翻转坐标系) ---
        guard let context = UIGraphicsGetCurrentContext() else { return }
        context.translateBy(x: 0, y: bounds.height)
        context.scaleBy(x: 1.0, y: -1.0)

        // 在重绘前清空
        imageDrawInfos.removeAll()

        // --- 阶段一,步骤 5:正常布局 ---
        let framesetter = CTFramesetterCreateWithAttributedString(attributedText)
        let path = CGPath(rect: bounds, transform: nil)
        let frame = CTFramesetterCreateFrame(framesetter, CFRange(location: 0, length: 0), path, nil)

        // --- 阶段二,步骤 1:绘制文本 (留下空白) ---
        CTFrameDraw(frame, context)

        // --- 阶段二:遍历 Run 并“填洞” ---
        guard let lines = CTFrameGetLines(frame) as? [CTLine] else { return }
        var lineOrigins = [CGPoint](repeating: .zero, count: lines.count)
        CTFrameGetLineOrigins(frame, CFRange(location: 0, length: 0), &lineOrigins)

        for (lineIndex, line) in lines.enumerated() {
            let lineOrigin = lineOrigins[lineIndex]

            guard let runs = CTLineGetGlyphRuns(line) as? [CTRun] else { continue }

            for run in runs {
                // 阶段二,步骤 3 & 4:找到我们的占位符 Run
                guard let attributes = CTRunGetAttributes(run) as? [NSAttributedString.Key: Any],
                      let imageInfo = attributes[NSAttributedString.Key("MyImageInfo")] as? ImageInfo else {
                    // 这不是我们的图片 run,跳过
                    continue
                }

                // 阶段二,步骤 5:计算绘制位置
                // 5a. 获取 run 的 X 偏移
                let stringRange = CTRunGetStringRange(run)
                let xOffset = CTLineGetOffsetForStringIndex(line, stringRange.location, nil)

                // 5b. 构建 *全局* 矩形
                // Y 轴:(基线Y - 下行深度Y)
                let runRect = CGRect(
                    x: lineOrigin.x + xOffset,
                    y: lineOrigin.y - imageInfo.descent, // 基线向下
                    width: imageInfo.width,
                    height: imageInfo.ascent + imageInfo.descent
                )

                // 阶段二,步骤 6:手动绘制
                // 注意:由于坐标系已翻转,我们需要再次翻转图片
                context.saveGState()
                context.translateBy(x: runRect.origin.x, y: runRect.origin.y)
                context.scaleBy(x: 1.0, y: -1.0)
                // 绘制的位置是 (0, 0),因为我们已经平移了 context
                // Y 轴是负的,因为我们翻转了
                let flippedRect = CGRect(x: 0, y: -runRect.height, width: runRect.width, height: runRect.height)
                imageInfo.image.draw(in: flippedRect)
                context.restoreGState()

                // (可选) 绘制边框以便调试
                context.setStrokeColor(UIColor.red.cgColor)
                context.stroke(runRect)
            }
        }
    }
}1)基础绘制
class ManualRunDrawView: UIView {

    let attributedString: NSAttributedString = {
        let string = NSMutableAttributedString(string: "红色的, ", attributes: [
            .font: UIFont.systemFont(ofSize: 24),
            .foregroundColor: UIColor.red
        ])

        string.append(NSAttributedString(string: "绿色的, ", attributes: [
            .font: UIFont.systemFont(ofSize: 24),
            .foregroundColor: UIColor.green
        ]))

        string.append(NSAttributedString(string: "蓝色的。", attributes: [
            .font: UIFont.systemFont(ofSize: 24),
            .foregroundColor: UIColor.blue
        ]))

        return string
    }()

    override init(frame: CGRect) {
        super.init(frame: frame)
        backgroundColor = .white
    }
    required init?(coder: NSCoder) { super.init(coder: coder); backgroundColor = .white }

    override func draw(_ rect: CGRect) {
        // --- 1. 通用设置 (翻转坐标系) ---
        guard let context = UIGraphicsGetCurrentContext() else { return }
        context.translateBy(x: 0, y: bounds.height)
        context.scaleBy(x: 1.0, y: -1.0)

        // --- 2. 创建 CTLine ---
        let line = CTLineCreateWithAttributedString(attributedString)

        // --- 3. 设置绘制基线位置 ---
        let drawPosition = CGPoint(x: 20, y: bounds.midY)
        context.textPosition = drawPosition // CTRunDraw 也依赖这个!

        // --- 4. 核心 API:CTLineGetGlyphRuns ---
        guard let runs = CTLineGetGlyphRuns(line) as? [CTRun] else { return }

        // --- 5. 遍历所有 CTRun 并手动绘制 ---
        // 我们不再调用 CTLineDraw(line, context)
        for run in runs {

            // 5a. 核心 API:CTRunGetAttributes
            // 获取这个 run 独有的属性字典
            guard let attributes = CTRunGetAttributes(run) as? [NSAttributedString.Key: Any] else {
                continue
            }

            // 5b. 从属性中获取颜色
            let color = attributes[.foregroundColor] as? UIColor ?? .black

            // 5c. 设置上下文的填充色
            context.setFillColor(color.cgColor)

            // 5d. 核心 API:CTRunDraw
            // 在 context.textPosition 处绘制这个 run
            // CFRange(location: 0, length: 0) 表示绘制整个 run
            CTRunDraw(run, context, CFRange(location: 0, length: 0))
        }
    }
}
2)链接点击识别
import Foundation
import UIKit
import CoreText

// 1. 定义一个自定义属性 Key 来存储 URL
private let kMyLinkAttributeName = NSAttributedString.Key("MyLinkURL")

class ClickableRunView: UIView {

    let attributedString: NSAttributedString = {
        let string = NSMutableAttributedString(string: "请访问我们的网站: ", attributes: [
            .font: UIFont.systemFont(ofSize: 20)
        ])

        string.append(NSAttributedString(string: "www.example.com", attributes: [
            .font: UIFont.systemFont(ofSize: 20),
            .foregroundColor: UIColor.blue,
            .underlineStyle: NSUnderlineStyle.single.rawValue,
            kMyLinkAttributeName: URL(string: "https://www.example.com")! // <-- 存储 URL
        ]))

        return string
    }()

    // 用于存储可点击区域和它们对应的数据
    private var clickableRects: [(rect: CGRect, url: URL)] = []

    override init(frame: CGRect) {
        super.init(frame: frame)
        backgroundColor = .white

        let tapGesture = UITapGestureRecognizer(target: self, action: #selector(handleTap(_:)))
        addGestureRecognizer(tapGesture)
    }
    required init?(coder: NSCoder) { super.init(coder: coder); backgroundColor = .white }

    override func draw(_ rect: CGRect) {
        // --- 1. 通用设置 (翻转坐标系) ---
        guard let context = UIGraphicsGetCurrentContext() else { return }
        context.translateBy(x: 0, y: bounds.height)
        context.scaleBy(x: 1.0, y: -1.0)

        // --- 2. 准备工作 ---
        // 在每次重绘时,清空旧的矩形
        clickableRects.removeAll()

        let framesetter = CTFramesetterCreateWithAttributedString(attributedString as CFAttributedString)
        let path = CGPath(rect: bounds, transform: nil)
        let frame = CTFramesetterCreateFrame(framesetter, CFRange(location: 0, length: 0), path, nil)

        // --- 3. 遍历所有行和 Run,计算并存储矩形 ---
        guard let lines = CTFrameGetLines(frame) as? [CTLine] else { return }
        var lineOrigins = [CGPoint](repeating: .zero, count: lines.count)
        CTFrameGetLineOrigins(frame, CFRange(location: 0, length: 0), &lineOrigins)

        for (index, line) in lines.enumerated() {
            let lineOrigin = lineOrigins[index]

            guard let runs = CTLineGetGlyphRuns(line) as? [CTRun] else { continue }

            for run in runs {
                // 4a. 检查属性中是否有我们的 "link" key
                guard let attributes = CTRunGetAttributes(run) as? [NSAttributedString.Key: Any],
                      let url = attributes[kMyLinkAttributeName] as? URL else {
                    continue
                }

                // 4b. 找到了!测量这个 Run (与示例 2 相同)
                var ascent: CGFloat = 0
                var descent: CGFloat = 0
                let runWidth = CTRunGetTypographicBounds(run, CFRange(location: 0, length: 0), &ascent, &descent, nil)

                // 4c. 核心 API:CTRunGetImageBounds (更紧密的边界)
                // 或者我们可以用 GetTypographicBounds 来构建
                // 这里我们用另一种方式获取 X 偏移
                var glyphPosition: CGPoint = .zero
                CTRunGetPositions(run, CFRange(location: 0, length: 1), &glyphPosition) // 获取第一个字形的位置
                let xOffset = glyphPosition.x // xOffset 是相对于 lineOrigin.x 的

                // 4d. 构建 *局部* 矩形
                let localRect = CGRect(
                    x: xOffset,
                    y: -descent,
                    width: CGFloat(runWidth),
                    height: ascent + descent
                )

                // 4e. 将 *局部* 矩形平移到 *全局* (视图) 坐标
                // 注意:Core Text 坐标系!
                let globalCTRect = localRect.offsetBy(dx: lineOrigin.x, dy: lineOrigin.y)

                // 4f. 将矩形从 *Core Text* 坐标系转回 *UIKit* 坐标系 (Y 轴翻转)
                let uiKitRect = CGRect(
                    x: globalCTRect.origin.x,
                    y: bounds.height - globalCTRect.origin.y - globalCTRect.height,
                    width: globalCTRect.width,
                    height: globalCTRect.height
                )

                // 4g. 存储矩形和 URL
                clickableRects.append((rect: uiKitRect, url: url))
            }
        }

        // --- 5. 正常绘制整个 Frame ---
        CTFrameDraw(frame, context)
    }

    @objc private func handleTap(_ gesture: UITapGestureRecognizer) {
        let tapLocation = gesture.location(in: self)

        // 遍历我们存储的矩形
        for hitBox in clickableRects {
            if hitBox.rect.contains(tapLocation) {
                print("点击了链接: \(hitBox.url)")
                // 在这里可以打开 URL
                // UIApplication.shared.open(hitBox.url)
                return
            }
        }
        print("没有点击到链接")
    }
}CTFramesetter会自动处理换行,当我们想手动控制换行时,可以用CTTypesetter。
1)CTTypesetterSuggestLineBreak
func CTTypesetterSuggestLineBreak(
    _ typesetter: CTTypesetter,
    _ startIndex: CFIndex,
    _ width: Double
) -> CFIndex
按单词(word)换行。
如下示例,输出:Try word 和wrapping
let attrStringWith = NSAttributedString(string: "Try word wrapping", attributes: [.font: UIFont.systemFont(ofSize: 18)])
let typesetter = CTTypesetterCreateWithAttributedString(attributedString)
let totalLength = attributedString.length // UTF-16 长度
var startIndex = 0
var lineCount = 1

while startIndex < totalLength {
    let charCount = CTTypesetterSuggestLineBreak(typesetter, startIndex, 100)
    // 如果返回 0,意味着一个字符都放不下(或已结束)
    if charCount == 0 {
        if startIndex < totalLength {
            print("Line \(lineCount): (Error) 无法放下剩余字符。")
        }
        break
    }
    // 获取这一行的子字符串
    let range = NSRange(location: startIndex, length: charCount)
    let lineString = (attributedString.string as NSString).substring(with: range)
    print("Line \(lineCount): '\(lineString)' (UTF-16 字符数: \(charCount))")
    // 更新下一次循环的起始索引
    startIndex += charCount
    lineCount += 1
}
2)CTTypesetterSuggestClusterBreak
func CTTypesetterSuggestClusterBreak(
    _ typesetter: CTTypesetter,
    _ startIndex: CFIndex,
    _ width: Double
) -> CFIndex
按字符(char)换行。
如下示例,输出:Try word wr和apping
let attrStringWith = NSAttributedString(string: "Try word wrapping", attributes: [.font: UIFont.systemFont(ofSize: 18)])
let typesetter = CTTypesetterCreateWithAttributedString(attributedString)
let totalLength = attributedString.length // UTF-16 长度
var startIndex = 0
var lineCount = 1

while startIndex < totalLength {
    let charCount = CTTypesetterSuggestClusterBreak(typesetter, startIndex, 100)
    // 如果返回 0,意味着一个字符都放不下(或已结束)
    if charCount == 0 {
        if startIndex < totalLength {
            print("Line \(lineCount): (Error) 无法放下剩余字符。")
        }
        break
    }
    // 获取这一行的子字符串
    let range = NSRange(location: startIndex, length: charCount)
    let lineString = (attributedString.string as NSString).substring(with: range)
    print("Line \(lineCount): '\(lineString)' (UTF-16 字符数: \(charCount))")
    // 更新下一次循环的起始索引
    startIndex += charCount
    lineCount += 1
}