Explore, search, preview, and upload Cloudinary assets directly inside Visual Studio Code or supported IDE, with a built-in Docs AI assistant for Cloudinary documentation.
General availability release: Please report any problems or feedback by opening an issue.
- Home Screen – Search your media library, ask the Docs AI assistant, and access all extension features from one sidebar view
- Docs AI Assistant – Chat with Cloudinary documentation without leaving your editor. Includes source citations, follow-up suggestions, and chat history
- Asset Explorer – View Cloudinary folders and assets in the sidebar media library
- Search & Filter – Quickly locate assets by public ID or type
- Optimized Preview – Preview images/videos with Cloudinary transformations applied (
f_auto,q_auto) - Right-click Actions – Copy Public ID or URL instantly
- Custom Upload Panel – Upload files via drag-and-drop, file browser, or remote URL with progress tracking
- Configure AI Tools – One-click install of Cloudinary skills and MCP servers for Cursor, GitHub Copilot, Windsurf, Claude Code, and more
- Environment Switching – Switch between different product environments defined in config
- Status Bar Indicator – Shows the active Cloudinary environment
Requirements
Before using this extension, ensure you have:
- A Cloudinary account (Sign up for free).
- Your Cloudinary API credentials:
- Cloud Name
- API Key
- API Secret
Instead of using VS Code settings, this extension reads your credentials from an environments.json file.
Located at:
- macOS/Linux:
~/.cloudinary/environments.json - Windows:
%USERPROFILE%\.cloudinary\environments.json
Auto-created with placeholder content on first use:
{
  "REPLACE_WITH_YOUR_CLOUD_NAME": {
    "apiKey": "REPLACE_WITH_YOUR_API_KEY",
    "apiSecret": "REPLACE_WITH_YOUR_API_SECRET"
  }
}
Note: The cloud name is the key (the property name in the JSON object). You can optionally add
"uploadPreset": "your-preset-name"if you want to use a default upload preset.
You can also include a project-specific config:
.project-root/.cloudinary/environments.json
This will override the global config if found.
Once a valid configuration has been added, the active environment will be shown in the status bar at the bottom of the window. Click this to switch environments.
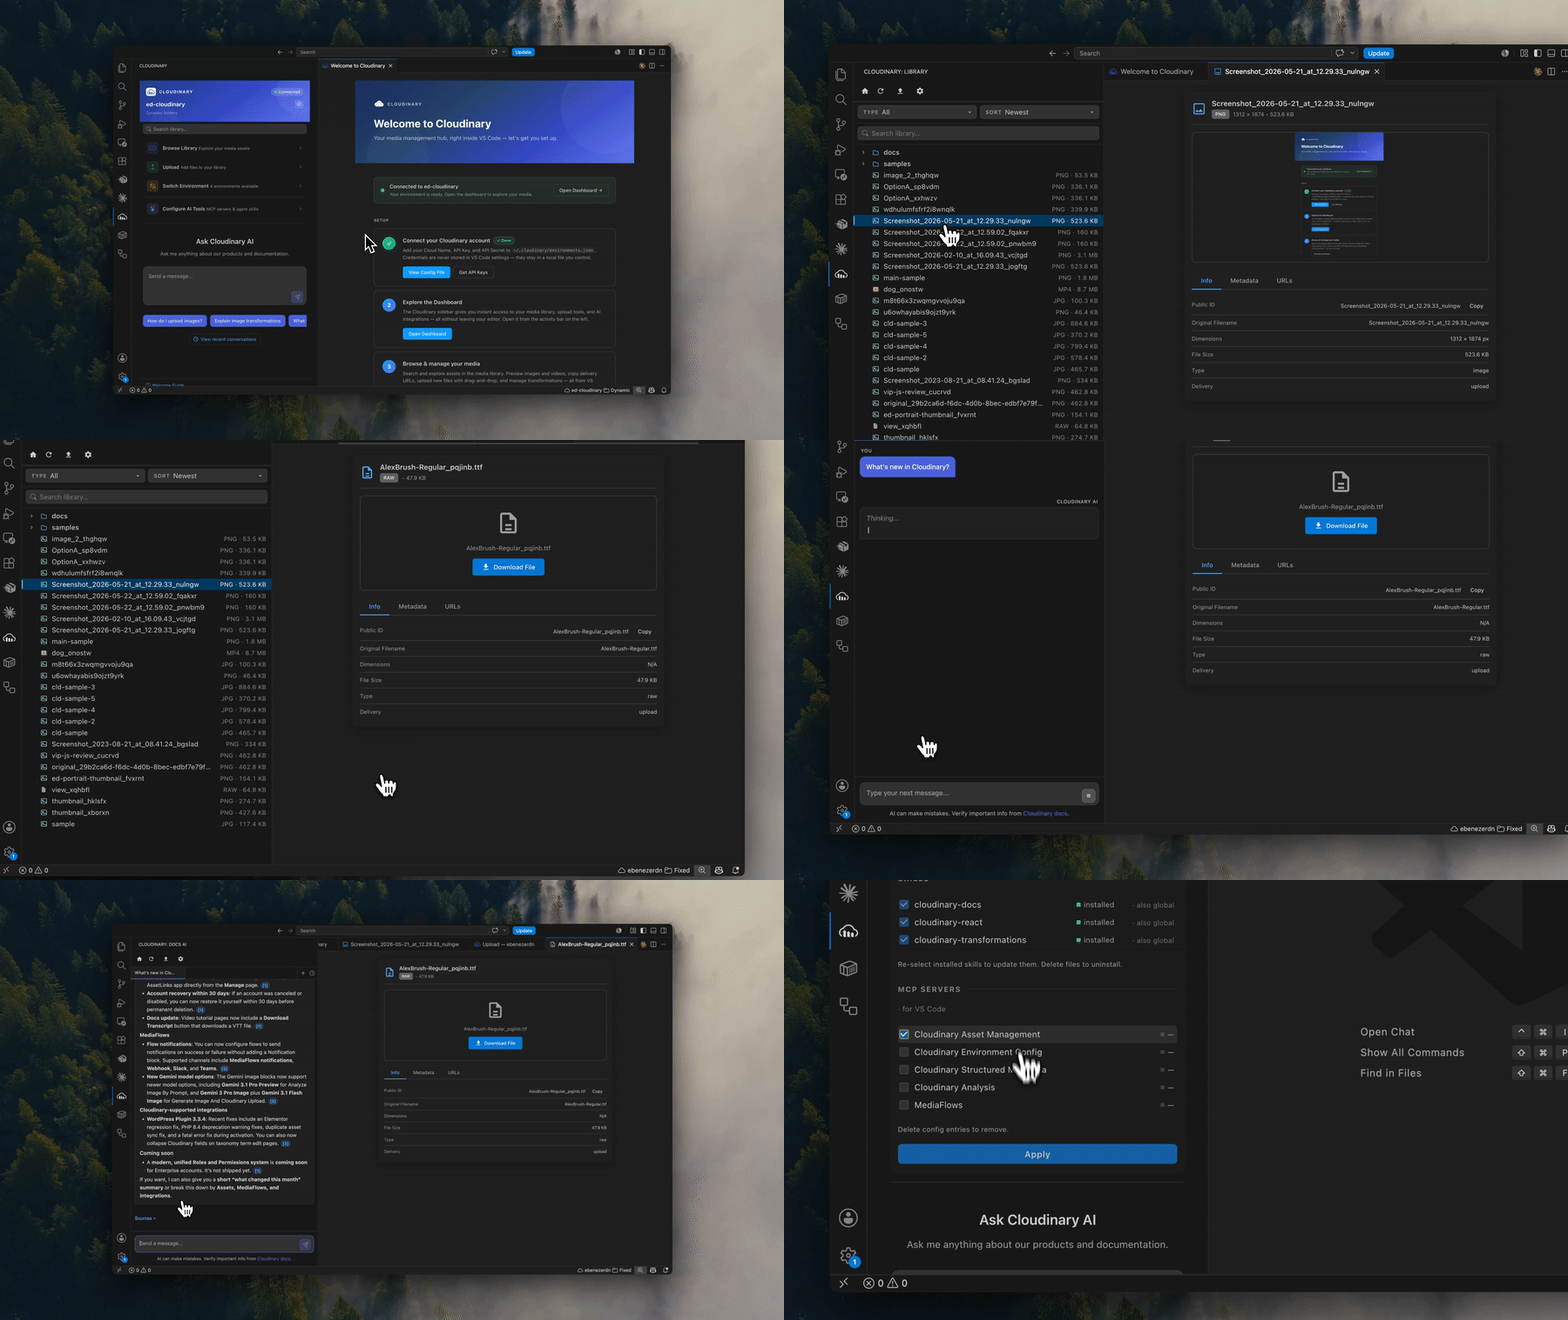
- Click the Cloudinary icon in the Activity Bar
- Search your library, open the media library, upload assets, or ask the Docs AI assistant
- Type a question in the Ask Cloudinary AI box on the home screen, or run
Cloudinary: Open Docs AIfrom the command palette - Answers stream in with citations linking to the relevant Cloudinary docs
- Start new chats in tabs and revisit past conversations from the history menu
- Click Browse Library on the home screen
- Browse folders and assets from your connected environment
- Click the Cloudinary status bar item (bottom bar)
- Select from configured environments
- Click Upload from the library toolbar to open the upload panel, or click Upload here on a folder entry to open with that folder pre-selected.
- Alternatively, run
Cloudinary: Uploadfrom the command palette.
Upload Panel Features:
- Drag & Drop – Drag files directly onto the drop zone (in VS Code, hold Shift while dropping)
- File Browser – Click "Browse Files" to select files from your system
- Remote URL – Paste a URL to upload from a remote source
- Folder Selection – Choose the destination folder from a dropdown
- Upload Presets – Optionally select from your configured upload presets (signed uploads work without a preset)
- Custom Public ID – Specify a custom public ID for single file uploads
- Tags – Add comma-separated tags to your uploads
- Progress Tracking – See real-time upload progress for each file
- Uploaded Assets – View thumbnails of uploaded assets, click to preview, copy URL or public ID
Learn more: See the Cloudinary Upload Presets documentation for details on creating and configuring upload presets (optional).

- Use the always-visible filter controls in the media library to narrow assets by type or change sort order.
- Use the always-visible search field in the media library to search by public ID.

- Right-click any asset to:
- Copy Public ID
- Copy Secure URL
- Click any asset to open a preview panel
- Supports images, videos, and raw files
- Compact Preview – Assets display at a smaller size with an enlarge button
- Full-Size View – Click the enlarge button to open a lightbox with the full-size asset
- Asset Info – View public ID, dimensions, file size, and original filename
- Metadata – View tags, context metadata, and structured metadata
- URLs – Copy original or optimized URLs with one click
- Type Icons – Tab icons indicate asset type (image, video, or file)
- Authenticated Assets – Authenticated delivery assets are marked with a lock and use a signed original URL for preview/copy actions
- Click Configure AI Tools on the home screen
- Pick your platform (Cursor, GitHub Copilot, Windsurf, Claude Code, and more) and scope (project or global)
- Select the Cloudinary skills and MCP servers to install, then click Apply
- After installing an MCP server, reload your editor and start a new chat to activate it
- Click Refresh to reload the media library
- Asset filtering is limited to basic types (image, video, raw)
- No user-facing option to control library page size or prefetch cap
- Folder dropdown discovery is capped to a bounded folder depth for responsiveness
Got feedback or feature ideas? See CONTRIBUTING.md or open an issue.
Build, preview and upload faster with Cloudinary inside VS Code!