A professional node-based image processing application for computer vision development, verification, and comparison.
CV Studio is an advanced node-based image processing application that allows you to visually create computer vision pipelines through an intuitive drag-and-drop interface. Perfect for:
- Prototyping - Quickly test and compare different CV algorithms
- Education - Learn computer vision concepts interactively
- Development - Build and validate processing pipelines before production
- Research - Experiment with ML models and traditional CV techniques
- 🎨 Visual Node Editor - Intuitive drag-and-drop interface powered by DearPyGUI
- 🔄 Real-time Processing - See results instantly as you build your pipeline
- 🧩 150+ Built-in Nodes - Input, processing, ML/DL, audio, analysis, visualization, and action nodes
- 🤖 ML/DL Integration - ONNX, MediaPipe, YOLOv8/YOLO11, YAMNet, VLM and custom models
- 📹 Multiple Input Sources - Webcam, video, images, RTSP, HLS, WebRTC, WebSocket, MQTT, API, YouTube, screen capture
- 🔊 Audio Pipeline - Microphone input → audio processing → AudioClassification with passthrough sync
- 🗺️ Satellite Imagery - Copernicus/Sentinel-2 live tile streaming with band combinations and NDVI formulas
- 🧠 On-Device Training - OnlineTraining node for live distillation fine-tuning (PyTorch backprop)
- ➕ In-Node Model Import - Upload custom ONNX models directly from any DL node UI without restarting
- 💾 Save & Load - Export and import your processing graphs as JSON
- 🏗️ Modern Architecture - Professional codebase with proper error handling, logging, and testing
- 🔌 Extensible - Easy to add custom nodes and processing algorithms
Python          3.7 or later
opencv-python   4.5.5.64 or later
onnxruntime     1.16.0 or later
dearpygui       2.0.0 or later
mediapipe       0.8.10 or later  ※ Required for MediaPipe nodes
protobuf        3.20.0 or later  ※ Required for MediaPipe nodes
filterpy        1.4.5 or later   ※ Required for MOT (Multi-Object Tracking) nodes
librosa         0.9.0 or later   ※ Required for AudioClassification and audio resampling
sounddevice     0.4.0 or later   ※ Required for Microphone node
pymongo         4.0.0 or later   ※ Required for MongoDB action node
requests        2.28.0 or later  ※ Required for VLM and CopernicusMap nodes
torch           1.13.0 or later  ※ Optional, enables OnlineTraining backprop
onnx2torch      1.5.0 or later   ※ Optional, enables OnlineTraining ONNX→torch conversion
📘 Windows Users: For detailed Windows-specific installation instructions with troubleshooting, see:
- 🇬🇧 INSTALLATION_WINDOWS.md (English)
- 🇫🇷 INSTALLATION_WINDOWS_FR.md (Français)
-
Clone the repository
git clone https://github.com/hackolite/CV_Studio.git cd CV_Studio -
Install dependencies
pip install -r requirements.txt
-
Run the application
python main.py
# Create virtual environment
python -m venv venv

# Activate virtual environment
# On Windows:
venv\Scripts\activate
# On Linux/Mac:
source venv/bin/activate

# Install dependencies
pip install -r requirements.txt

# Run the application
python main.py# Install build tools first
# Windows: https://visualstudio.microsoft.com/visual-cpp-build-tools/
# Ubuntu: sudo apt-get install build-essential libssl-dev libffi-dev python3-dev
# Install required packages
pip install Cython numpy wheel
# Install from GitHub
pip install git+https://github.com/hackolite/CV_Studio.git
# Run the application
ipn-editorSee Image-Processing-Node-Editor/docker/nvidia-gpu for Docker setup instructions.
For Windows users who want a standalone .exe file that doesn't require Python installation:
No Python or build tools installation required! Simply trigger a build on GitHub:
- Go to the Actions tab in this repository
- Click on "Build Windows Executable" in the left sidebar
- Click "Run workflow" → Select branch → Click green "Run workflow" button
- Wait 10-15 minutes for the build to complete
- Download the
CV_Studio-Windows-Executable.zipfrom the Artifacts section - Extract and run
CV_Studio.exe- Done! 🎉
📖 Detailed instructions: See COMMENT_OBTENIR_EXE.md (Français) or HOW_TO_GET_EXE.md (English)
The easiest way to build locally! Just download and run a script that does everything automatically:
Using Batch Script (Simple - Double-click to run):
- Download
build_windows.bat - Double-click the file
- Wait 5-15 minutes
- Find your executable in
dist/CV_Studio/CV_Studio.exe
Using PowerShell (Modern):
# Download the script (or clone the repo to get it)
powershell -ExecutionPolicy Bypass -File build_windows.ps1
The script automatically:
- ✅ Clones the repository (if needed)
- ✅ Installs all Python dependencies
- ✅ Builds the .exe with PyInstaller
- ✅ Shows you where to find the result
📖 Full guide: See BUILD_WINDOWS_SCRIPT.md for detailed instructions and troubleshooting
The modern, clean way to build CV_Studio! Works on Windows, Linux, and macOS.
# Clone repository
git clone https://github.com/hackolite/CV_Studio.git
cd CV_Studio

# Install dependencies
pip install -r requirements.txt

# Build executable (GPU support)
python build_unified.py --clean

# Or build for CPU-only (no CUDA required)
python build_unified.py --clean --cpu
Features:
- ✅ Cross-platform (Windows/Linux/macOS)
- ✅ Clean, colored output
- ✅ CPU/GPU build modes
- ✅ Comprehensive error handling
- ✅ Single command builds
- ✅ CI/CD friendly
Quick Reference:
- 📖 BUILD_QUICKREF.md - One-page cheat sheet
- 📚 BUILD_GUIDE.md - Comprehensive guide
Before building the executable, ensure you have:
- Python 3.7+ installed (tested with Python 3.12)
- Git for cloning the repository
- Windows OS (for building Windows executables)
Étape 1 : Cloner le dépôt / Step 1: Clone the repository
git clone https://github.com/hackolite/CV_Studio.git
cd CV_Studio
Étape 2 : Installer les dépendances principales / Step 2: Install main dependencies
# Install main dependencies
pip install -r requirements.txt
Étape 3 : Installer les dépendances de build / Step 3: Install build dependencies
# Install PyInstaller and build tools
pip install -r requirements-build.txt
# Or manually: pip install pyinstaller
Étape 4 : Construire l'exécutable / Step 4: Build the executable
# Standard build with clean
python build_exe.py --clean

# Alternative: Build without console window (GUI only)
python build_exe.py --clean --windowed

# Alternative: With custom icon
python build_exe.py --clean --icon your_icon.ico
The build process will:
- ✅ Verify all dependencies are installed
- ✅ Clean previous build artifacts (if --clean flag used)
- ✅ Package all Python dependencies
- ✅ Include all nodes (Input, Process, DL, Audio, etc.)
- ✅ Bundle all ONNX models for object detection
- ✅ Create the standalone executable
Build time: Approximately 5-15 minutes depending on your system.
Étape 5 : Localiser l'exécutable / Step 5: Locate your executable
Your .exe file is ready at:
dist/CV_Studio/CV_Studio.exe
The dist/CV_Studio/ folder contains:
CV_Studio.exe- Main executablenode/- All node implementations and ONNX modelsnode_editor/- Editor core and settingssrc/- Source utilities_internal/- Python runtime and dependencies
Étape 6 : Tester l'exécutable / Step 6: Test the executable
# Navigate to the dist folder
cd dist/CV_Studio

# Run the executable
CV_Studio.exe

# Or run with debug output
CV_Studio.exe --use_debug_print
Étape 7 : Vérifier les fonctionnalités / Step 7: Verify functionality
Test that everything works:
- Open the application
- Add an Image node (Input → Image)
- Add an Object Detection node (VisionModel → Object Detection)
- Select a YOLOX model
- Add a Result Image node
- Connect the nodes and verify object detection works
Étape 8 : Distribution / Step 8: Distribution
To share your executable:
# Create a ZIP archive
cd dist
# On Windows PowerShell:
Compress-Archive -Path CV_Studio -DestinationPath CV_Studio_v1.0.zip

# Or use 7-Zip (if installed):
7z a CV_Studio_v1.0.zip CV_Studio
The ZIP file can be distributed to users who just need to:
- Extract the ZIP file
- Run
CV_Studio.exe - No Python installation required!
- ✅ All nodes (Input, Process, DL, Audio, etc.)
- ✅ All ONNX models for object detection (YOLOX, YOLO, FreeYOLO, etc.)
- ✅ Complete Python runtime (no separate Python installation needed)
- ✅ All required libraries (OpenCV, DearPyGUI, ONNX Runtime, etc.)
- ✅ Configuration files and fonts
Size: Approximately 800 MB - 1.5 GB
# Clean build (recommended)
python build_exe.py --clean

# GUI mode without console window
python build_exe.py --windowed

# Debug mode with detailed logging
python build_exe.py --debug

# Custom icon (if you have an icon file)
python build_exe.py --icon your_icon.ico

# Combine options
python build_exe.py --clean --windowed --icon your_icon.icoProblem: PyInstaller not found
pip install pyinstallerProblem: Missing dependencies
pip install -r requirements.txt
pip install -r requirements-build.txt
Problem: Exe doesn't start
- Install Visual C++ Redistributable
- Run from command line to see error messages:
CV_Studio.exe --use_debug_print - Check antivirus isn't blocking the executable
Problem: ONNX models not found
- Verify the
dist/CV_Studio/node/DLNode/directory structure is intact - Rebuild with
python build_exe.py --clean
For comprehensive guides, see:
- Quick Reference - Quick start guide
- Full Guide (English) - Complete documentation with all options
- Guide complet (Français) - Documentation complète en français
Start the application with:
python main.py--setting <path>- Specify custom configuration file (default:node_editor/setting/setting.json)--unuse_async_draw- Disable asynchronous drawing for debugging--use_debug_print- Enable debug output
Example:
python main.py --setting custom_config.json --use_debug_printSelect a node from the menu and click to add it to the canvas.

Drag from an output terminal to an input terminal to create connections. Only compatible terminal types can be connected.

Use the mouse wheel to zoom in and out of the node editor canvas (range: 10% to 500%). The current zoom level is displayed in the menu bar. Use the View menu for precise zoom controls.
🔍 Zoom Controls
- Mouse Wheel Up/Down: Zoom in/out by 10% per scroll
- View → Zoom In: Zoom in by 10%
- View → Zoom Out: Zoom out by 10%
- View → Reset Zoom: Return to 100%
- Zoom Range: 0.1x (10%) to 5.0x (500%)
For more details, see Node Editor Zoom Controls.
Select the node and press the Delete key.

Save your processing pipeline as a JSON file via the Export menu option.

Load a previously saved processing pipeline from a JSON file.

Here are some practical examples to help you get started with common computer vision tasks:
For complete, runnable code examples including DearPyGui usage patterns, see the examples/ directory:
- dearpygui_node_editor_colored_combo_example.py - Demonstrates node editor with themed combo boxes, domain-based coloring, and dynamic UI updates
See examples/README.md for detailed documentation on each example.
Task: Apply blur and edge detection to an image
- Add an Image node (Input → Image)
- Add a Blur node (VisionProcess → Blur)
- Add a Canny node (VisionProcess → Canny)
- Add a Result Image node (Visual → Result Image)
- Connect: Image → Blur → Canny → Result Image
- Click "Select Image" in the Image node to load your image
- Adjust blur and Canny parameters using the sliders
Result: You'll see real-time edge detection applied to your blurred image.
Task: Detect objects in real-time from your webcam
- Add a WebCam node (Input → WebCam)
- Add an Object Detection node (VisionModel → Object Detection)
- Add a Draw Information node (Overlay → Draw Information)
- Add a Result Image node (Visual → Result Image)
- Connect: WebCam → Object Detection → Draw Information → Result Image
- Select your camera device in the WebCam node
- Choose a detection model in the Object Detection node
Result: Real-time object detection with bounding boxes drawn on your webcam feed.
Task: Process a video file with multiple filters
- Add a Video node (Input → Video)
- Add multiple processing nodes (e.g., Brightness, Contrast, Grayscale)
- Add an Image Concat node (Overlay → Image Concat) to compare results
- Add a Result Image node (Visual → Result Image)
- Connect the Video node to each processing node
- Connect all processing outputs to the Image Concat node
- Connect Image Concat to Result Image
Result: Side-by-side comparison of different processing effects on your video.
Task: Detect faces and apply effects
- Add an Image or WebCam node
- Add a Face Detection node (VisionModel → Face Detection)
- Add a Draw Information node (Overlay → Draw Information)
- Add a Crop node (VisionProcess → Crop) - optional, to extract faces
- Connect nodes in sequence
- Use the Draw Information node to visualize detected faces
Result: Automatic face detection with bounding boxes and optional face extraction.
- Organize Your Workspace: Arrange nodes logically from left (inputs) to right (outputs) for better readability
- Use Image Concat: Compare different processing approaches side-by-side using the Image Concat node
- Check Terminal Colors: Nodes can only connect if terminal types match (indicated by color)
- Start Simple: Begin with a basic pipeline and add complexity incrementally
- Save Frequently: Use Export to save your work regularly
- Reduce Resolution: Use the Resize node early in your pipeline to speed up processing
- Toggle Nodes: Use the ON/OFF Switch node to temporarily disable expensive operations
- Limit Video FPS: Adjust skip rate in Video nodes to process fewer frames
- GPU Acceleration: Enable GPU in Deep Learning nodes when available (requires ONNX Runtime GPU)
- Use Debug Print: Launch with
--use_debug_printto see detailed node execution logs - Disable Async Draw: Use
--unuse_async_drawif you experience UI issues - Check Connections: Verify all node connections are properly established (no red indicators)
- Monitor Performance: Use the FPS node to track processing speed
- Test Incrementally: Add one node at a time and verify it works before adding more
-
Input Nodes:
- Use Image for static images and prototyping
- Use WebCam for real-time testing
- Use Video for batch processing and testing on recorded content
- Use RTSP for network camera streams
-
Processing Nodes:
- Start with basic nodes (Brightness, Contrast, Blur) before complex ones
- Chain multiple processing nodes to create sophisticated effects
- Use Grayscale before Threshold for better results
-
ML/DL Nodes:
- Check GPU availability before enabling GPU inference
- Different models have different performance characteristics - experiment!
- Combine detection nodes with tracking for smoother results
-
Visualization:
- Use Result Image for final output
- Use Result Image (Large) when you need more detail
- Use PutText to add custom labels and timing information
- Use RGB Histogram for color analysis
| Action | Shortcut/Method |
|---|---|
| Add Node | Click menu item, then click on canvas |
| Delete Node | Select node, press Delete key |
| Pan Canvas | Middle mouse button drag or Ctrl + Left mouse drag |
| Connect Nodes | Drag from output terminal to input terminal |
| Disconnect Nodes | Right-click on connection line, select delete |
| Select Multiple | Ctrl + Click on nodes |
| Minimap | Click minimap in bottom-right to navigate large graphs |
Problem: Application crashes on startup
- Solution: Check if required dependencies are installed:
pip install -r requirements.txt - Solution: Ensure you have a compatible Python version (3.7+)
- Solution: Try disabling async drawing:
python main.py --unuse_async_draw
Problem: Webcam not detected
- Solution: Close other applications using the webcam
- Solution: Check camera permissions in your OS settings
- Solution: Try different device numbers in the WebCam node dropdown
Problem: Cannot connect two nodes
- Solution: Verify terminal types match (same color)
- Solution: Check that output terminal connects to input terminal (not output to output)
- Solution: Some nodes require specific input types - check node documentation
Problem: Deep Learning node shows "Model not found" error
- Solution: Download the required model files (see node-specific README files)
- Solution: Check the model path in the node configuration
- Solution: Verify you have the correct ONNX runtime installed
Problem: Low FPS / Slow processing
- Solution: Add a Resize node to reduce image resolution
- Solution: Enable GPU acceleration in DL nodes if available
- Solution: Reduce video skip rate or use lower resolution input
- Solution: Close unnecessary nodes and connections
Problem: Export/Import doesn't work
- Solution: Ensure you're saving to a writable location
- Solution: Check that the JSON file is valid and not corrupted
- Solution: Import files should be loaded before adding new nodes
Problem: Node parameters don't update
- Solution: Try reconnecting the node connections
- Solution: Restart the application
- Solution: Check if the node is receiving valid input data
Create custom configuration files to save your preferred settings:
# Create a custom config
cp node_editor/setting/setting.json my_config.json

# Edit my_config.json to set your preferences
# - webcam_width/height: Camera resolution
# - process_width/height: Processing resolution
# - editor_width/height: Window size
# - use_gpu: Enable GPU acceleration
# - use_pref_counter: Enable performance monitoring

# Run with custom config
python main.py --setting my_config.jsonCV Studio supports multiple cameras simultaneously:
- The application automatically detects available cameras on startup
- Each WebCam node can select a different camera device
- Use multiple WebCam nodes to process multiple camera feeds in parallel
- Combine feeds using Image Concat for multi-camera display
Extend CV Studio with your own nodes:
# Create a new node file in node/ProcessNode/
from node.ProcessNode.node_abc import ProcessNodeABC

class MyCustomNode(ProcessNodeABC):
    node_label = 'My Custom Filter'
    node_tag = 'MyCustomFilter'

    def update(self, node_id, connection_list, node_image_dict, node_result_dict):
        # Your processing logic here
        input_image = self._get_input_image(node_image_dict, connection_list)
        # Process input_image...
        output_image = input_image  # Replace with your processing

        return {"image": output_image, "json": None}
See the Development section for more details on creating custom nodes.
Process multiple files efficiently:
- Create your processing pipeline using an Image node
- Test with a single image
- Export the graph configuration
- Modify the exported JSON to point to different images
- Import and process each configuration
For video batch processing:
- Use the Video node with your pipeline
- Add a Video Writer node to save output
- Configure output settings in
setting.json - Process multiple videos by changing the input file
CV Studio supports integration with external systems:
- API Integration: Use API input nodes to receive data from REST endpoints
- WebSocket Streaming: Real-time data streaming for live applications
- RTSP Streams: Connect to IP cameras and network video sources
- Serial Communication: Interface with Arduino and other embedded devices (enable in settings)
See tests/dummy_servers/README.md for examples of external server integration.
CV Studio features a modern, professional architecture designed for scalability and maintainability.
New in this version: CV Studio now implements a timestamped queue system for node data communication that ensures:
- ✅ FIFO Data Retrieval - Oldest data is retrieved first from node queues
- ✅ Automatic Timestamping - All data automatically timestamped when created
- ✅ Thread-Safe Operations - Safe concurrent access across all nodes
- ✅ Backward Compatibility - Existing nodes work without modifications
- ✅ Queue Management - Automatic size limits prevent memory overflow
Each node that sends data to other nodes does so through its own timestamped queue. When nodes retrieve data, they get the oldest data from the FIFO queue, ensuring chronological processing order. See TIMESTAMPED_QUEUE_SYSTEM.md for detailed documentation.
Benefits:
- Proper temporal ordering of video frames and audio data
- Prevention of data race conditions
- Better synchronization between nodes
- Monitoring and debugging capabilities
CV_Studio/
├── src/                    # New professional architecture
│   ├── core/              # Core business logic
│   │   ├── nodes/         # Node abstractions (BaseNode, NodeFactory, EnhancedNode)
│   │   ├── config/        # Settings management
│   │   └── pipeline/      # Processing pipeline (future)
│   ├── nodes/             # Node implementations with adapters
│   │   ├── input/         # Input node adapters
│   │   ├── process/       # Processing node adapters
│   │   ├── ml/            # ML/DL node adapters
│   │   └── examples/      # Example implementations
│   ├── utils/             # Reusable utilities
│   │   ├── exceptions.py  # Custom exception hierarchy
│   │   ├── logging.py     # Centralized logging
│   │   └── resource_manager.py  # Resource lifecycle management
│   └── gui/               # GUI components (future)
│
├── node/                  # Original node implementations (fully compatible)
│   ├── InputNode/         # Input sources (webcam, video, images)
│   ├── ProcessNode/       # Image processing nodes
│   ├── DLNode/            # Deep learning nodes
│   ├── ActionNode/        # Action/control nodes
│   ├── OverlayNode/       # Drawing and overlay nodes
│   ├── timestamped_queue.py  # Timestamped FIFO queue system (NEW)
│   ├── queue_adapter.py   # Backward-compatible queue adapter (NEW)
│   └── ...                # Other node categories
│
├── node_editor/           # Node editor core and UI
├── tests/                 # Test suite (52+ tests, including queue system)
├── main.py               # Application entry point
└── requirements.txt      # Python dependencies
The src/ directory introduces professional development practices:
from src.utils.exceptions import NodeExecutionError, NodeConfigurationError

# Clear, structured error handling
raise NodeExecutionError(node_id, "Processing failed", original_exception)from src.utils.logging import get_logger
logger = get_logger(__name__)
logger.info("Processing node...")
logger.error("Node failed", exc_info=True)from src.utils.resource_manager import get_resource_manager
manager = get_resource_manager()
manager.register('video_capture', video_cap, cleanup_func=lambda v: v.release())from src.core.config import Settings
settings = Settings('config.json')
width = settings.get('webcam_width', 640)
settings.set('use_gpu', True)from src.core.nodes import EnhancedNode
class MyNode(EnhancedNode):
node_label = 'My Custom Node'
node_tag = 'MyNode'
# Built-in logging, error handling, resource management
def update(self, node_id, connection_list, node_image_dict, node_result_dict):
result = self.safe_execute(self.process_image, node_image_dict)
return {"image": result, "json": None}100% backward compatible - All existing code in the node/ and node_editor/ directories continues to work unchanged. The new architecture in src/ provides optional enhancements for future development.
- src/README.md - Technical architecture documentation
- Timestamped Queue System - FIFO queue documentation 🆕
CV Studio includes comprehensive test coverage with 150+ test files and pytest configuration.
# Run all tests
python -m pytest tests/ -v

# Run specific test suite
python -m pytest tests/test_utils/ -v
python -m pytest tests/test_core/ -v

# Run queue system tests
python -m pytest tests/test_timestamped_queue.py tests/test_queue_adapter.py tests/test_queue_integration.py -v

# Run with coverage report
python -m pytest tests/ --cov=src --cov=node --cov-report=htmlCore Architecture Tests:
- ✅ Base node class (14 tests) 🆕
- ✅ Enhanced node class (22 tests) 🆕
- ✅ DPG node ABC (16 tests) 🆕
- ✅ Node factory (7 tests)
- ✅ Settings management (10 tests)
Utilities Tests:
- ✅ Exception hierarchy (7 tests)
- ✅ Logging utilities (6 tests)
- ✅ Resource management (8 tests)
- ✅ GPU utilities (7 tests)
Queue System Tests:
- ✅ Timestamped queue system (35 tests)
- Core queue functionality (17 tests)
- Backward compatibility adapter (12 tests)
- Integration with node system (6 tests)
Node Integration Tests:
- ✅ 150+ integration tests for various node implementations
- ✅ Video processing nodes
- ✅ Audio processing nodes
- ✅ Object detection and tracking nodes
- ✅ And many more...
All inference nodes support CPU and GPU execution (select via the GPU checkbox). If the model does not support GPU inference, it falls back to CPU automatically.
📥 Input Node
| Image |
Reads still images (bmp, jpg, png, gif) and outputs them frame by frame. Open the file dialog with the Select Image button. |
| Video |
Reads a video file (mp4, avi) and outputs one image per frame. Open the file dialog with Select Movie. Check Loop to repeat playback; Skip rate sets the frame skip interval. |
| Video (Set Frame Position) |
Reads a video file and outputs the image at a user-specified frame position. Open the file dialog with Select Movie. |
| WebCam |
Reads a webcam and outputs one image per frame. Select the camera index in the Device No drop-down list. |
| RTSP |
Reads the RTSP stream of a network camera and outputs one image per frame. Enter the RTSP URL and press Start. |
| HLS |
Reads an HLS (HTTP Live Streaming) stream and outputs video frames. Enter the HLS URL (.m3u8) and press Start. |
| YouTube |
Streams a YouTube video and outputs frames. Enter the video URL and press Start. Requires yt-dlp or pytube.
|
| WebRTC |
Receives a WebRTC video stream and outputs frames in real time. Configure the signaling server URL and press Start. |
| WebSocket |
Receives image frames published over a WebSocket connection. Configure host, port and topic, then press Start. |
| MQTT |
Receives image frames published over an MQTT broker. Configure broker address, port and topic, then press Start. |
| API |
Exposes an HTTP endpoint that accepts image frames (POST) and injects them into the pipeline. Configure the listening port and press Start. |
| Microphone |
Captures real-time audio from a microphone and outputs audio chunks. Options: • Device selector — choose from all available audio input devices • Sample rate — 8 kHz to 48 kHz (default 16 kHz) • Chunk duration — 0.1 s to 5.0 s Click Start to begin recording, Stop to pause. Output is compatible with all AudioProcess and AudioClassification nodes. See README_Microphone.md for details. |
| Screen Capture |
Captures and outputs the full desktop screen as a video source. Useful for applying CV pipelines to desktop content in real time. |
| Temperature |
Reads temperature sensor data and outputs it as a numeric value. Compatible with Raspberry Pi GPIO sensors. |
| Int Value | Outputs a user-defined integer constant. Use as a parameter source for other nodes. |
| Float Value | Outputs a user-defined float constant. Use as a parameter source for other nodes. |
| JSON Boolean |
Outputs a boolean value that can be toggled in the UI. Useful for conditional routing and trigger nodes. |
🖼️ Process Node
| ApplyColorMap |
Applies a pseudo-color map to a grayscale input image. Select from all OpenCV colormaps (JET, HOT, VIRIDIS, etc.) via the dropdown. |
| Blur |
Applies smoothing (averaging, Gaussian, median, or bilateral) to the input image. Kernel size is adjustable via slider. |
| Brightness | Adjusts image brightness. Change value with the alpha slider. |
| Canny | Applies Canny edge detection. Adjust minimum and maximum thresholds with sliders. |
| CLAHE |
Applies Contrast Limited Adaptive Histogram Equalization to the input image. Adjust clip limit and tile grid size. |
| Contrast | Adjusts image contrast. Change value with the beta slider. |
| Crop | Crops the input image. Adjust upper-left (x1, y1) and lower-right (x2, y2) coordinates with sliders. |
| EqualizeHist | Performs histogram equalization on the brightness channel of the input image. |
| Flip | Flips the image horizontally, vertically, or both. |
| Gamma Correction | Applies gamma correction to the input image. Gamma value adjustable via slider. |
| Grayscale | Converts the input image to grayscale. |
| Illumination Correct | Corrects uneven illumination (shading) across the image using background subtraction techniques. |
| Image Alpha Blend | Alpha-blends two input images. Adjust the blending ratio with the alpha slider. |
| Kernel Sharpen | Applies a sharpening convolution kernel to the input image. |
| Morphology |
Applies morphological operations (erode, dilate, open, close, gradient, tophat, blackhat). Select the operation type and adjust kernel size. |
| NLM Denoise |
Applies Non-Local Means (NLM) denoising to reduce noise in the input image. Adjust filter strength (h), template window, and search window. |
| Omnidirectional Viewer |
Transforms a 360-degree equirectangular image by roll, pitch, and yaw axes. Use sliders to navigate the virtual camera inside the sphere. |
| Resize |
Resizes the image to the specified width and height using a selectable interpolation method (nearest, linear, cubic, area, Lanczos). |
| Simple Filter | Applies a 3×3 2D convolution filter to the image. Choose from preset kernels or enter custom values. |
| Adaptive Threshold | Applies adaptive thresholding (mean or Gaussian). Adjustable block size and C constant. |
| Bilateral Filter |
Applies a bilateral filter that smooths while preserving edges. Adjust diameter, sigma color, and sigma space. |
| Color Space | Converts the image between color spaces (BGR, RGB, HSV, HLS, LAB, YCrCb, etc.). |
| Threshold |
Binarizes the input image. Select the algorithm type (binary, Otsu, etc.) and adjust the threshold value. In Otsu mode the threshold value is determined automatically. |
| Unsharp Mask | Applies unsharp masking for sharpness enhancement. Adjust radius, amount, and threshold. |
| Zoom | Digitally zooms into a region of the image. Adjust zoom factor and center point. |
🤖 Deep Learning Node
All deep learning nodes share the following common features:
- Model selector — choose from built-in models via the drop-down list
- GPU checkbox — switch between CPU and GPU inference (falls back to CPU if GPU is unavailable)
- ➕ Add Model button — import any custom ONNX model directly from the node UI (no restart required); uploaded models are saved persistently and appear in the drop-down list on the next launch
- Refer to each model subdirectory under
node/DLNode/for individual model licenses
| Object Detection |
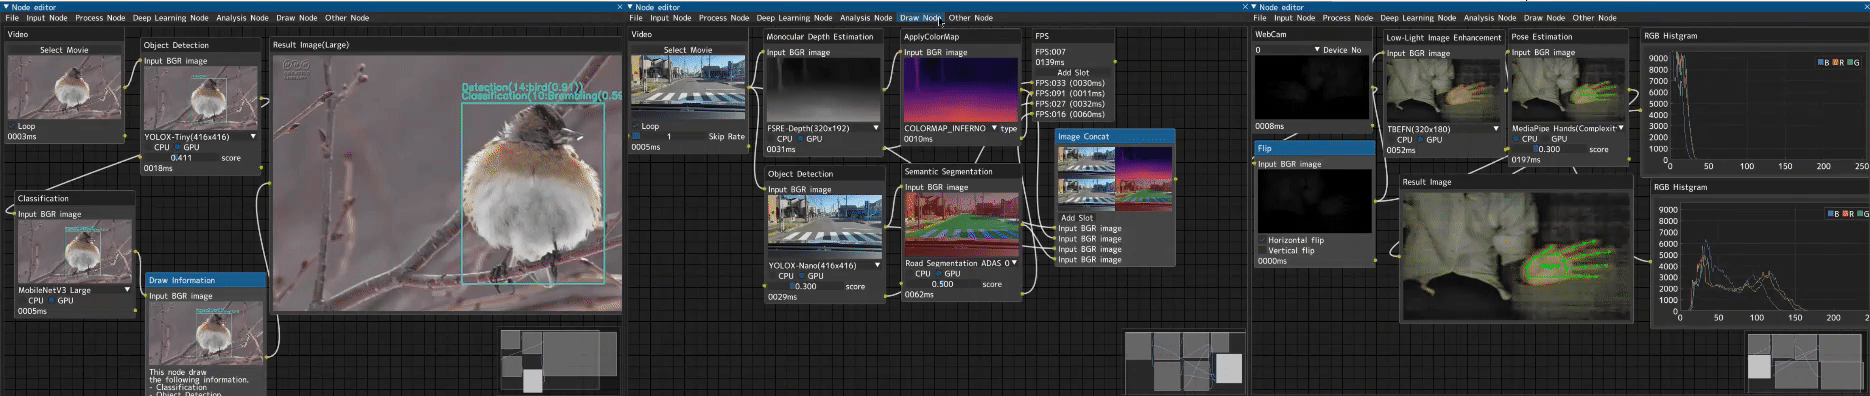
Detects objects in the input image and outputs bounding boxes, class names, and confidence scores. Built-in models: • YOLOX-Nano (416×416) — 80 COCO classes • YOLOX-Tiny (416×416) — 80 COCO classes • YOLOX-S (640×640) — 80 COCO classes • YOLO11Nano (608×416) — 80 COCO classes • FreeYOLO-Nano (640×640) — 80 COCO classes • FreeYOLO-CrowdHuman (640×640) — person only • Light-Weight Person Detector (192×192) — person only • YOLOTENNIS (608×608) — player1, player2, ball • YOLO-DOTA-OBB (416×416) — 16 aerial object classes (oriented bounding boxes) Options: • Score threshold, NMS threshold, max detections (sliders) • Draw bounding boxes toggle; box thickness slider • ▼/▶ Settings collapse button to hide advanced parameters • Add Model button — upload any custom ONNX detection model; choose output format (yolo11 / yolox) and class source (COCO or generic labels) when the ONNX has no embedded class names |
| Semantic Segmentation |
Performs pixel-wise semantic segmentation on the input image. Built-in models: • DeepLabV3 (MobileNetV2 backbone) • Road Segmentation ADAS 0001 • Skin / Clothes / Hair Segmentation (DeepLabV3+) • MediaPipe Selfie Segmentation — Normal mode • MediaPipe Selfie Segmentation — LandScape mode • YOLOv8-nano-seg (instance segmentation) • FLAIR Aerial Segmentation — IGN aerial imagery (19 classes) • FLAIR Aerial INT8 — quantized ONNX variant Options: • Model selector drop-down • GPU / CPU toggle • Add Model button — import a custom ONNX segmentation model; specify input resolution, number of classes, and a display name |
| Classification |
Classifies the input image (or bounding-box crops when connected downstream of an Object Detection node). Options: model selector, GPU toggle, top-k results |
| Face Detection |
Detects faces in the input image and outputs bounding boxes and keypoints. Options: model selector, score threshold, GPU toggle |
| Pose Estimation |
Estimates human body keypoints (skeleton) for the input image. Options: model selector (MediaPipe / ONNX), score threshold, GPU toggle |
| Monocular Depth Estimation |
Estimates per-pixel depth from a single RGB image. Outputs a grayscale depth map. Options: model selector, GPU toggle |
| Low-Light Image Enhancement |
Enhances images captured in low-light or night-time conditions using ONNX-based enhancement models. Options: model selector, GPU toggle |
| Audio Classification |
Classifies audio chunks (from a Microphone or AudioProcess node) and outputs a top-k label list and a mel-spectrogram image. Also provides an audio passthrough output, enabling synchronized audio+video pipelines (e.g. into ImageConcat → VideoWriter). Built-in models: • YAMNet (Google/Qualcomm) — 521 AudioSet classes, 16 kHz, waveform input Options: • Model selector drop-down • Top-k results slider • Class label source (ONNX metadata / ESC-50 built-in / YAMNet built-in) • Add Model button — upload a custom ONNX audio model; specify input type (waveform or spectrogram), sample rate, and class names |
| Online Training |
Performs on-device distillation / fine-tuning of a student detection model guided by a teacher model. Supports PyTorch backprop (full head or backbone) and affine-head fallback when PyTorch is unavailable. Displays a live distillation loss chart (IoU, class CE/KL, cardinality, FP/FN losses). Options: teacher model, student model, train scope (head / all), learning rate, loss weights |
| TinyBert Vigilance |
Runs a TinyBERT NLP model on text input to predict a vigilance / attention score. Outputs a float score and a label; connects to the Vigilance Gauge visual node. |
🔊 Audio Process Node
Audio processing nodes receive audio chunks and output transformed audio chunks. Chain them after a Microphone node.
| Spectrogram |
Computes a mel-spectrogram from an audio chunk and outputs it as an image. Options: FFT size, hop length, number of mel bands, frequency range |
| BandPass Filter |
Applies a bandpass filter to the audio signal. Options: low-cut and high-cut frequency sliders |
| Compressor |
Applies dynamic range compression to the audio signal. Options: threshold (dB), ratio, attack, release |
| Decibel |
Measures the RMS amplitude and outputs it as a dB value. Useful for level monitoring and trigger conditions. |
| Equalizer |
Multi-band parametric equalizer. Options: per-band gain sliders (configurable center frequency and bandwidth) |
| Noise Gate |
Suppresses audio below a configurable threshold (noise floor). Options: threshold (dB), attack, release |
| Normalize | Normalizes audio amplitude to a target peak or RMS level. |
| Resample |
Resamples the audio chunk to a new target sample rate. Options: target sample rate selector |
📊 Stats / Analysis Node
| FPS | Calculates FPS from processing-time inputs. Add slots with Add Slot. |
| RGB Histogram | Calculates and displays the per-channel RGB histogram of the input image. |
| BRISQUE | Evaluates perceptual image quality using the BRISQUE metric (higher = worse quality). |
| IoU |
Computes Intersection-over-Union between two sets of bounding boxes. Also computes set-level distillation metrics (Hungarian matching, cardinality, FP/FN) for use with OnlineTraining. |
| Homography |
Estimates and applies a homography transform between two sets of keypoints. Useful for court or field calibration (e.g. tennis court bird's-eye view). |
| BAR | Displays numeric values as a live bar chart. Add input slots as needed. |
| Operator | Applies arithmetic or logical operations (+, −, ×, ÷, min, max, abs, …) on two scalar inputs. |
| DistanceTracker | Tracks the cumulative distance traveled by detected objects across frames. |
| Dataprocessing Keypoints | Extracts, filters, and transforms keypoint data from Pose Estimation or Object Detection nodes. |
🎨 Visual / Overlay Node
| Draw Information | Draws analysis results (labels, bounding boxes, keypoints) onto the image from Classification, Object Detection, Pose Estimation, or Segmentation nodes. |
| Image Concat |
Displays multiple input images side by side in a single output frame. Add more image inputs with Add Slot. Also forwards audio from connected audio sources, enabling synchronized audio+video output. |
| PutText | Draws a text string on the image. Select color from the color map; optionally overlay processing time. |
| Result Image | Displays the image in the node canvas. If connected to a raw-output node (Classification, Object Detection…) the analysis result is drawn automatically. |
| Result Image (Large) | Same as Result Image but with a larger preview area. |
| Overlay |
Overlays a semi-transparent mask or colored region over the input image. Options: color picker, alpha slider |
| Overlay Image |
Overlays a second image (PNG with alpha channel supported) on top of the input image. Options: position (x, y), scale, alpha blend ratio |
| HeatMap | Accumulates object detections over time and renders a 2D spatial density heatmap. |
| ObjHeatMap | Renders a heatmap from object bounding-box center positions; useful for crowd/traffic density analysis. |
| Chart |
Plots detection metrics (count, confidence, distillation losses) as a live time-series chart. Connects to Object Detection, OnlineTraining, or IoU nodes. |
| Map |
Renders a 2D floor/field map and plots object positions on it. Options: background image, coordinate transform, labels overlay toggle |
| TennisCourt | Renders a top-view tennis court diagram and overlays player/ball positions from detection output. |
| Word Cloud | Generates a word cloud image from text classification output (e.g. AudioClassification labels). |
| Vigilance Gauge |
Displays a gauge that visualizes a vigilance / attention score (0–1). Connects to TinyBert Vigilance node output. |
🗺️ Map Node
| CopernicusMap |
Streams satellite imagery from the Copernicus Sentinel Hub (Sentinel-2 / Sentinel-1) and renders it as a live tile map. Options: • Sentinel-2 band combinations (B02, B03, B04, B08, B11, B12, …) • True Color (naked eye) checkbox — renders a natural RGB composite (B04/B03/B02 ×2.5) • Visible Spectrum Only checkbox — restricts band slots to visible bands (B02/B03/B04) • Custom formula input (NDVI, EVI, …) • GPS position overlay with trace • Tile cache to avoid redundant API calls Requires a Sentinel Hub API key (set in Settings node or environment variable). |
📡 Tracker Node
| MOT |
Multi-Object Tracking: takes Object Detection output and assigns persistent IDs to objects across frames. Supported algorithms: motpy, ByteTrack, Norfair, IOU Tracker, SORT, CenterTrack Select the algorithm from the drop-down; each has its own tuning parameters. See TrackerNode/mot/README.md for per-algorithm details. |
| ReId |
Re-Identification: matches detected persons across cameras or after re-entry using appearance features. Connects downstream of an Object Detection or MOT node. |
⏱️ Trigger / Logic Node
| Trigger |
Fires a boolean signal when a connected numeric value crosses a configurable threshold. Options: threshold, comparison operator, hysteresis |
| ObjDetCount |
Counts the number of detected objects (by class) and outputs a boolean trigger when the count satisfies a condition. Options: target class, count threshold, comparison operator |
| DbDetCount | Triggers when a database detection count crosses a threshold; used with the MongoDB node. |
| CourtKeypointDeviation | Triggers when a tracked keypoint (e.g. player position on a court) deviates beyond a set distance from a reference point. |
| Boolean Inverter | Inverts (NOT) a boolean input signal. |
| ON/OFF Switch | Routes the input image to the output only when switched ON. Toggle manually or via a boolean input. |
| Simple Router | Routes the input image to one of multiple output slots based on a boolean or index signal. |
⚡ Action Node
| VLM (Vision Language Model) |
Sends the current frame to an external VLM HTTP endpoint and displays the natural-language response. Options: • Server URL (e.g. local Ollama endpoint) • Model name (e.g. llava, bakllava)• Prompt / caption text input Requests are sent in a subprocess so the GUI never blocks. |
| MongoDB |
Stores detection results (bounding boxes, classes, timestamps) in a MongoDB collection. Options: connection URI, database name, collection name, write interval |
| CamControl (PTZ) |
Controls a PTZ (Pan-Tilt-Zoom) camera based on detected object positions. Options: connection settings, pan/tilt/zoom speed, target-following mode |
| Buzzer |
Triggers a GPIO buzzer (e.g. on Raspberry Pi) when a boolean input goes HIGH. Options: GPIO pin, frequency, duration |
| Video Recorder |
Records the input video stream to a file when a trigger signal is active. Options: output path, codec, FPS |
💾 Video / Output Node
| Video Writer |
Exports the input image stream as a video file (mp4/avi). Supports synchronized audio+video output when connected via ImageConcat with an audio source. Options: • Output path and filename • Codec (H.264, MPEG-4, …) • Target FPS • Output resolution • Audio passthrough (chunk deduplication and pts_ms alignment) |
| Dynamic Play | Plays back a recorded video file with real-time playback controls (play, pause, seek). |
| Image Concat | See Visual / Overlay Node section above. |
⏳ Timeseries Node
| Position Prediction |
Predicts the next position of a tracked object using a Kalman filter or similar time-series model. Connects downstream of MOT or Object Detection nodes. |
🔧 System Node
| Settings | Global application settings node: configure API keys, default output paths, GPU settings, logging level, and other application-wide parameters. |
| Sizing | Dynamically resizes all node thumbnails in the canvas to a chosen preview resolution. |
| SyncQueue | Synchronizes frames from multiple asynchronous sources (e.g. different cameras or streams) by timestamp, ensuring frame-aligned output. |
| SystemResource | Displays real-time CPU, RAM, and GPU utilization as gauges and time-series charts. |
| Scan | Scans a connected device or network for available cameras or streams and populates the result. |
| Deploy | Packages the current processing graph and models into a deployable bundle (e.g. for edge devices). |
You can extend CV Studio by creating custom nodes. Use the new architecture for enhanced development experience:
from src.core.nodes import EnhancedNode
from src.utils.logging import get_logger
import cv2

logger = get_logger(__name__)

class MyCustomNode(EnhancedNode):
    """Example custom node with enhanced features"""

    node_label = 'My Custom Node'
    node_tag = 'CustomNode'
    _ver = '1.0.0'

    def __init__(self):
        super().__init__()
        logger.info(f"Initialized {self.node_tag}")

    def add_node(self, parent, node_id, pos, opencv_setting_dict=None):
        """Add node to GUI"""
        # Implement your GUI setup here
        pass

    def update(self, node_id, connection_list, node_image_dict, node_result_dict):
        """Process the node"""
        try:
            # Your processing logic here
            input_image = self._get_input_image(node_image_dict, connection_list)
            output_image = cv2.cvtColor(input_image, cv2.COLOR_BGR2GRAY)

            return {"image": output_image, "json": None}
        except Exception as e:
            logger.error(f"Node processing failed: {e}", exc_info=True)
            return {"image": None, "json": None}
See src/nodes/examples/example_enhanced_node.py for a complete example.
We welcome contributions! Here's how you can help:
- Fork the repository
- Create a feature branch (
git checkout -b feature/amazing-feature) - Make your changes using the new architecture in
src/ - Add tests for new functionality
- Ensure tests pass (
python -m pytest tests/) - Commit your changes (
git commit -m 'Add amazing feature') - Push to the branch (
git push origin feature/amazing-feature) - Open a Pull Request
- Use the new architecture in
src/for new code - Add tests for new functionality
- Update documentation as needed
- Maintain backward compatibility
- Follow existing code style and conventions
- Fix RGB Histogram node graph always appearing in foreground
- Fix connection line remaining when deleting connected nodes
- Improve import feature to work after nodes are added
- Pipeline processing system (graph-based execution)
- GUI component refactoring
- Plugin system for dynamic node loading
- Type safety with comprehensive type hints
- Auto-generated API documentation
- Performance monitoring and optimization
- Export to production-ready code
Original Author:
Fork from Kazuhito Takahashi (@KzhtTkhs)
Repository Builder :
hackolite
We appreciate all contributions from the community!
This project is licensed under the Apache License 2.0 - see the LICENSE file for details.
- The source code of CV Studio itself is under Apache-2.0 license
- Each algorithm/node implementation is subject to its own license
- Please check the LICENSE file in each node directory for specific algorithm licenses
- Third-party dependencies have their own licenses
Sample images are sourced from:
- Original Image-Processing-Node-Editor project
- DearPyGUI for the GUI framework
- OpenCV for computer vision functionality
- ONNX Runtime for ML model inference
- MediaPipe for ML solutions
- All contributors and users of this project
- Issues: GitHub Issues
- Discussions: GitHub Discussions
- Documentation: See the docs in this repository
Made with ❤️ for the Computer Vision Community
⭐ Star this repo if you find it useful!