It’s to present ‘best practices for custom design and engaging interactions — so that developers can reuse code in their own apps.’ Indeed a beautiful app. However, I wished they had followed the Dart team’s approach to organizing a library package. This involves implementing ‘export files’ to keep the number of import statements in each Dart file to a reasonable number.
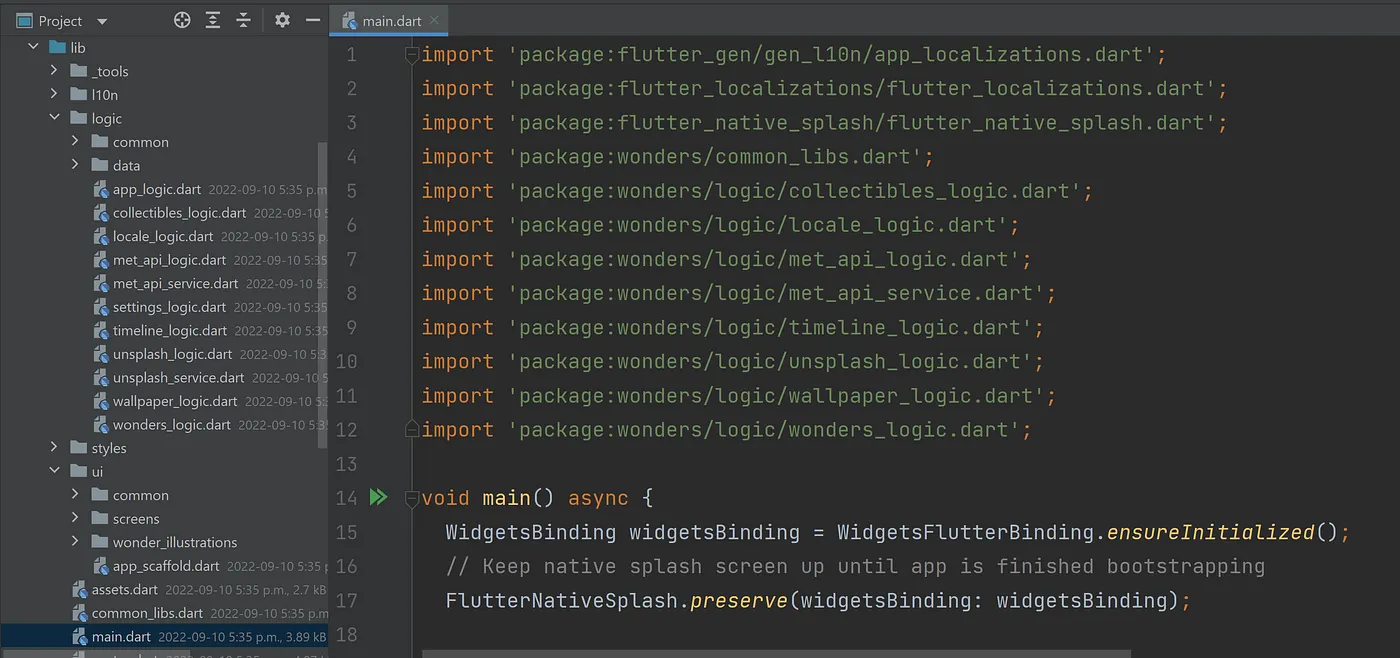
Further, in my opinion, the app’s files and folders could be arranged in such a way to instill better management and maintenance of the source code itself. Below is a screenshot of the source code for the original Wonderous app. The directory named, logic, and the directory named, ui, are both opened to display their contents. The first contains the app’s business logic while the second contains the code that involves the app’s interface. That’s certainly the assumption made given the names of these two directories. Not too bad, but we could do better.
Below is a screenshot of very much the same code, but now in a separate repository
containing an altered version of the Wonderous app. In this version, the source code is arranged and
organized into particular directories and files. Following a common convention,
the business logic is now found in a directory named, controller, and any code involving the app’s interface
will be found in a directory named, view. Lastly, the app’s code concerned with data will be found in the
folder, model.

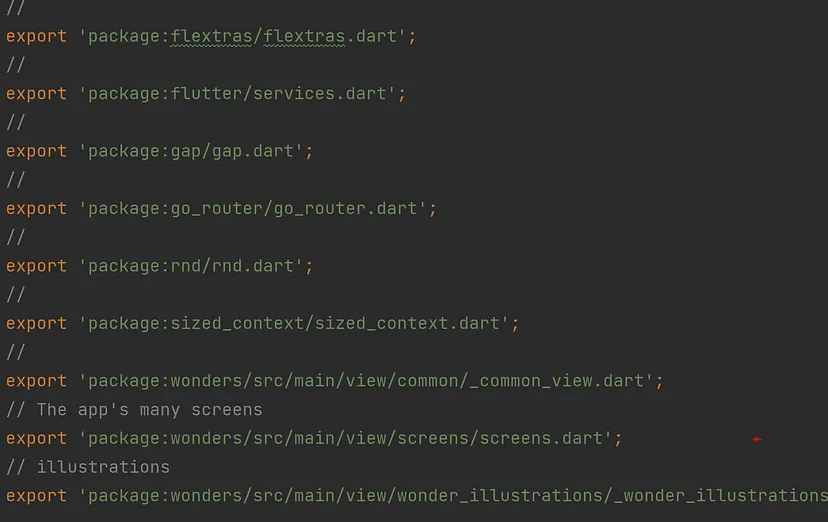
Of course, what may have struck you most in the screenshot above is the immense reduction of import statements used.
It’s now down to just one: import 'package:wonderous/src/view.dart';. We’ll take a closer look at those export files shortly.
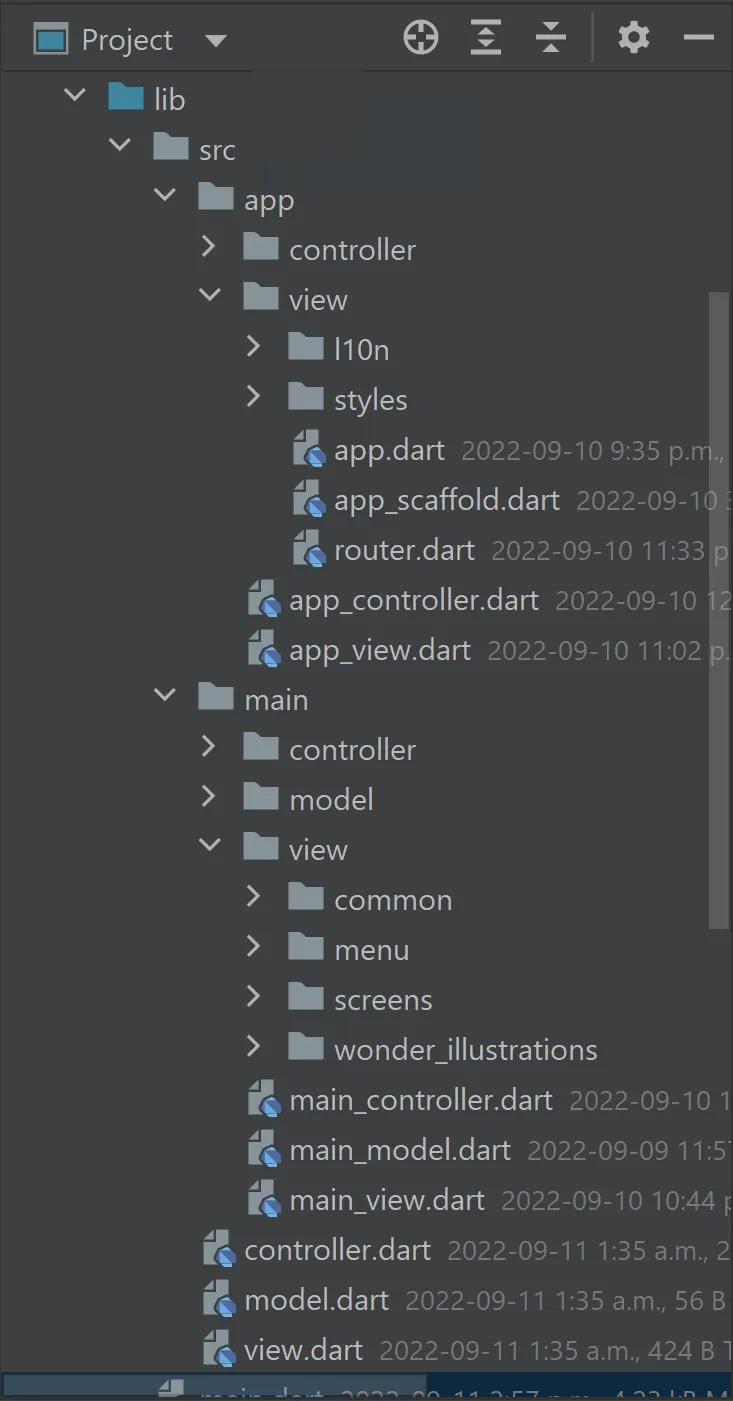
For now, below is another look at the directory structure of the two versions. The third and last screenshot listed below is that of the altered version again but with only its root directory named, src, now opened. Note, that that particular name, src, holds significant meaning for Dart packages (see organizing a library package). By design, any files in the directory, src, are then designated as to be not part of the package’s public API. In other words, the only thing to be externally accessed in the main.dart file is the function, runApp(), and the app itself, WonderousApp(). Unlike the original app, everything else is now secure under the directory, src. However, that also means the code can't be documented by dart doc either.
| Original | Altered | app and main folder closed |
|---|---|---|
 |
 |
 |
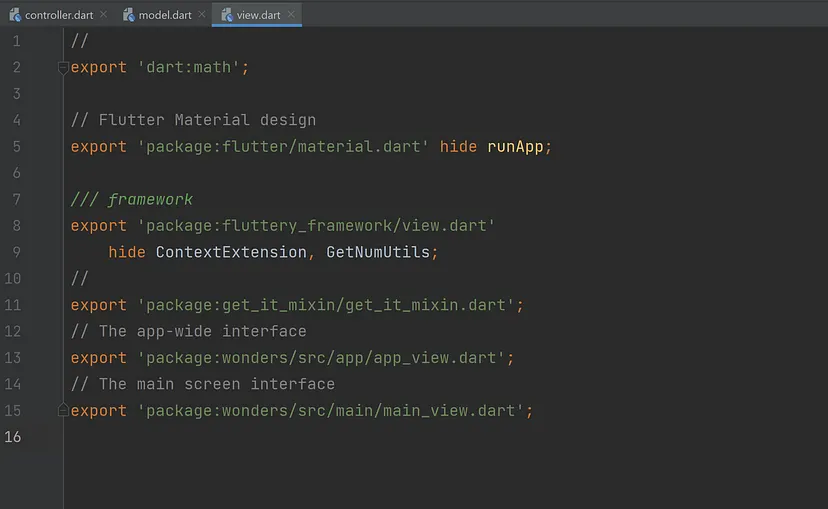
Everything else is certainly secure now when the show directive is also used on that lone import statement (see screenshot below).
You then have this one statement, and it tells the next developer that opens this file a heck of a lot about the code used…all at a glance.
import 'package:wonderous/src/view.dart' show WondersApp, runApp;
It tells you the code in this file is only concerned with the app’s interface because of the file name,
view. It also specifies at a glance what classes are used (WondersApp, runApp).
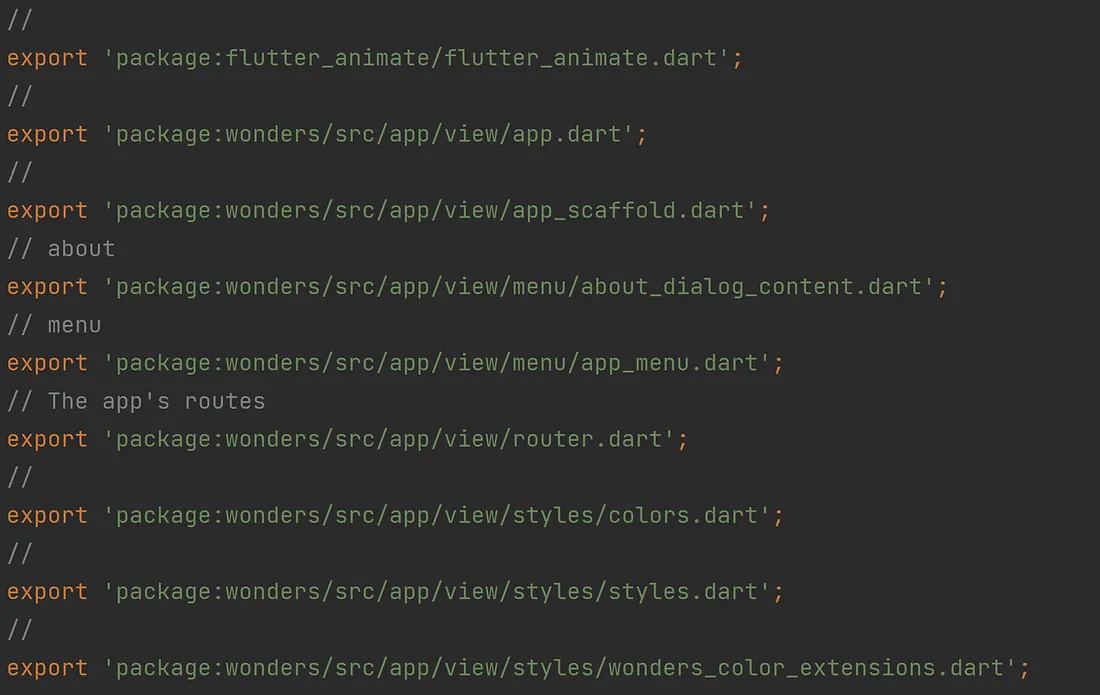
Further, it shows you the ‘export file’ (view.dart) being used — which likely contains the app’s
remaining interface code as well. A new developer (or yourself months from now) can open that export file
and review all such code and determine where it all lives and the extent of the app’s interface…all at a glance.
Very helpful.
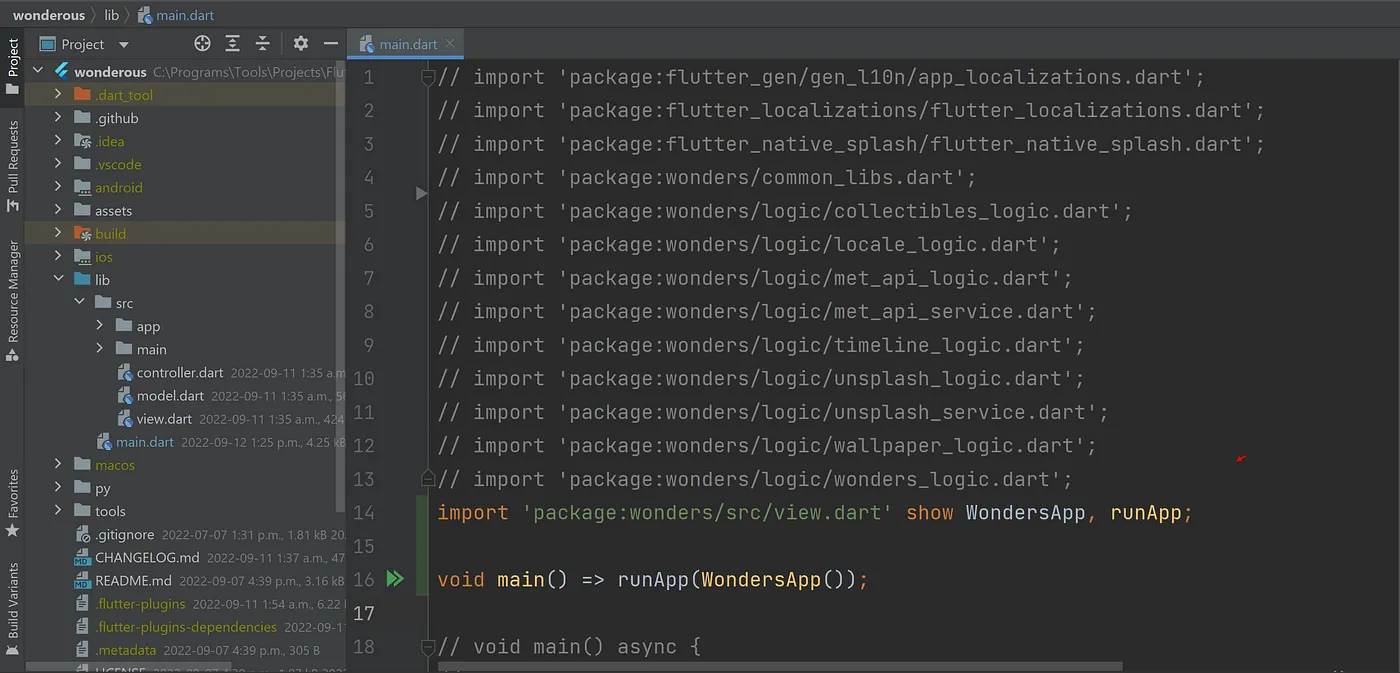
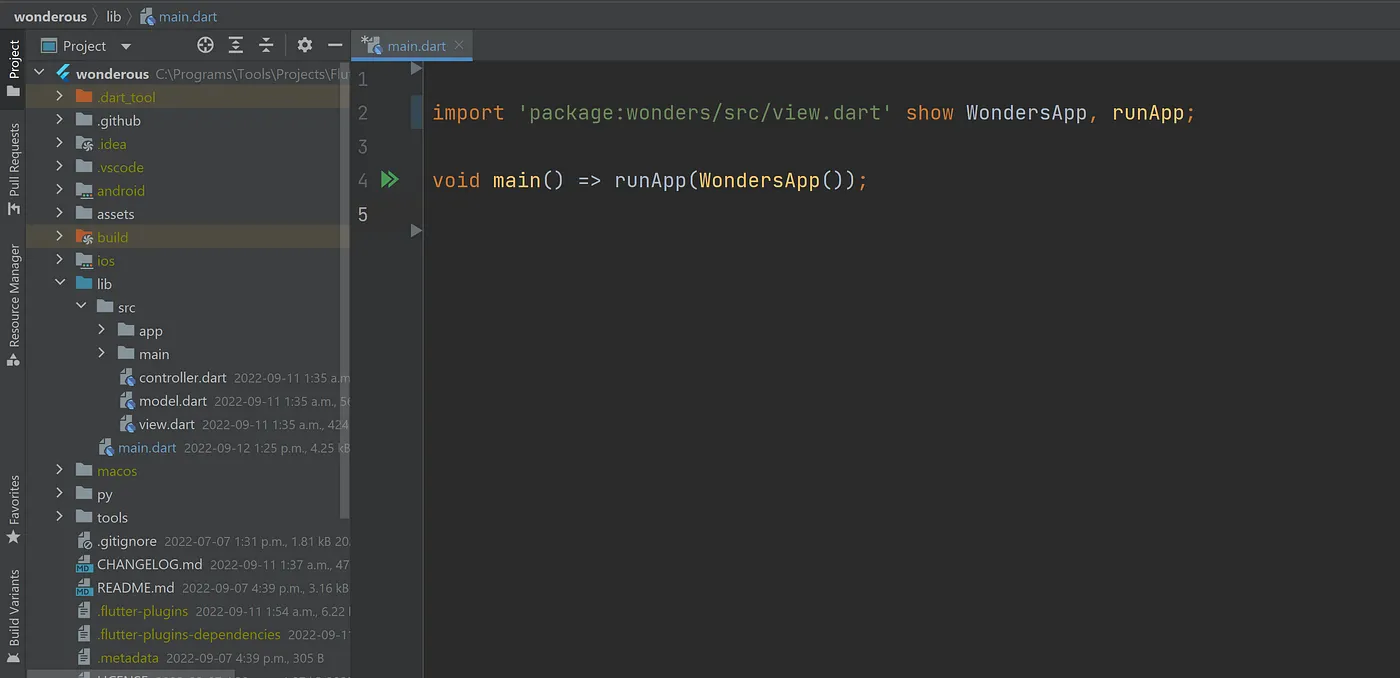
In this altered version of the Wonderous app, you’re not first greeted with reams of import statements every time you open a Dart file. For example, in the screenshot of the main.dart file below, I’ve removed the commented-out code. The main.dart file is now very clean. Very modular.
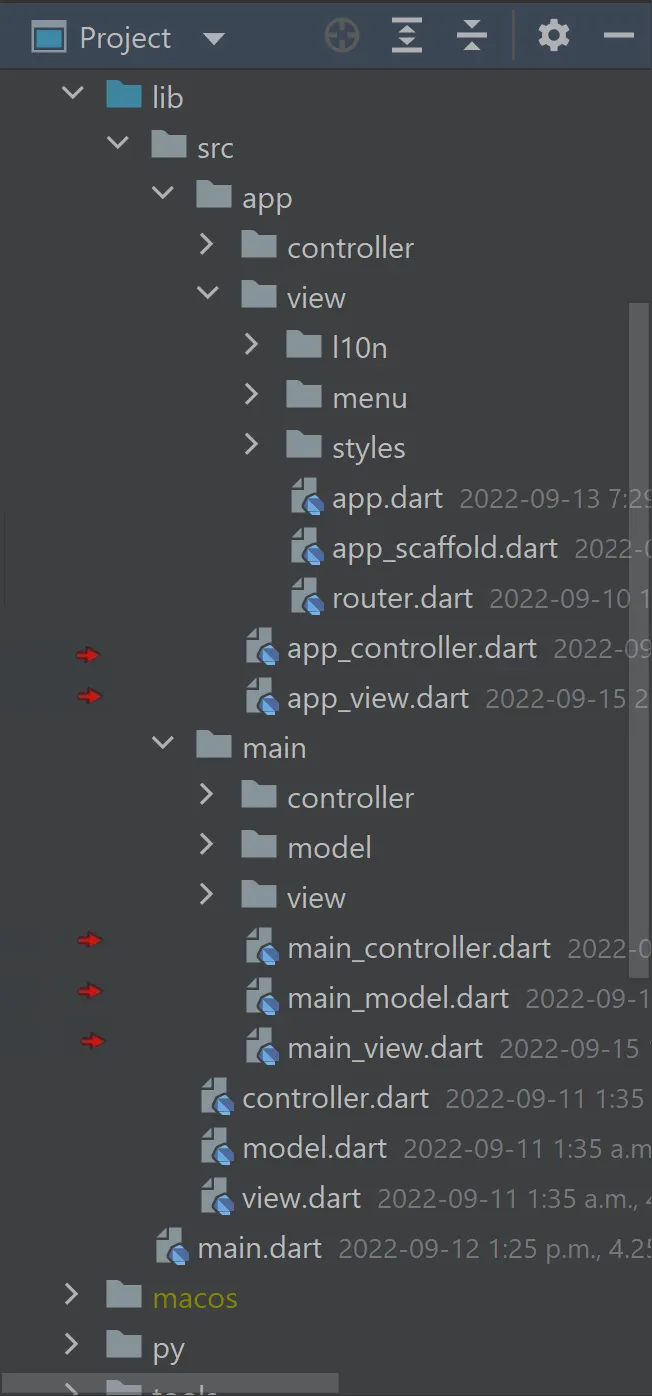
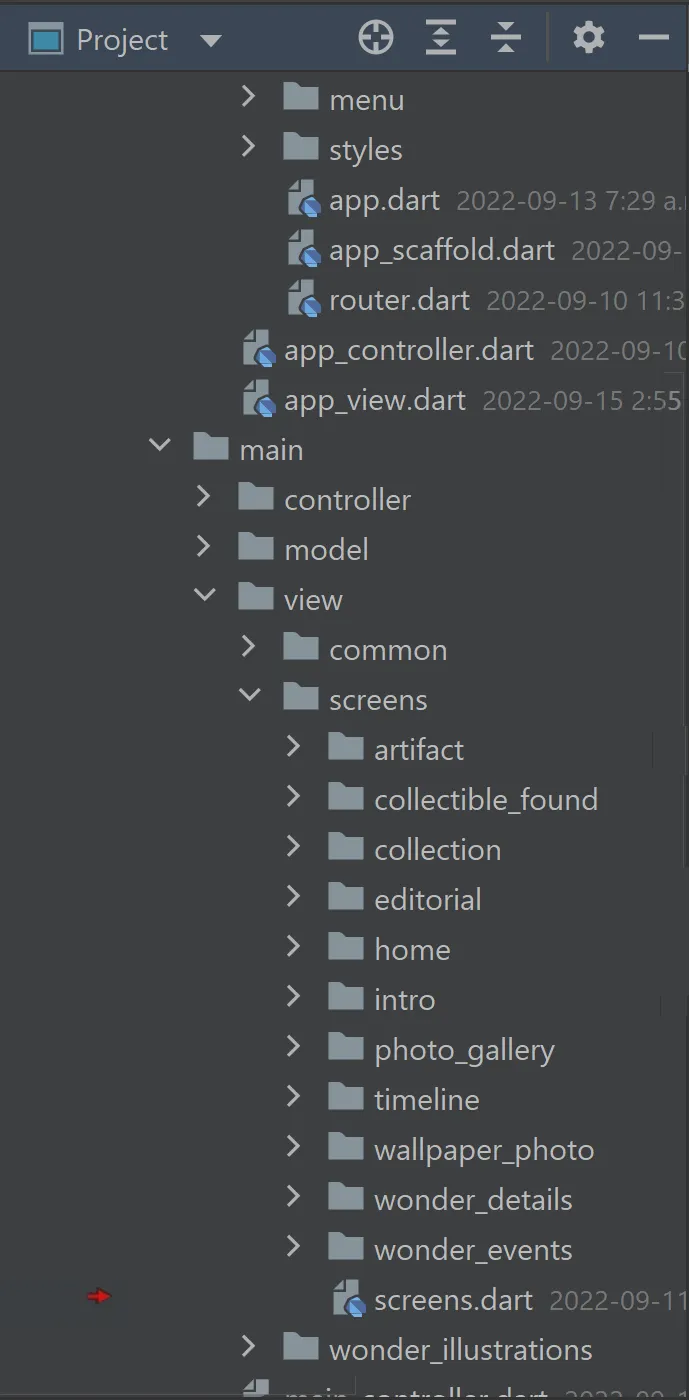
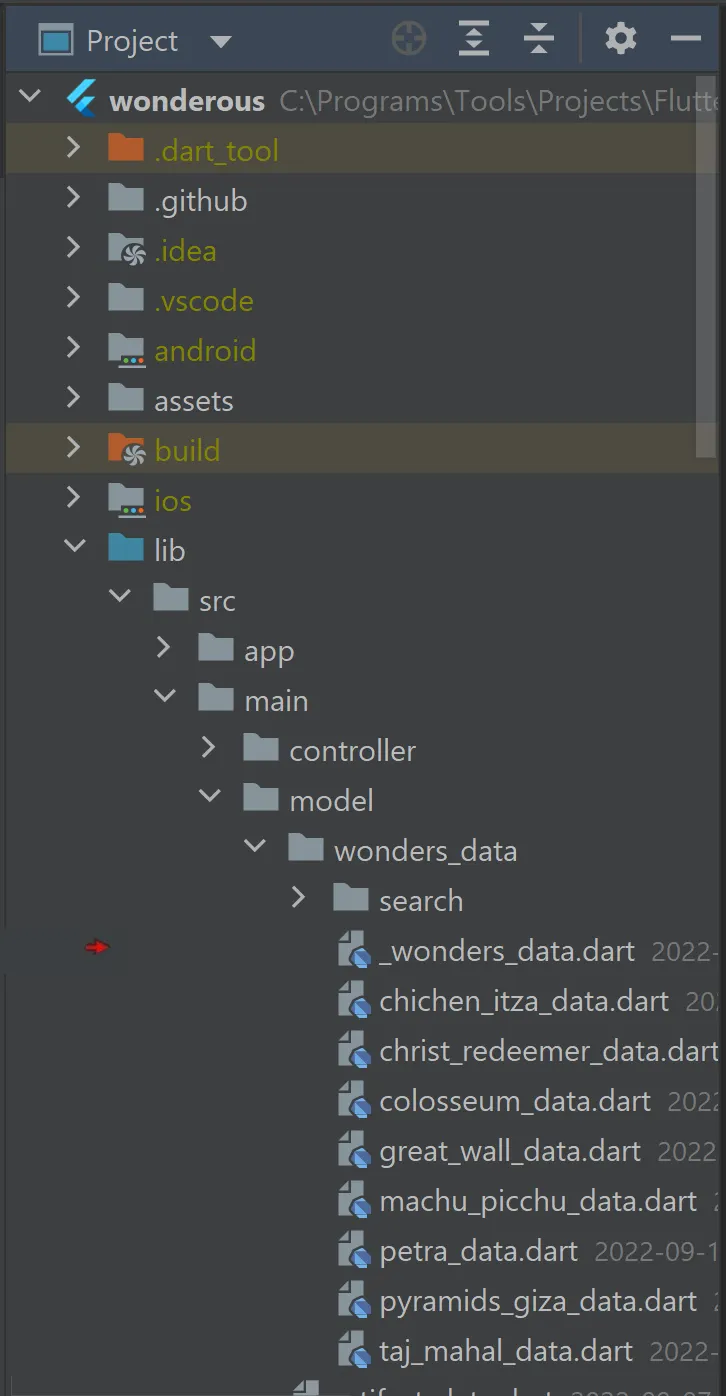
Back to the changes made to the app’s directory structure, note the three files in the third screenshot
below. Each is highlighted with a little red arrow. Note, that they’re the only files found directly
under the src folder. They are the app’s export files representing the three acknowledged aspects of
this app: its business logic, its data, and its interface. Looking at the names of these files,
you know which is which. Each contains export statements listing the source code which is then accessed
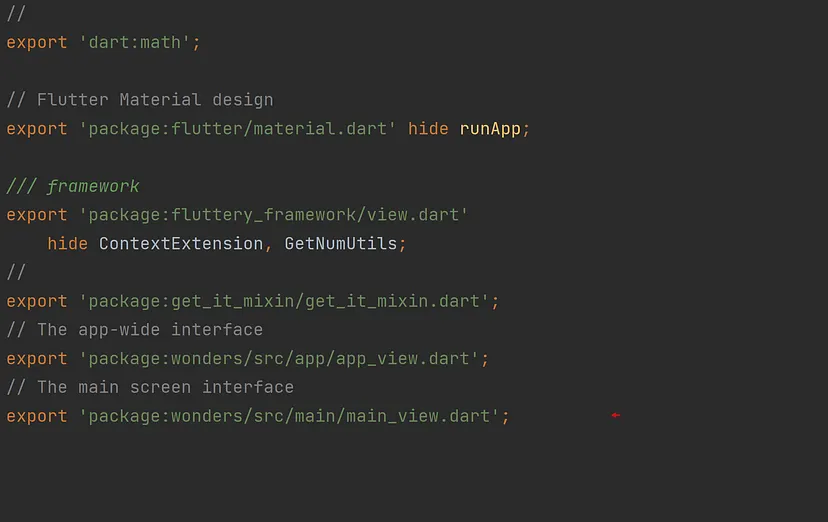
by import statements elsewhere in the app. Of course, you’ve already been introduced to the interface export file, view.dart.
| Original | Altered | The Three Export Files |
|---|---|---|
|
 |
 |
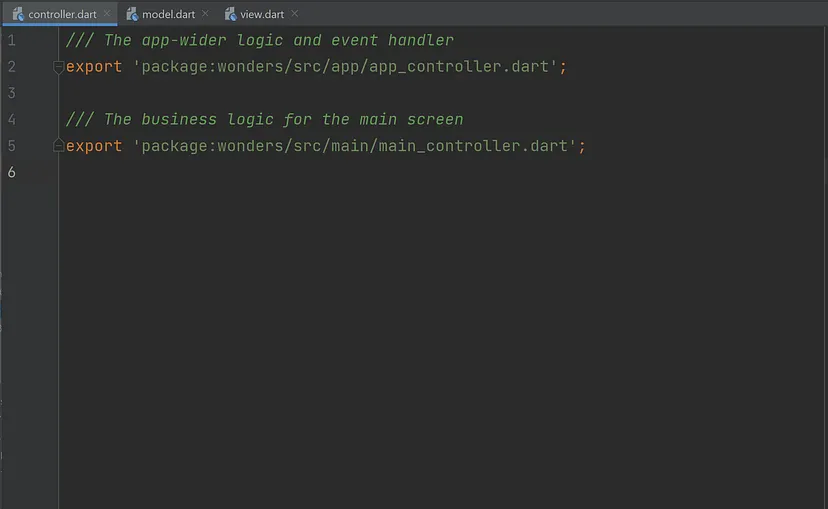
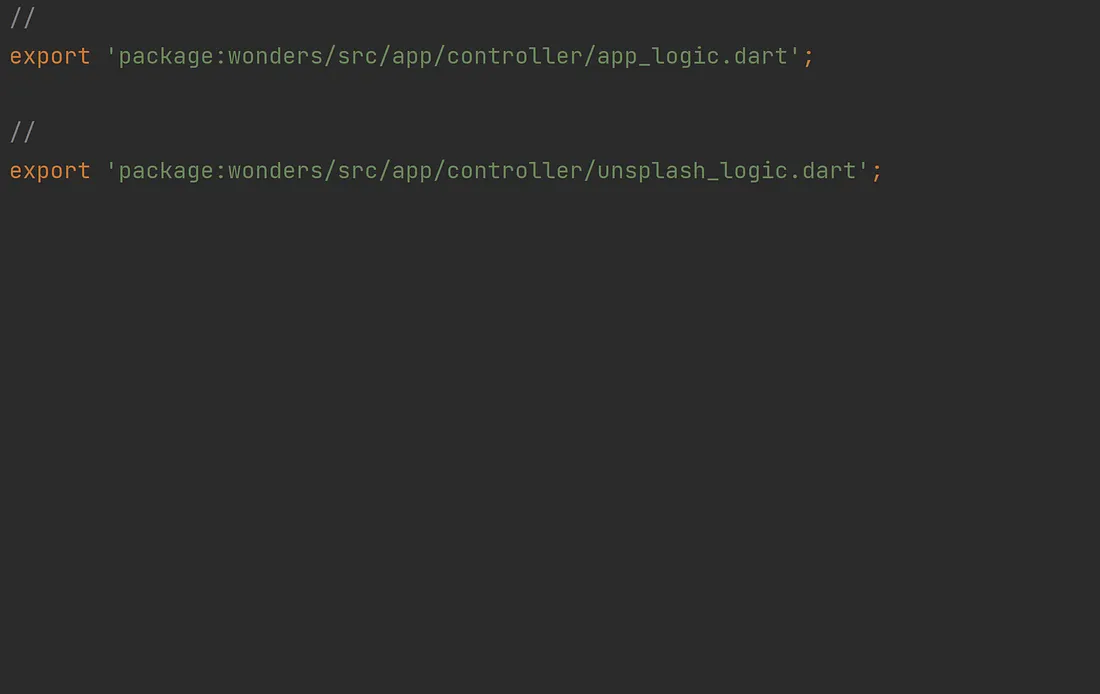
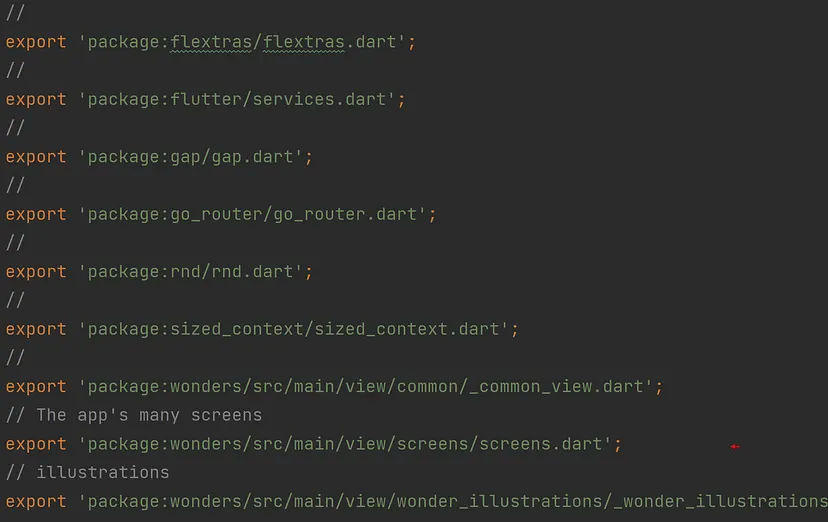
Those three files are now listed below for your perusal.
From top to bottom , you have the file controller.dart, the file model.dart, and the file view.dart.
When you examine their contents, you’ll have a very good idea of what’s involved in the app and where
everything is located.

We’ll examine those export statements further in a little bit,
but let’s return once again to the altered version’s directory structure,
and note that there is a further distinction made between the overall app itself and the app’s
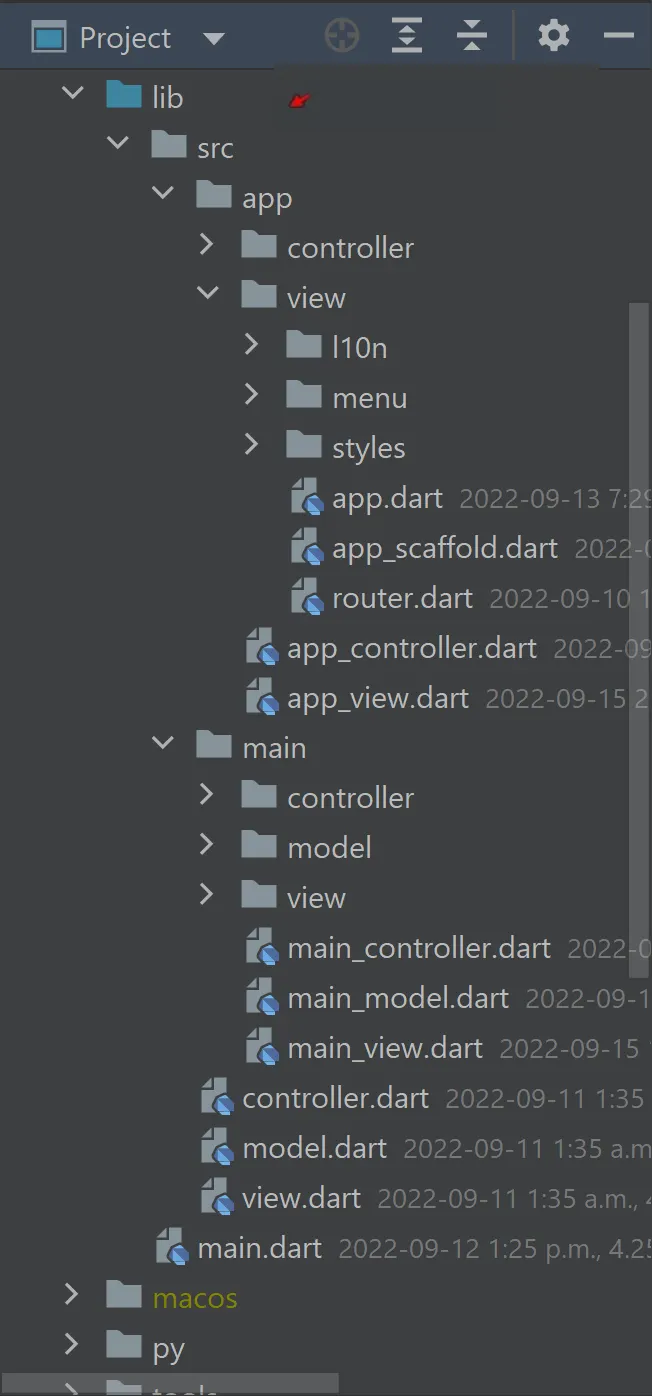
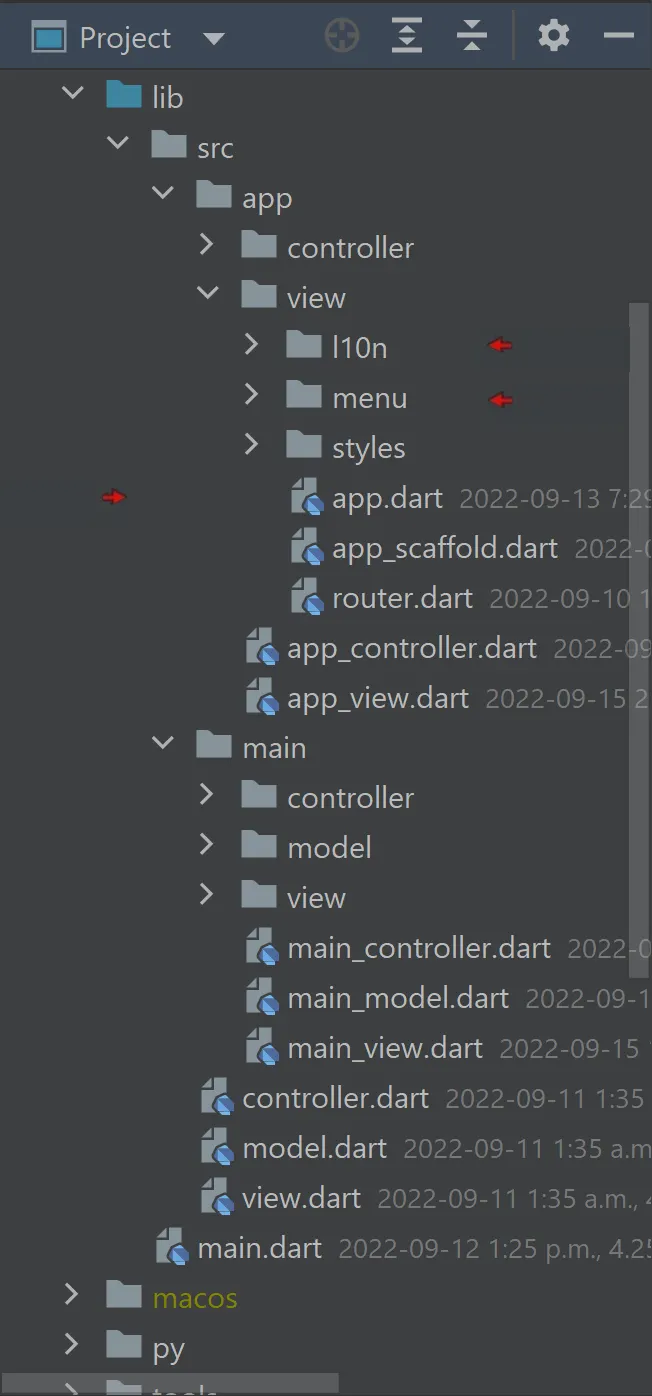
‘main screen.’ It’s in the form of two directories found directly under the src folder: appand main.
They’re highlighted in the first screenshot below.
I found making this further distinction to be very helpful in my apps. The directory, app, contains the code concerned with the overall functionality of the app while the directory, main (home for smaller apps), has code concerned only with the main screen that’s presented to the user.
Under the app folder, the overall style of the app is defined. Even the routes that take you from screen to screen are found there although the screens themselves are usually under the directory, main. This app’s Localization feature is small (it involves only English and Simplified Chinese) and is only affecting the app’s main screen, however, such features traditionally affect the whole app and so its translations are also found under the app directory in the folder, 110n, for demonstration purposes. See the second screenshot below.
The app’s menu is given a separate folder in my apps and is also traditionally found under the app folder as its options tend to vary widely and affect the whole app. Again, I’ve made an exception in this app, as the menu used here is not the traditional menu bar (not at the time of this writing anyway) and is really only concerned with the main screen. Regardless, it’s still placed under the app folder for demonstration purposes (second screenshot below). See how this works? Just opening a directory gives you an insight as to what’s involved in the app…all at a glance.
| Under src folder | Under app folder | Under main folder |
|---|---|---|
 |
 |
 |
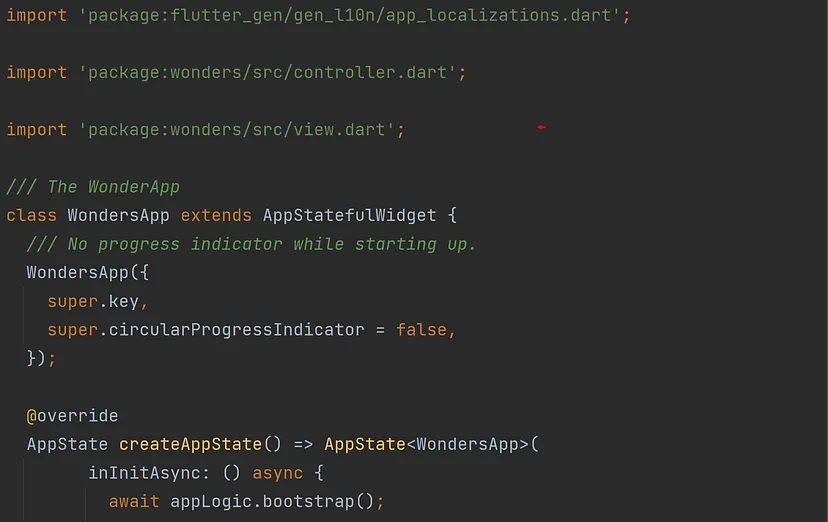
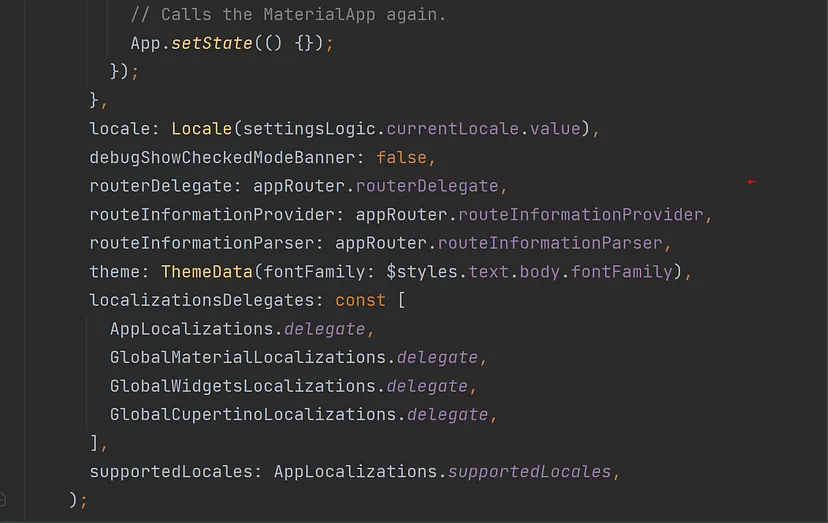
Note, in the second screenshot, the dart file, app. dart, is highlighted by an arrow. It’s another naming convention I follow. The file is under the folder, view, and is named after the app folder. Therefore, you can deduce it contains the ‘Wonderous App’ class passed to the runApp() function. See a screenshot of that file below.
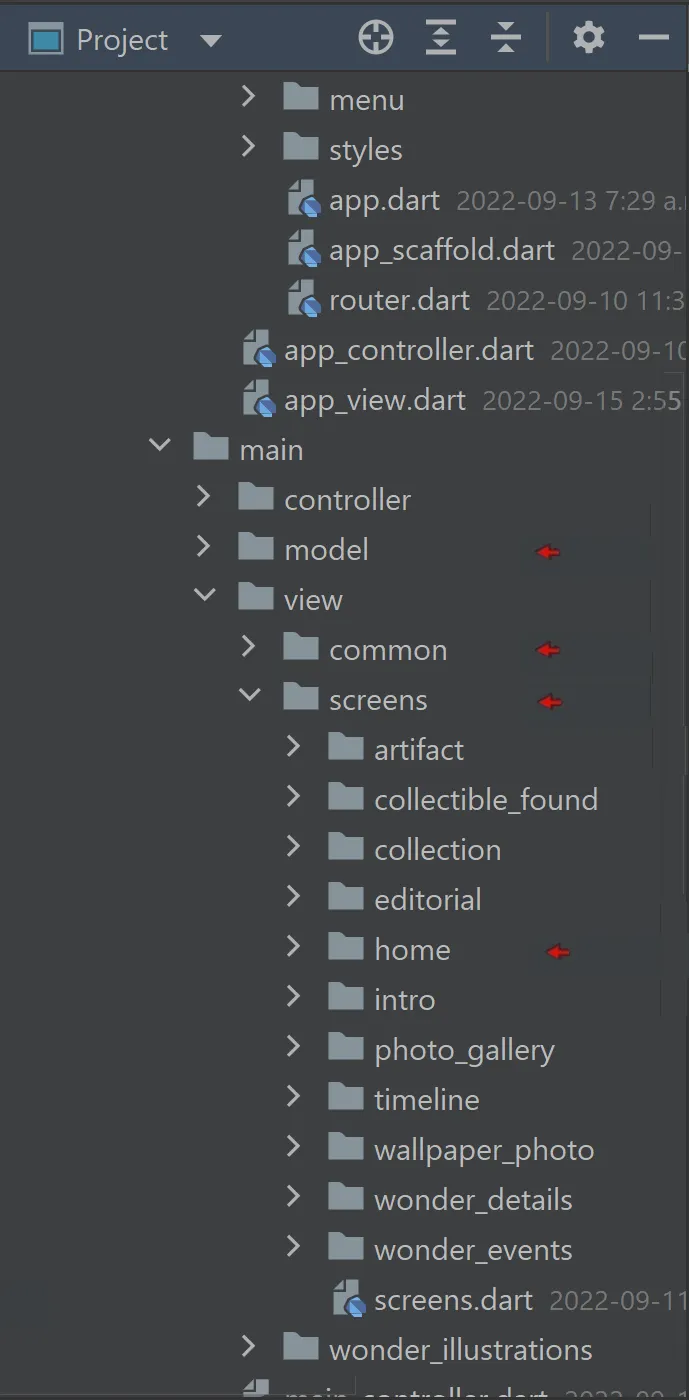
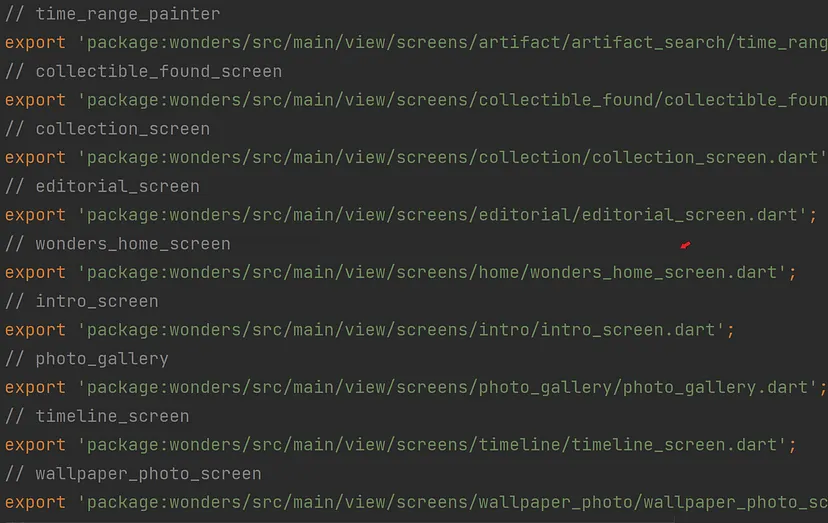
In the third and last screenshot above, you see the contents of the directory, main. At a glance, you know the main screen is working with some data because there’s a folder, model. Further, under its folder, view, you know the app has many individual screens all under a dedicated directory, screens. You can see there are also some ‘common’ interface elements — likely shared among those screens. Lastly, you’d be right if you guessed the directory named, home, contains the first screen that appears when the app starts up.

In the second screenshot below, you’ll see a number of dart files highlighted. Those files contain reams of export statements to then be referenced by the ‘top level’ export files under the src folder. At a glance, you can tell by the file names which files are concerned with the app’s business logic (controller), those concerned with the interface (view), and those with the app’s data (model).
 |
 |
 |
Below are those five export files. The first two are the ‘app level’ export files, app_controller.dart
and app_view.dart. They, of course, reference all the dart files under the folder, app.
The next three are the ‘main screen’ export files, main_controller.dart, main_model.art and main_view.art.
Note the file, screens.dart, referenced in the last one.
It’s the export file for the many screens in this app and is highlighted in the third screenshot above.
The naming convention used here is to name the export file after its parent directory, screens.
If there were additional files in that directory, however,
I would further make that export file distinct with a leading underscore.
In truth, I should have inserted the underscore anyway — making it a consistent naming convention.


By the way, this little exercise of rearranging the files and folders was all done rather quickly
as there were no naming conflicts at all (i.e. different classes with the same name).
Such naming conflicts rarely occur for apps written by one or more developers.
Simply put, when working on a project, we developers tend not to give classes we create duplicate names
— a phenomenon I’ve observed in my own experience.
Of course, when using third-party library packages, there may be conflicts but we can address that
with the importarguments,hideand show.
(See ‘Importing only part of a library’)
As you know, when the app starts up, the HomeScreen StatefulWidget is presented to the user every time. Let’s follow the import and export statements from the StatefulWidget, WonderousApp, at the start of the app back to the very source code file, wonder_home_screen.dart, that contains the class, HomeScreen. You can see below where that class lives:
wonderous/lib/src/main/view/screens/home/wonders_home_screen.dart
The sequence of screenshots reveals how the import statement listed below gives you access to every class that’s concerned with the app’s interface. Very clean and concise.
import 'package:wonderous/src/view.dart';
With that, most of your source code will have only three import statements:
import 'package:wonderous/src/controller.dart';
import 'package:wonderous/src/model.dart';
import 'package:wonderous/src/view.dart';
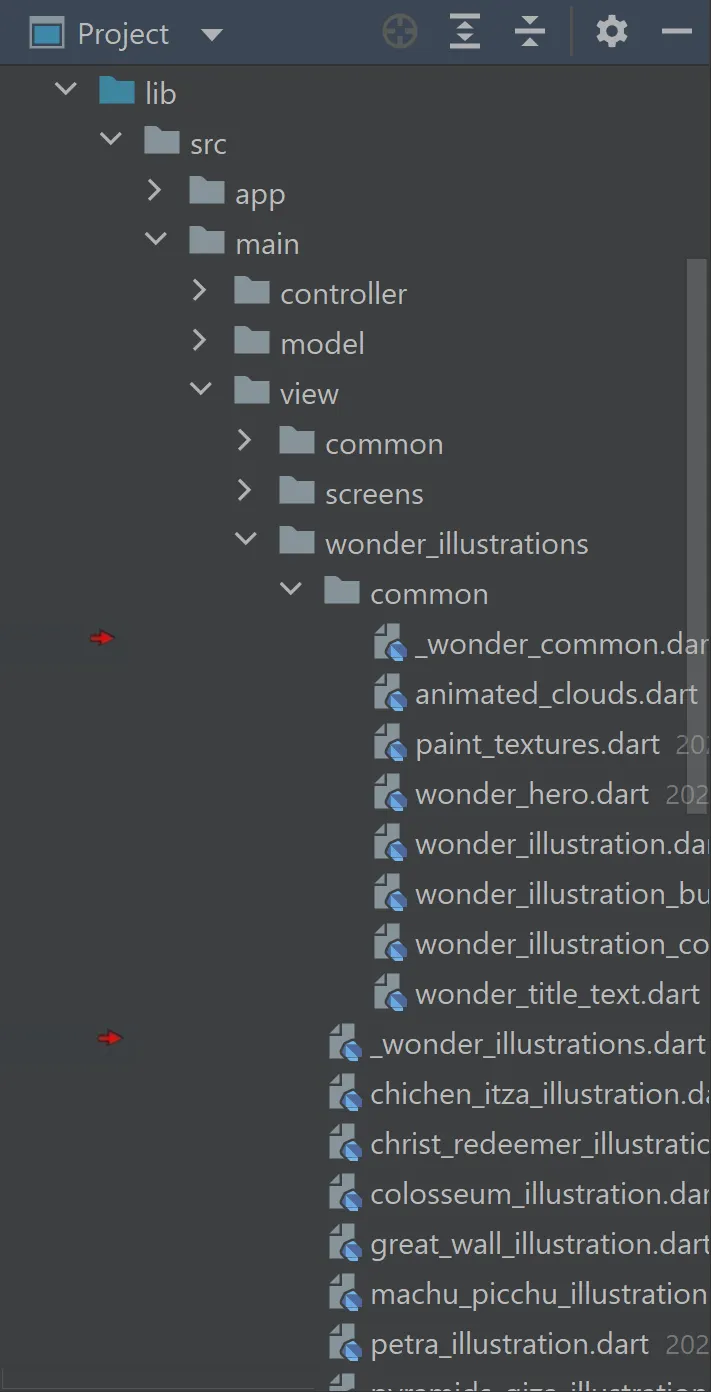
Below are three more export files highlighted with red arrows. Note, each file name begins with an underscore as I wanted such files to be listed first in a directory full of dart files. At a glance, you can deduce they’re export files likely listing the files and folders that accompany them.
In fact, to retain consistency, the screens.dart export file I introduced earlier has been renamed in the repository. You’ll find it too now begins with an underscore: _screens.dart. Consistency.
| _common_view.dart | _wonders_data.dart | _wonder_illustrations.dart |
|---|---|---|
 |
 |
 |
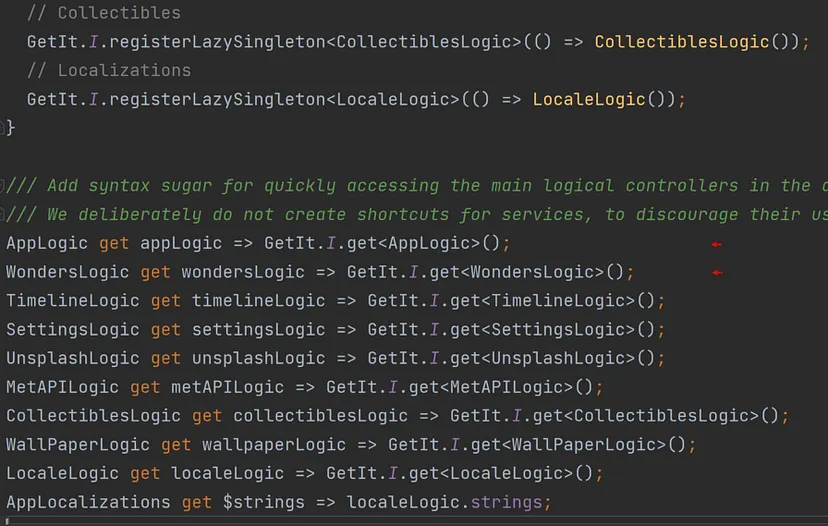
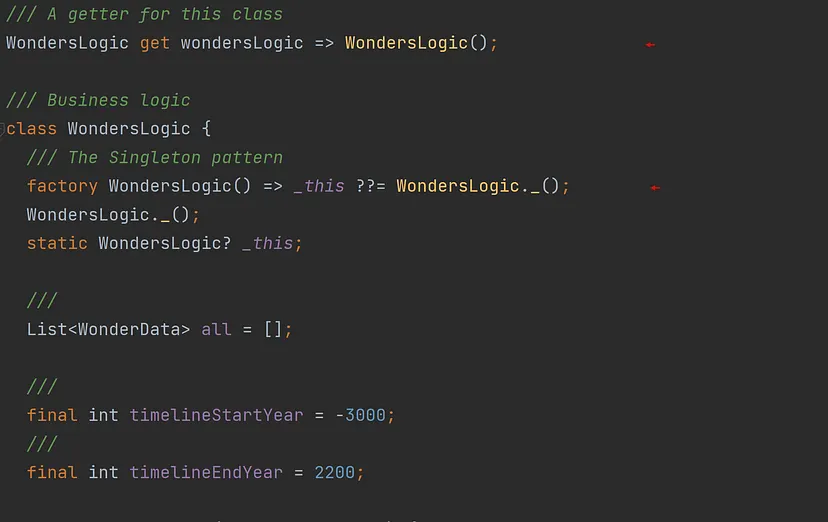
The first screenshot below is the main.dart file found in the original version. At the end of that file, it defines all the getters used in this app. I felt a better approach would be to define each such getter in the same file as where the class they reference also resides. Again, a more modular approach. See the alternative approach in the next two screenshots below.

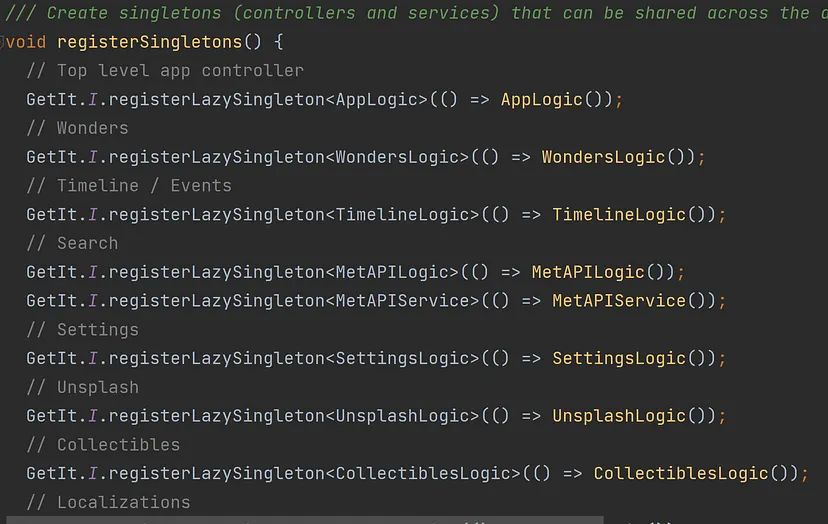
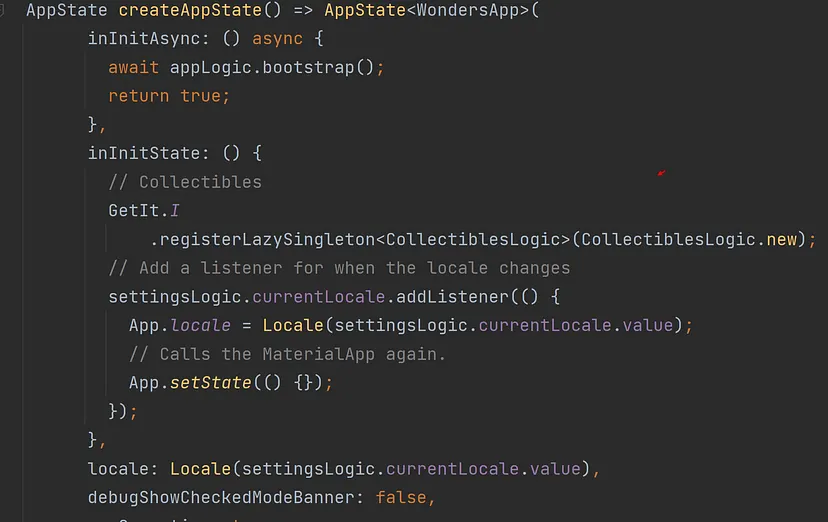
If you’ve run the original app, you’re aware of the screen logo that first comes up and is displayed until the app is ready to proceed. This all happens in its main() function. See the first screenshot below. Things are registered and initialized in the registerSingleton() function and in the bootstrap() function. In the alternate version (second screenshot below), I’m utilizing the Fluttery Framework and taking advantage of its ‘inline’ function called, inInitAysnc(), to perform the ‘boot strap’ operations before the app is ready to proceed.
| main.dart | app.dart |
|---|---|
 |
 |
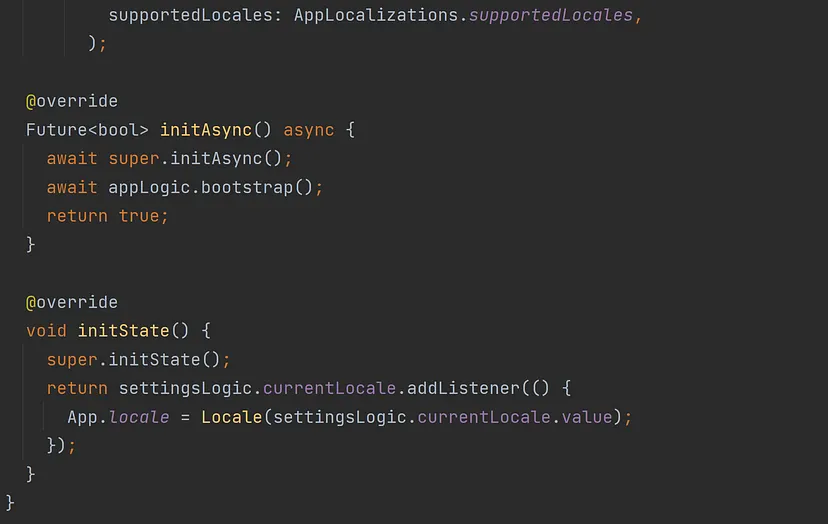
Like any good framework, the Fluttery Framework allows you options. In the first two screenshots below, for example, the framework allows you to instead override the initAsync() and initState() functions to implement what’s in the inline functions above. Heck! You can implement all the parameter values in functions if you want. See the third screenshot below. Why would you? There may be circumstances where some values are drawn from complicated formulas, remote sources, or complicated routines — all requiring a function. That’s why. Love options.
| app.dart | app.dart |
|---|---|
 |
 |
| app.dart |
|---|
 |
As for the reisterLazySingleton() function, it’s used once in the alternate version. As you can see in the second screenshot below, it’s all commented out. I felt it was excessive and indeed lazy. A factory constructor for each ‘Logic’ class would be a more efficient and effective approach. ‘Keep it Flutter’, I always say. Note, the CottectiblesLogic class continues to be registered in the ‘inline’ function, inInitState(). See the third screenshot below. Although I’ve come to realize it’s really not necessary — the ‘reset collectibles’ feature could be implemented in another manner, but that’s for another time.
| main.dart | main.dart |
|---|---|
 |
 |
| app.dart |
|---|
 |
I will again unabashedly promote the use of this framework as it’s designed to ‘Keep it Flutter’ during development. Unlike certain others out there frankly, this framework’s implementation and how it’s used will be readily recognizable to any developer who’s at all familiar with Flutter. It’s a framework that provides what I saw was lacking in the other frameworks or architectures. For example, error handling is emphasized, as well as a means to present either the Cupertino interface or the Material interface at runtime is readily available to you. Another characteristic seen lacking was a design pattern. In this case, one that acknowledges the three aspects present in nearly every computer program: an app’s interface, an app’s data, and an app’s business logic or event handling. That alone makes for more proficient software development and maintainability.
The app has a modest Localization feature allowing you to switch between English and simplified Chinese. The little tab initially labeled English is represented by the StatelessWidget, LocaleSwitcher. The get_it package is used ‘to watch’ the app’s Locale for any changes and calls the StatelessWidget’s build() function (rebuilding that widget again) if and when the current Locale is changed. See the first screenshot below.
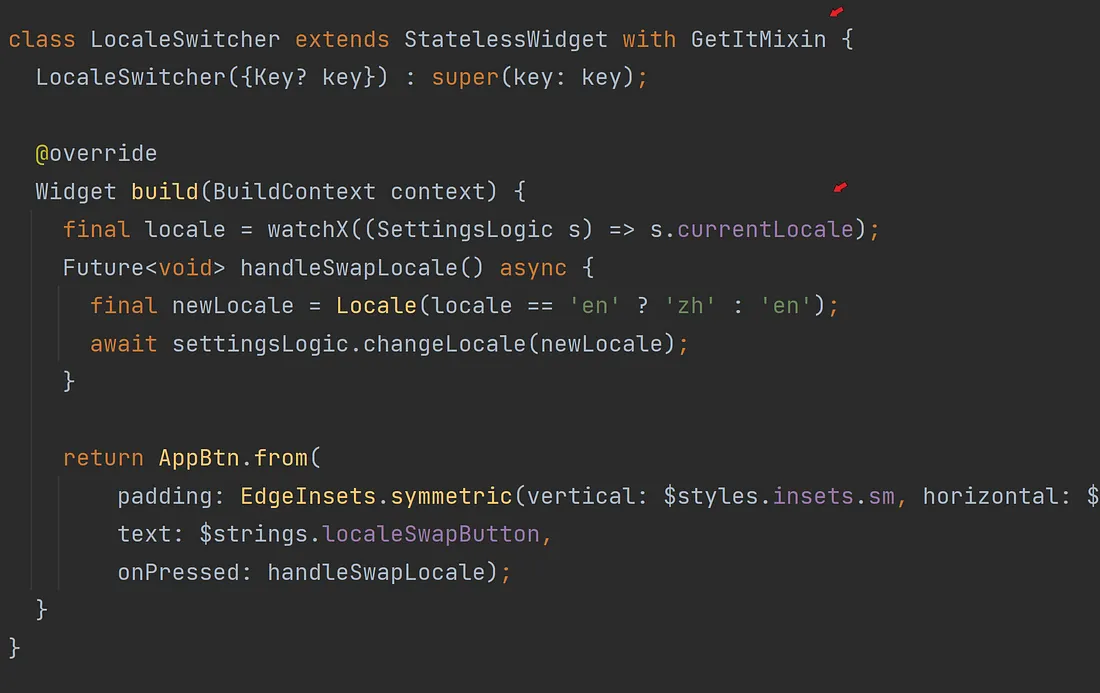
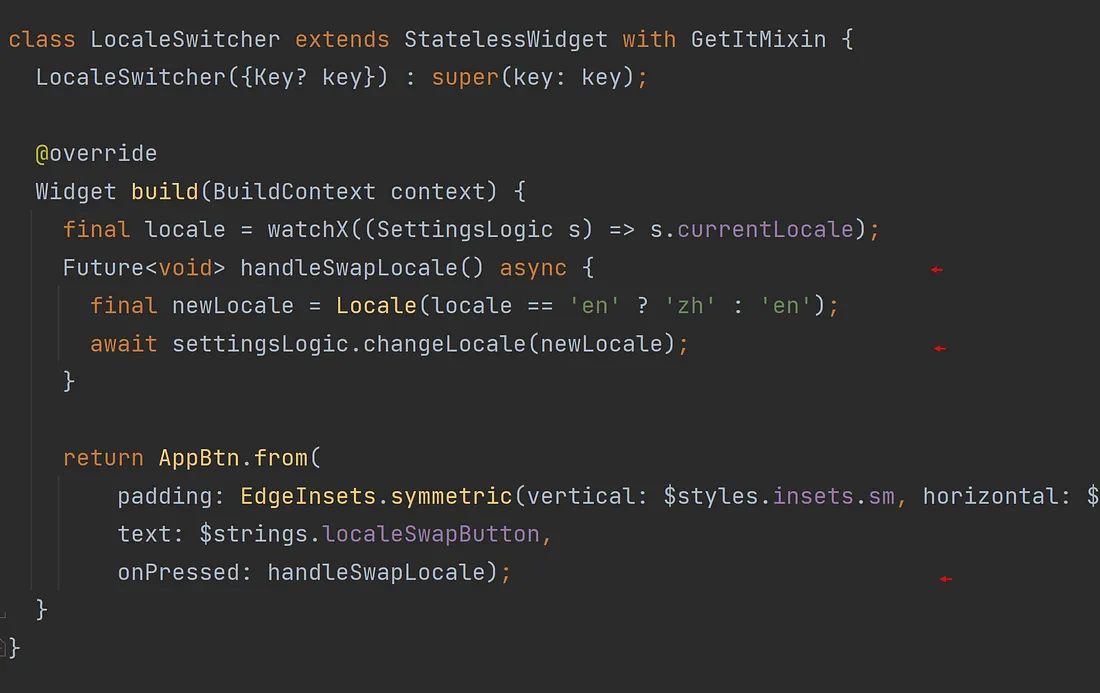
When you tap on that tab, the function, handleSwapLocale(), is called (see second screenshot above) and, in turn, calls the following function in the ‘Settings Logic’ class to indeed change the app’s current Locale:
await settingsLogic.changeLocale(newLocale);
Contrary to its intended design, the state of a StatelessWidget is changed.
Again, this is possible with the get_it package.
However, it’s certainly not ‘keeping it Flutter’ when you override a StatelessWidget’s element class
and call its function,markNeedsBuild(), to notify Flutter there’s a change in its state.
The Flutter documentation makes no mention of this approach, and I have taken the position that’s because it’s not an endorsed approach.
The documentation keeps it to the setState() function when it comes to updating an app’s interface after a change
— It’s the setState() function after all that eventually calls the markNeedsBuild() function; not you.
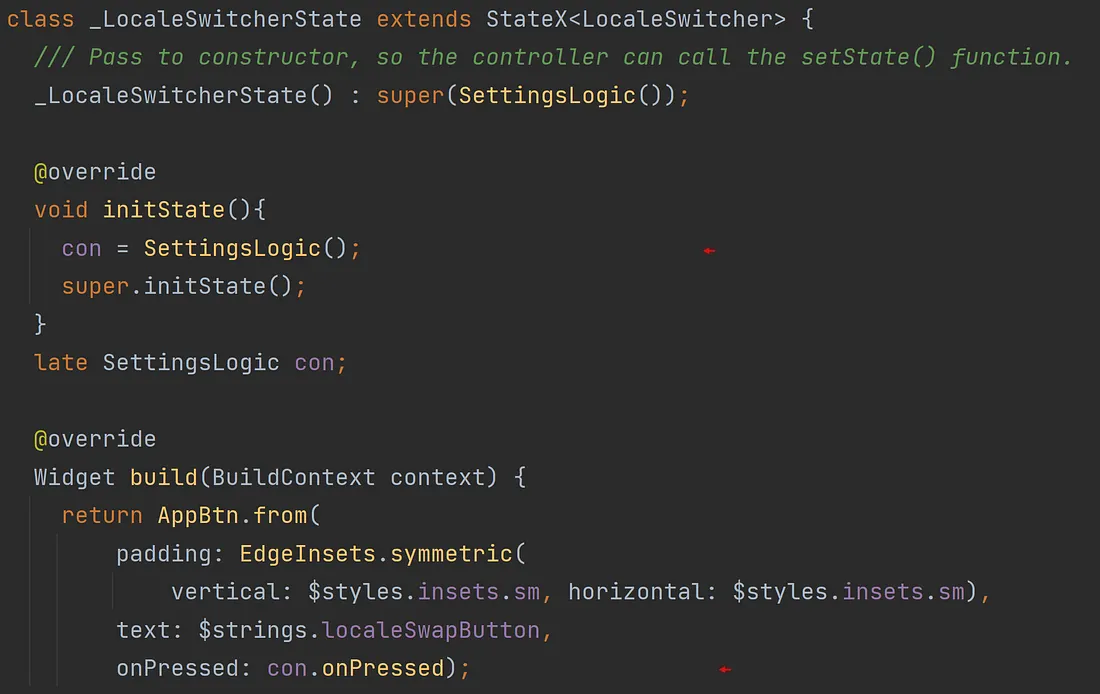
No, changing ‘the state’ or the value of a widget during an app’s lifetime means a StatefulWidget is to be used and not a StatelessWidget. Besides, doing so, you can then take advantage of a SOC (State Object Controller) when using the Fluttery Framework. In the first screenshot below, the StatelessWidget is now a StatefulWidget in my version of the Wonderous app. It uses the class, StateX, that comes from the Fluttery Framework to ‘extend’ Flutter’s original State class — hence the ‘X.’
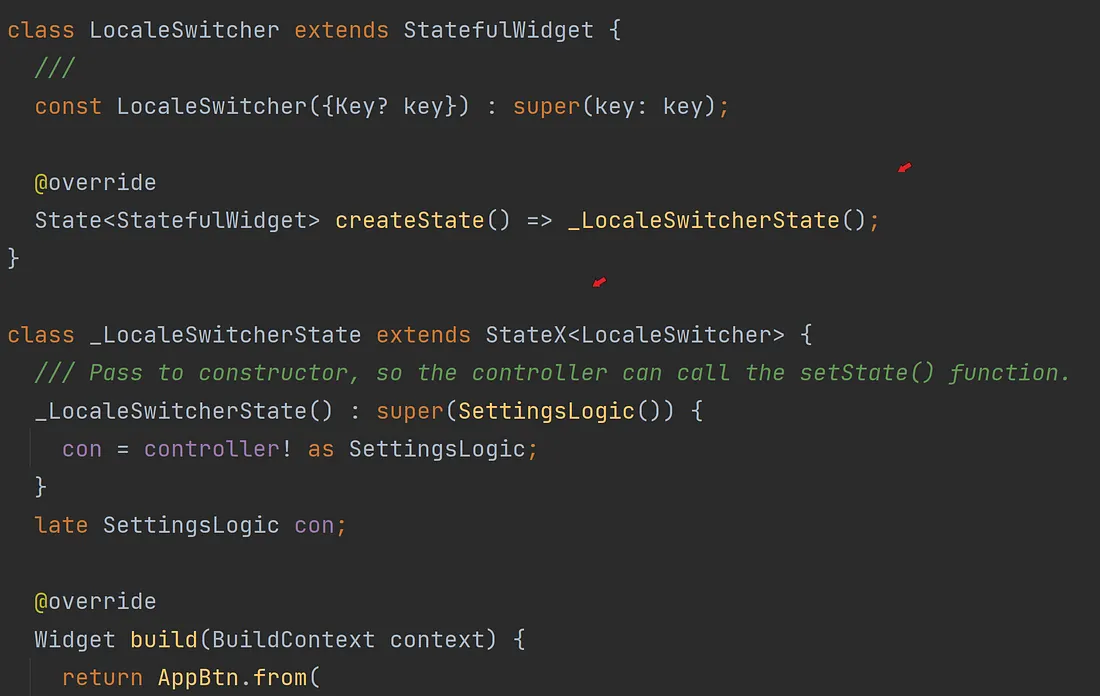
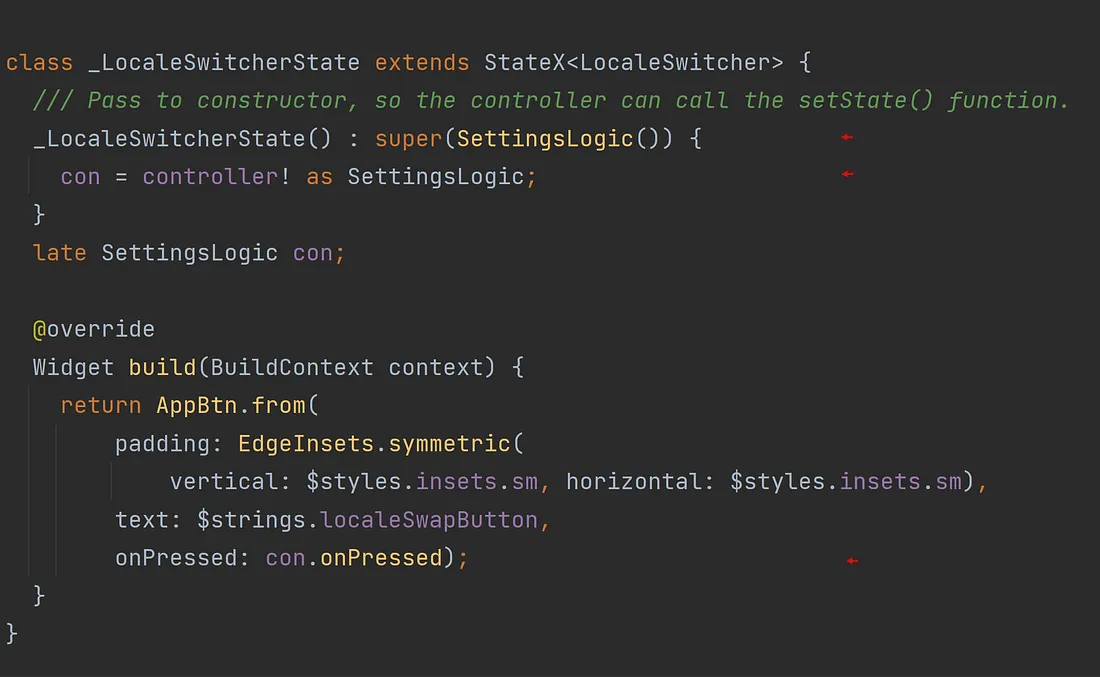
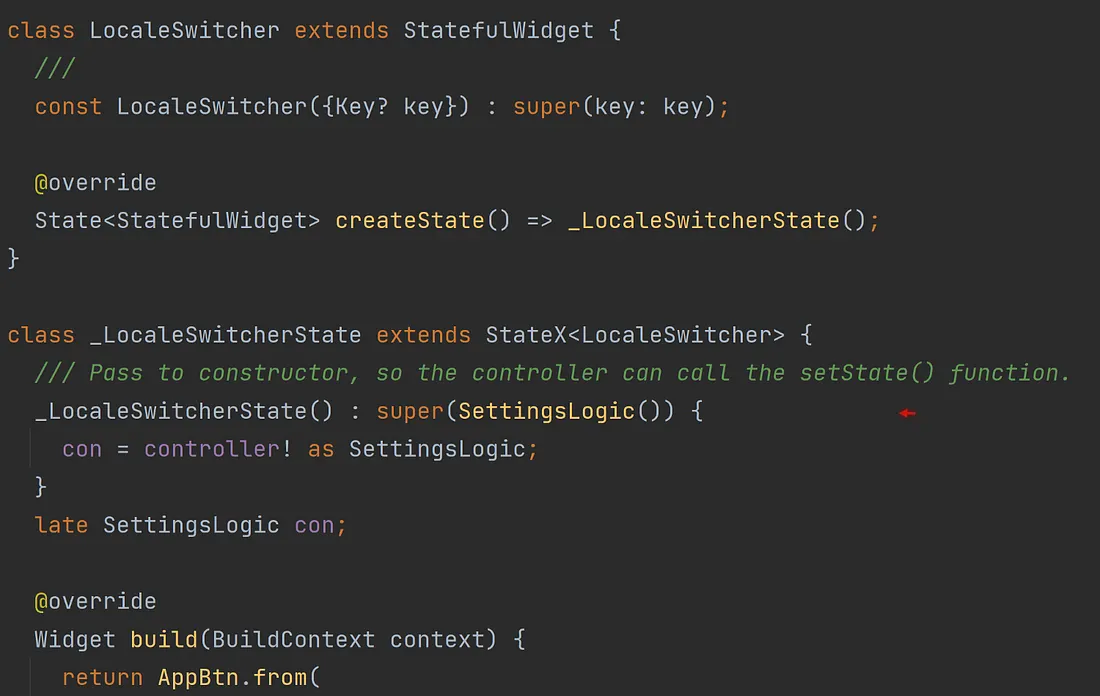
The second screenshot above is the same screenshot as the first, but instead highlights the State Object Controller, SettingsLogic. It’s being instantiated and passed to the super constructor. That controller is then retrieved in that class’s own constructor and assigned to the variable, con. This allows the function, onPressed(), found in that controller to be called whenever that tab is tapped on.

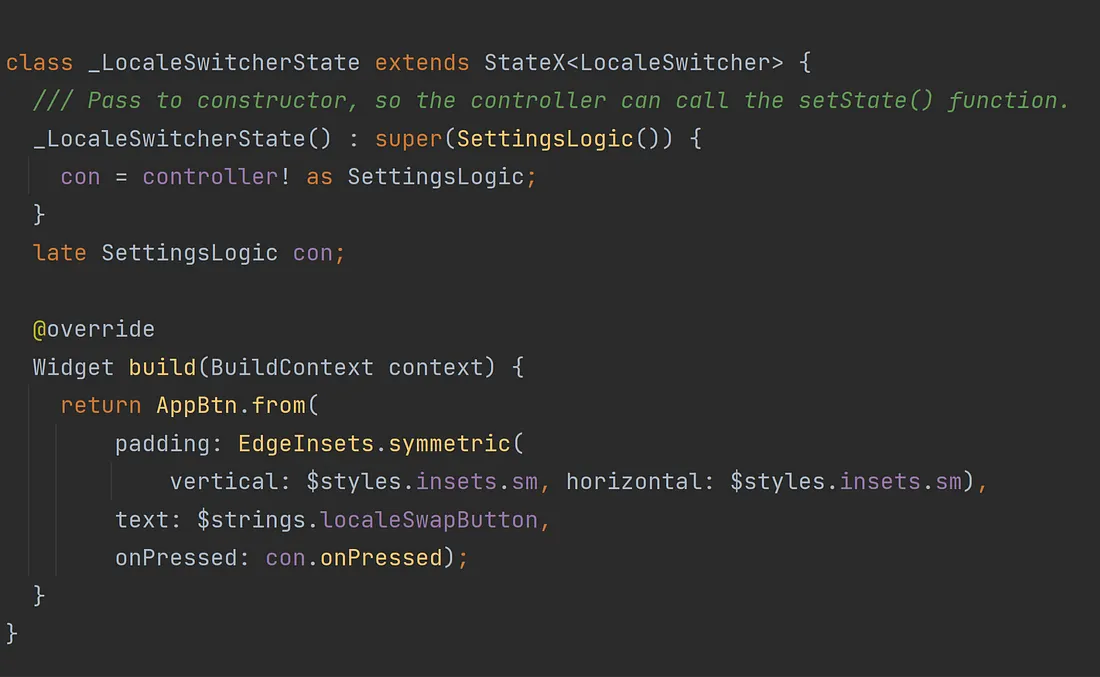
Do you see the differences between the two screenshots above?
See the clear separation of responsibilities between the original LocalSwitcher class
and the new LocalSwitcher class in the second screenshot above?
Note, looking that the new class’ stretch of code you’ve no idea what really happens in the onPressed() function (onPressed: con.onPressed),
and that’s a good thing. Doing so allows for easier maintainability and scalability.
It’s more modular. For example, ten more languages can be implemented tomorrow and not one single character needs to be changed here in that State class to do so.
A very powerful and desirable capability when it comes to writing software.
Further, note how the API between the app’s ‘business rules’ (logic)
and the app’s interface tends to match the name of the parameter receiving the function?
(The function, con.onPressed(), is passed to the named parameter, onPressed.)
It’s a consistent approach following the, ‘Keeping it Flutter’, methodology.
The ‘interface programmer’ will know the name of the function used when that tab is pressed
because the ‘business rules programmer’ will have named it, onPressed.
See what I mean? Such a consistent API approach is excellent when a team is developing the software.
By the way, in keeping with the importance of consistency, that’s the general pattern you’ll see in the Fluttery Framework when utilizing such Controllers in State classes:
The controller is passed to the State’s super constructor, it’s then assigned to a variable (usually named ‘con’) either in the class's constructor or in its initState() function. That ‘con’ variable is then referenced here and there in the class’s build() function or any other function defined in that class. The ‘con’ variable represents the logic/event handling.
It’s the Controller that contains the business logic and performs the event handling while the State object is just concerned with the interface. See what I mean? Granted, there are variations in how and when the Controller is assigned to a variable, but that’s the general pattern.
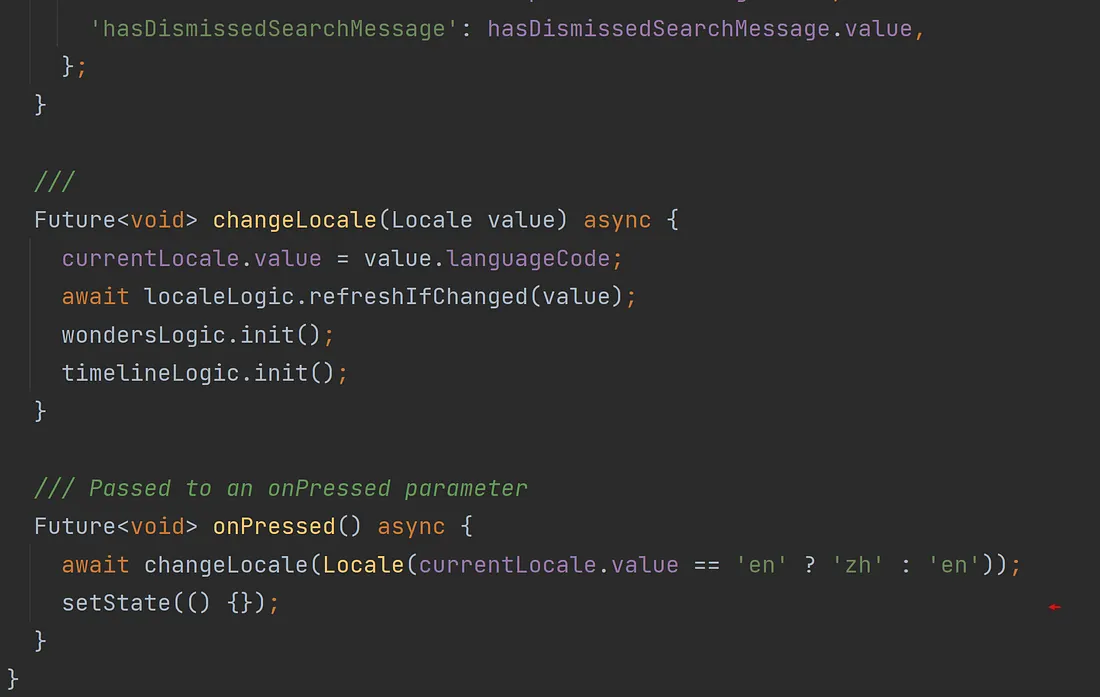
Let’s now take a look at the class, SettingLogic. It appears in both screenshots below. In the first screenshot, you can see it extends the StatXController class making it a State Object Controller. Further, note this class has a factory constructor. I’ve found, in most cases, it’s advantageous to use a factory constructor in my SOC’s. After all, you want your app’s logic to remain in memory — with only one instance of the Controller class.
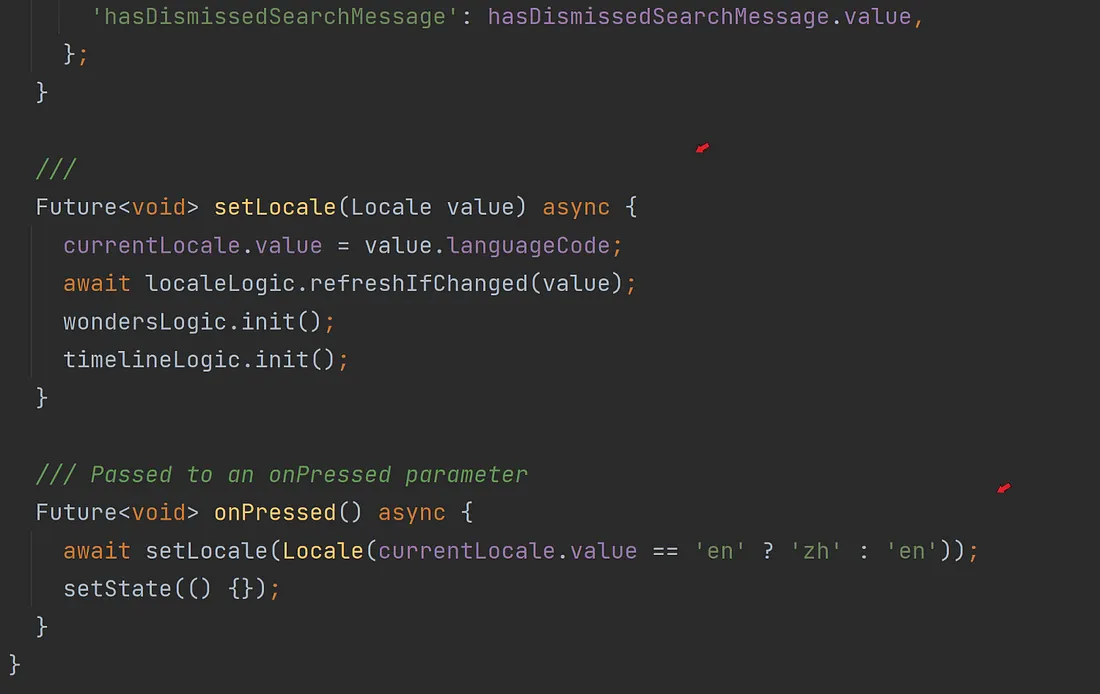
In the second screenshot, the last function listed is the onPressed() function. Note, with such a separation of responsibilities, you don’t even know from the interface side whether the onPressed() function performs an asynchronous operation or a synchronous operation. Again, that’s a good thing. Nor, should you know on the interface side. This allows the logic to be readily adaptive and change, for example, the operation to a synchronous operation at any time without consequence. Powerful stuff.
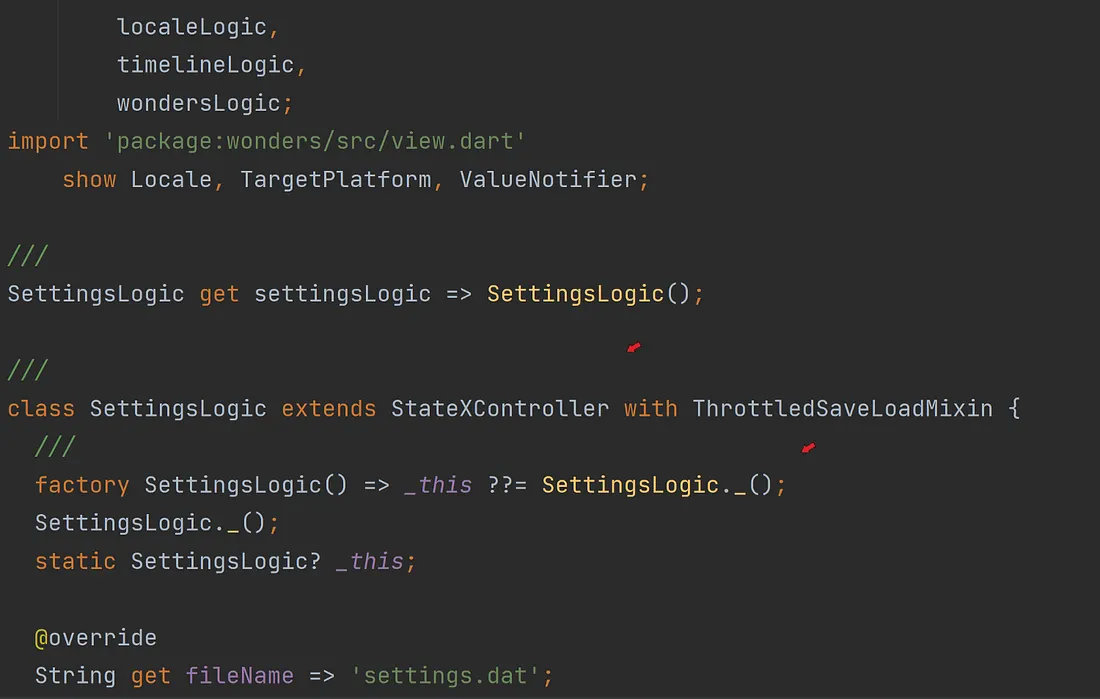
Being a class with a factory constructor, you know there is only one instance of this Controller, SettingsLogic, ever used in the app. That gives you those variations I mentioned earlier as to how a SOC is implemented in any given StateX object. For example, look at the first screenshot below. The control is seemingly instantiated again in the StateX object’s initState() function, but with a factory constructor, it’s not instantiated again. Instead, the original instance is assigned to that memory variable. That variable is then referenced throughout the remaining functions in that class as many times as necessary. By the way, placing such a reference in resident memory allows for a little more optimized performance as well.

Note, in the second screenshot above, the controller is seemingly instantiated every time the tab button is tapped. Again, it’s not. Because there’s just one instance involved, and it’s only referenced again in just one other specific event (if and when the tab is pressed), this is another approach to consider because a factory constructor is used. As a rule, all my controllers follow the Singleton pattern and use a factory constructor.
Passing a StateXController object to a State object’s super constructor (first screenshot below) gives the controller access to all the functions and features in that State object. Now, anything a State object can do, the controller can do as well. Very nice.
Thus, when your controller is ‘registered’ with a State object and its State object’s initState() function is called, its own initState() function will also be called. Anything your controller may need to be initialized, for example, before that widget is displayed can now be done so in its own initState() function. Very nice indeed.
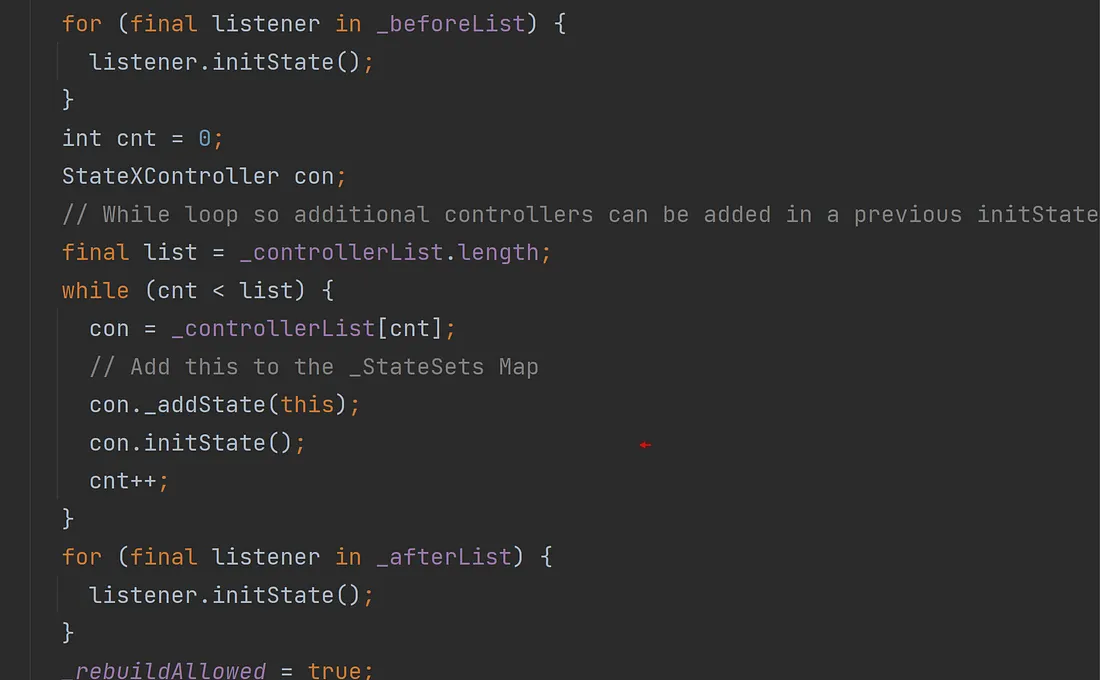
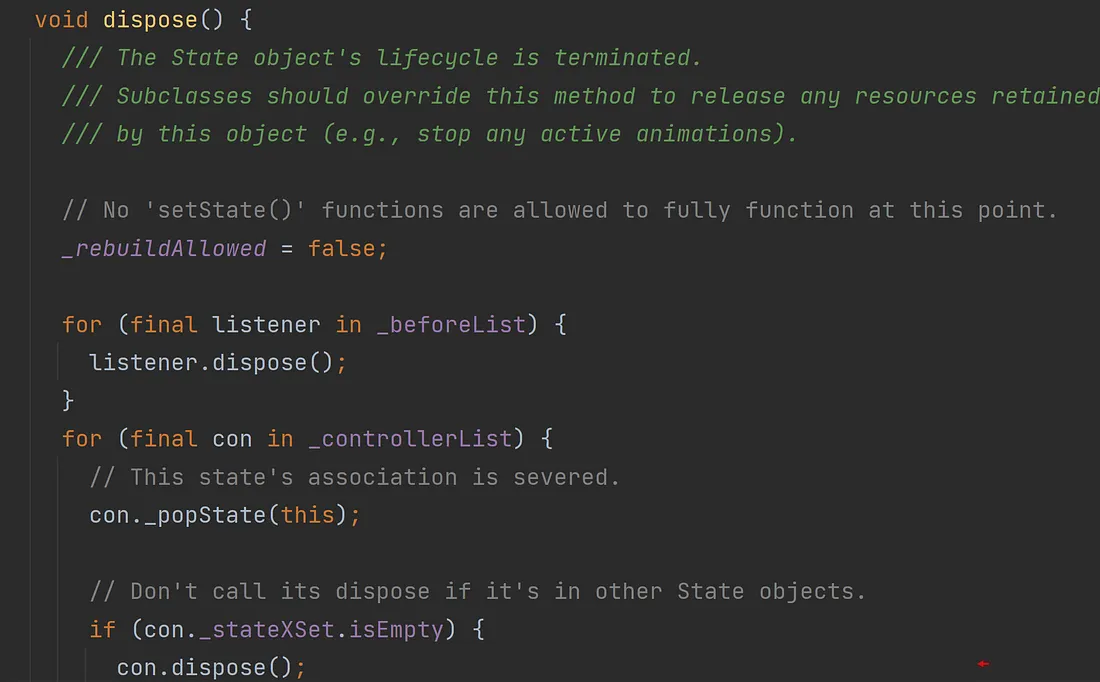
In the screenshot below, the controller, SettingsLogic, has two ‘State event’ functions already implemented: initState() and dispose(). Both are fired by the State object, _LocalSwitcherState .
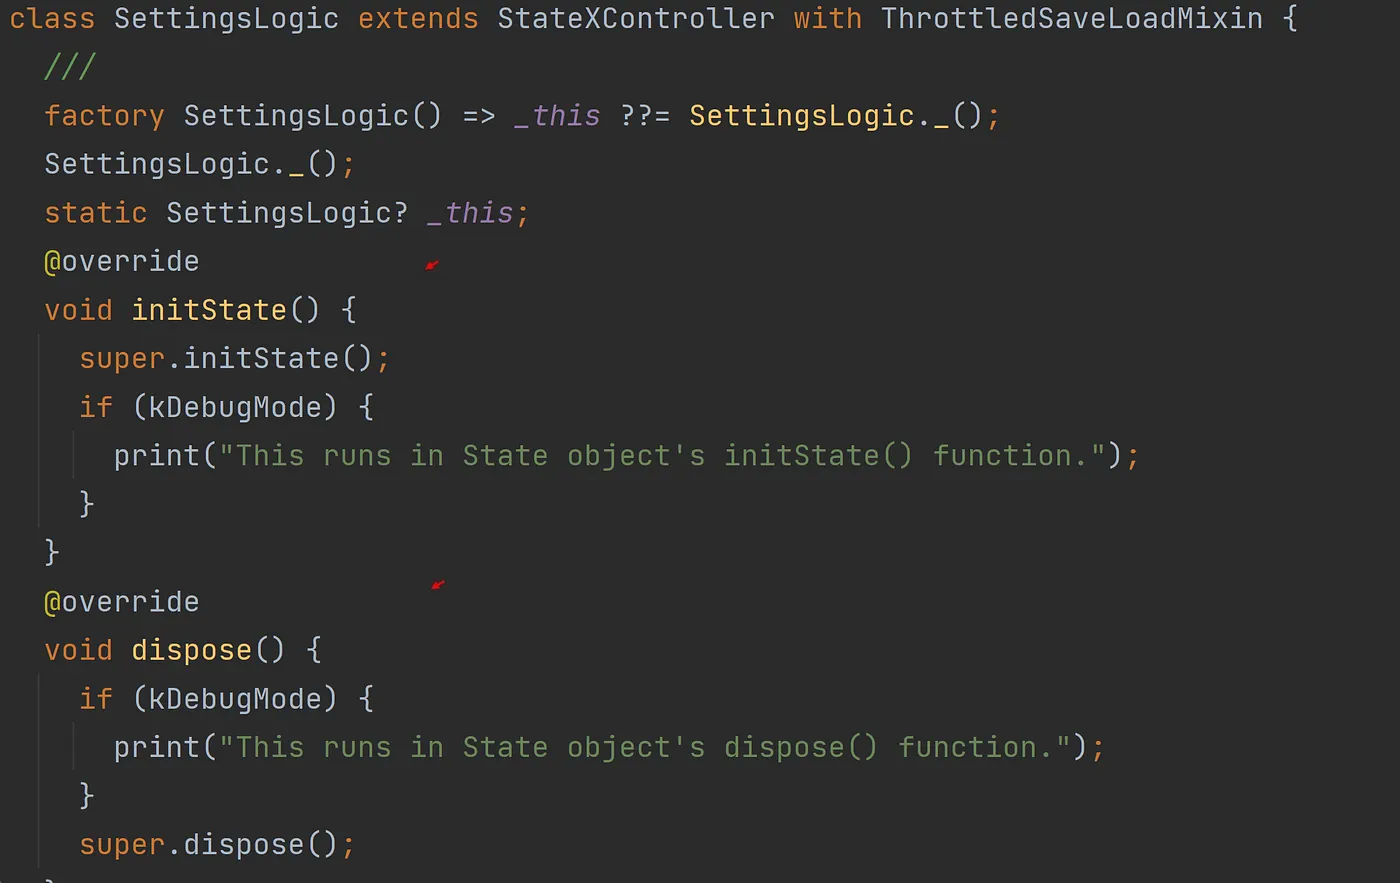
The StateX class object’s corresponding initState() and dispose() functions will call in turn any and all controllers (yes, there can be more than one) that were ‘added’ to them at any one time. See the screenshot below.
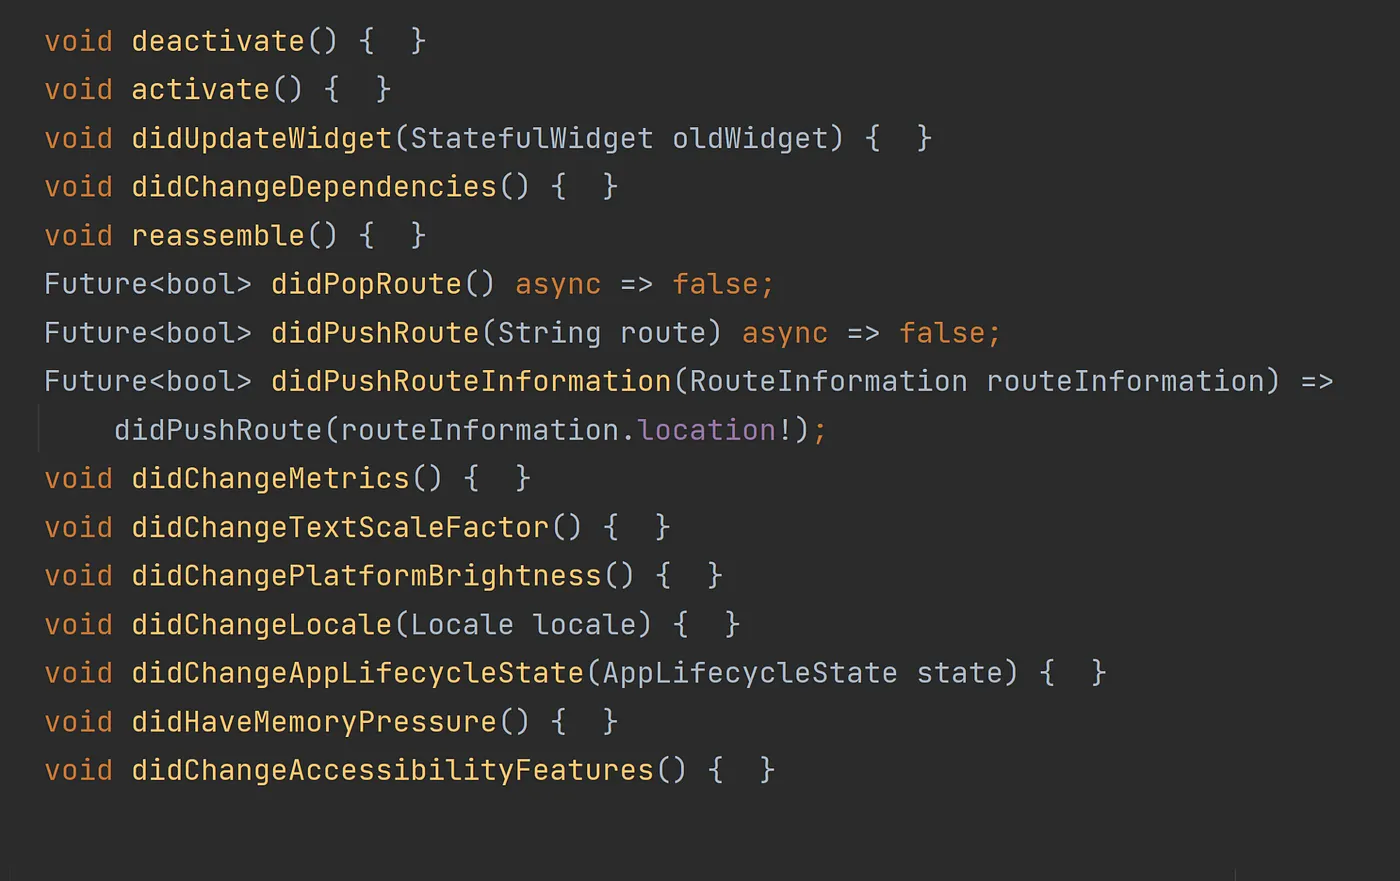
Another 15 other event handlers are available when your controller
is registered to the StateX object.
That’s because it’s added as an observer
(see below) making it ‘aware’ of still more system events that may occur on your host device. For example, when the Locale on the mobile phone changes.
WidgetBinding.instance.addObsever(this);
The screenshot below is a summary of those event functions. Imagine the possibilities in your own flutter apps: