Translation Guide
If you are someone who wants to help translate this mod in a non-english language, then you've come to the right place! For those who don't know how GitHub works or what Pull Requests are, it can seem a bit confusing, which is why this guide exists. It will give you a step by step process on how to help translate this mod!
For those of you who do know what said things are, then all that is requested is that you make translation changes in a PR to this main repo.
If you do not have a Github account, then you'll need to make one. This is the most important step. It's entirely free, and this method revolves entirely around it. Once you've made a Github account (and verified your email), you can move on to the next step.
If you already have a Github account, great! You can move on to the next step.
Now, you're going to be making what's called a fork of the LWM Repository. Basically, it's a copy of the entire mod for your own use (within the constraints of the license, but you don't need to worry about that), and you can freely modify it. This free modification ability is the crux of the translation process; you are going to add/make changes to the localization files, then basically "request" your changes be made to the actual repository.
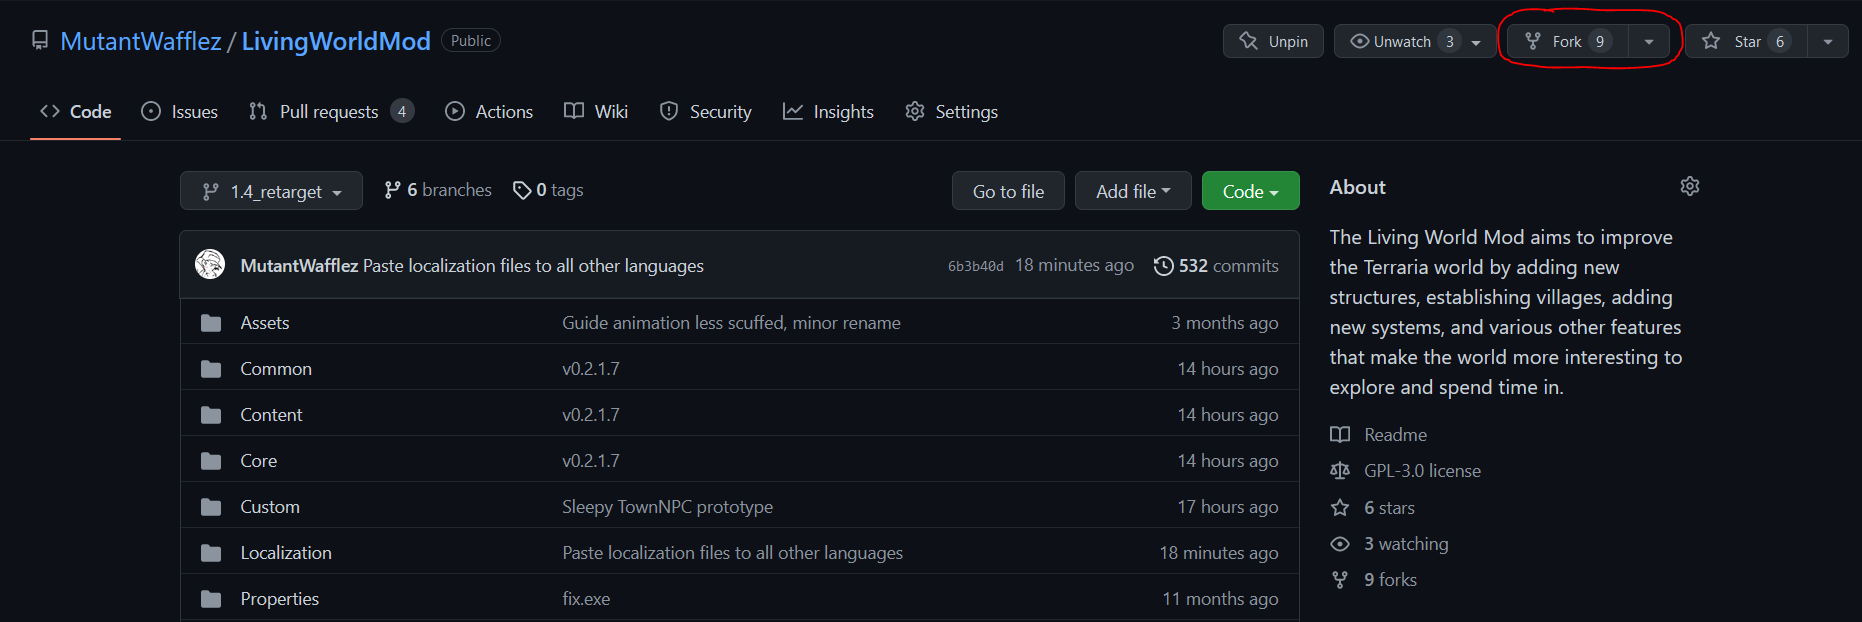
That being said, how do you make a fork? Simple: Head over to the main respository here while signed in with your Github account, and click the "Fork" button in the top right corner:
You'll then see a page with a couple questions: you don't need to worry about any of them for the purposes of translation, simply head to the bottom and the click the Create fork button.
Github will then take a little while to create the fork and put it on your account. Once it's done, it will then take you to your new fork, and you can now start the translation process!
Now, it's time for the actual translation process!
Once you've created a fork, head to the Localization folder, then to the language you want to translate for.
The Localization folders are based on how vanilla Terraria organizes them. Here's a Key for you if you can't figure it out:
de-DE: German
es-ES: Spanish
fr-FR: French
it-IT: Italian
pl-PL: Polish
pt-BR: Brazilian Portugeuse
ru-RU: Russian
zh-Hans: Simplified Chinese
So, say you wanted to translate to German: You'd go into the Localization folder, then to the de-DE folder.
Once you're in that folder, you should see a lot of files that end with .hjson extension. These are all of the files that contain the actual translations! You'll need to go through each of these files and translate anything WITHIN quotation marks into the language in question!
In order to edit the file on your fork, first you have to open up the file. After the file is opened, you have to click the pencil icon to the top right:
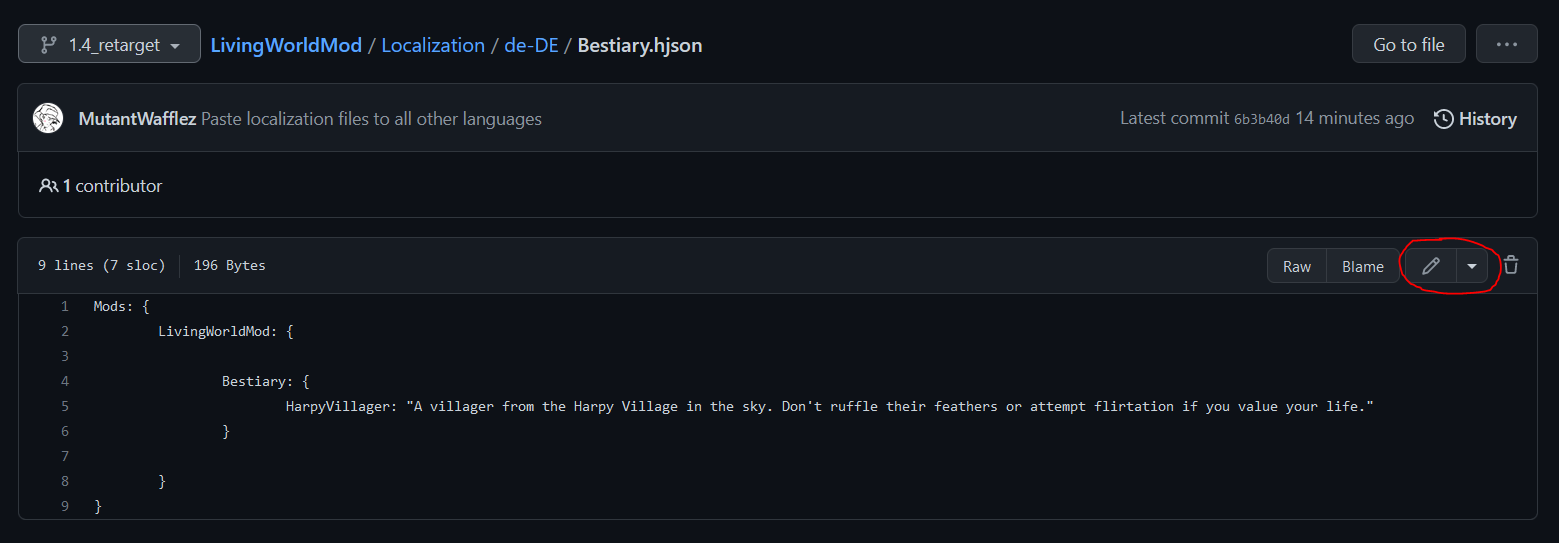
Once you've done this, you should be freely able to change the contents of the file. This is where you get to translating!
Remember: ONLY modify the stuff WITHIN the quotations marks ("")! Do NOT remove the quotation marks or touch anything else.
Once you've finished with everything in the file, move to step 4.
Once you've finished translating the file, you'll need to actually commit the changes, which basically means you are saving the changes to the website.
In order to do this, you need to scroll to the bottom of the page. Down there, you'll see a couple text boxes and options. You don't need to modify the first two boxes. All you have to do is click the Propose Changes button!
Then, you'll be sent back to your fork's front page. Simply repeat steps 3 and 4 for each file within the language folder, and once they're all done, move to step 5.
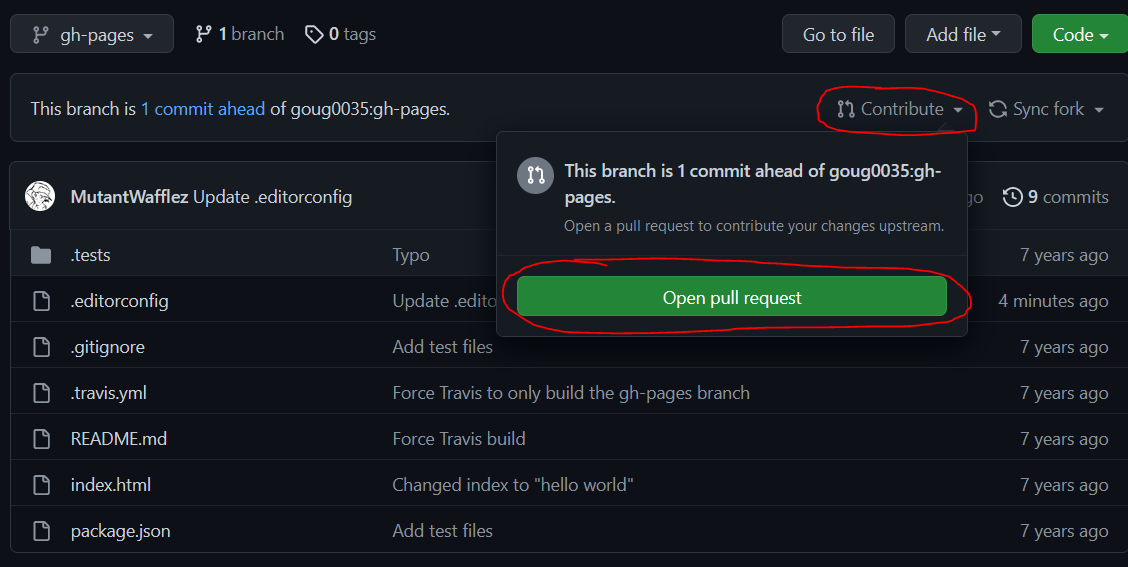
Once you're done translating all the files, you actually need to "request" to have your changes added to the real repository. This is very simple: you'll see a little message on the main code page that says "This branch is {number} commit(s) ahead of 1.4_retarget." If you see this, this is basically just how many changes you've made in comparison to the real repository.
To actually make a pull request, simply click the on the Contribute button, then the Open Pull Request button, like so:
Then, you'll be taken to the Pull Request page. Title it as such: "{Language} Translation." For example, if you're translating to German, it should be titled "German Translation." Like so:

Once titled, simply click the the Create Pull Request button, and everything on your side is done! Try to let one of the developers know you've made a pull request, so we can review it and get it reviewed as soon as possible.
###The End
Thanks for your contribution to the mod! It is greatly appreciated, and hopefully this guide was clear on the process. Thanks!