AutoDS Agent is a powerful multi-agent system designed to automate end-to-end data science workflows. From data exploration to model training and report generation — let AI agents handle the heavy lifting.
🚀 Quick Start • ✨ Features • 📖 Documentation • 🤝 Contributing
AutoDS Agent orchestrates multiple specialized AI agents that collaborate to complete complex data science tasks. Simply describe your goal in natural language, and watch the agents plan, execute, and deliver results.
User Goal: "Analyze the sales data and build a prediction model for next quarter"
    ↓
[Deep Research Agent] → Background research & task understanding
    ↓
[Planner Agent] → Creates step-by-step execution plan
    ↓
[Selector Agent] → Routes tasks to appropriate specialists
    ↓
[Code Agent] ← [Analyst Agent] ← [Memory Agent]
    ↓
[Report Agent] → Generates comprehensive final report
- Deep Research Agent — Conducts background research using web crawling and search
- Planner Agent — Breaks down complex goals into actionable steps
- Selector Agent — Intelligently routes tasks to specialized agents
- Code Agent — Writes and executes Python code for data processing & ML
- Analyst Agent — Provides statistical analysis and insights
- Memory Agent — Maintains context across the workflow
- Report Agent — Generates detailed Markdown reports
- Natural language goal input
- Real-time execution streaming
- Human-in-the-Loop (HITL) interaction for critical decisions
- Collapsible step details with progress tracking
- Clean, responsive design with dark/light mode
- 5-stage visual progress indicator
- Integrated file manager with preview capabilities
- Configuration panel for runtime adjustments
- Support for multiple LLM providers (Ollama, OpenAI, etc.)
- Per-agent model customization
- Configurable features (Deep Research, Search, HITL)
- Easy deployment with Docker or local setup
- Python 3.10+
- Node.js 18+
- Ollama (recommended) or other LLM provider
# Clone the repository
git clone https://github.com/your-org/autods-agent.git
cd autods-agent

# Set up Python environment
python -m venv .venv
source .venv/bin/activate  # On Windows: .venv\Scripts\activate
pip install -r requirements.txt

# Install frontend dependencies
cd frontend
npm install
cd ..Option 1: One-Click Start
./start.shOption 2: Manual Start
# Terminal 1: Start backend
cd src
python server.py
# Backend runs at http://localhost:8000

# Terminal 2: Start frontend
cd frontend
npm run dev
# Frontend runs at http://localhost:3000- Open
http://localhost:3000in your browser - You'll see the welcome screen with example tasks
- Click an example or type your own goal
- Press Enter and watch the agents work!
Edit src/agent_config.yaml to customize:
defaults:
  provider: "ollama"
  model_id: "qwen2.5:14b"
  host: "http://localhost:11434"

enable_search_tool: false
enable_hitl: true
enable_deep_research: true

agents:
  planner:
    provider: 'ollama'
    model_id: 'qwen2.5:14b'
  code_agent:
    model_id: "qwen2.5-coder:14b"
# ... more agent configurationsWhen HITL is enabled, the system will pause for human approval at critical points:
- Watch for yellow-highlighted prompts in the chat
- Type your response (e.g.,
approve,reject, or custom input) - Press Enter to continue
- Click 📁 in the top-right to open the file manager
- Upload data files to the workspace
- Preview, download, or delete generated files
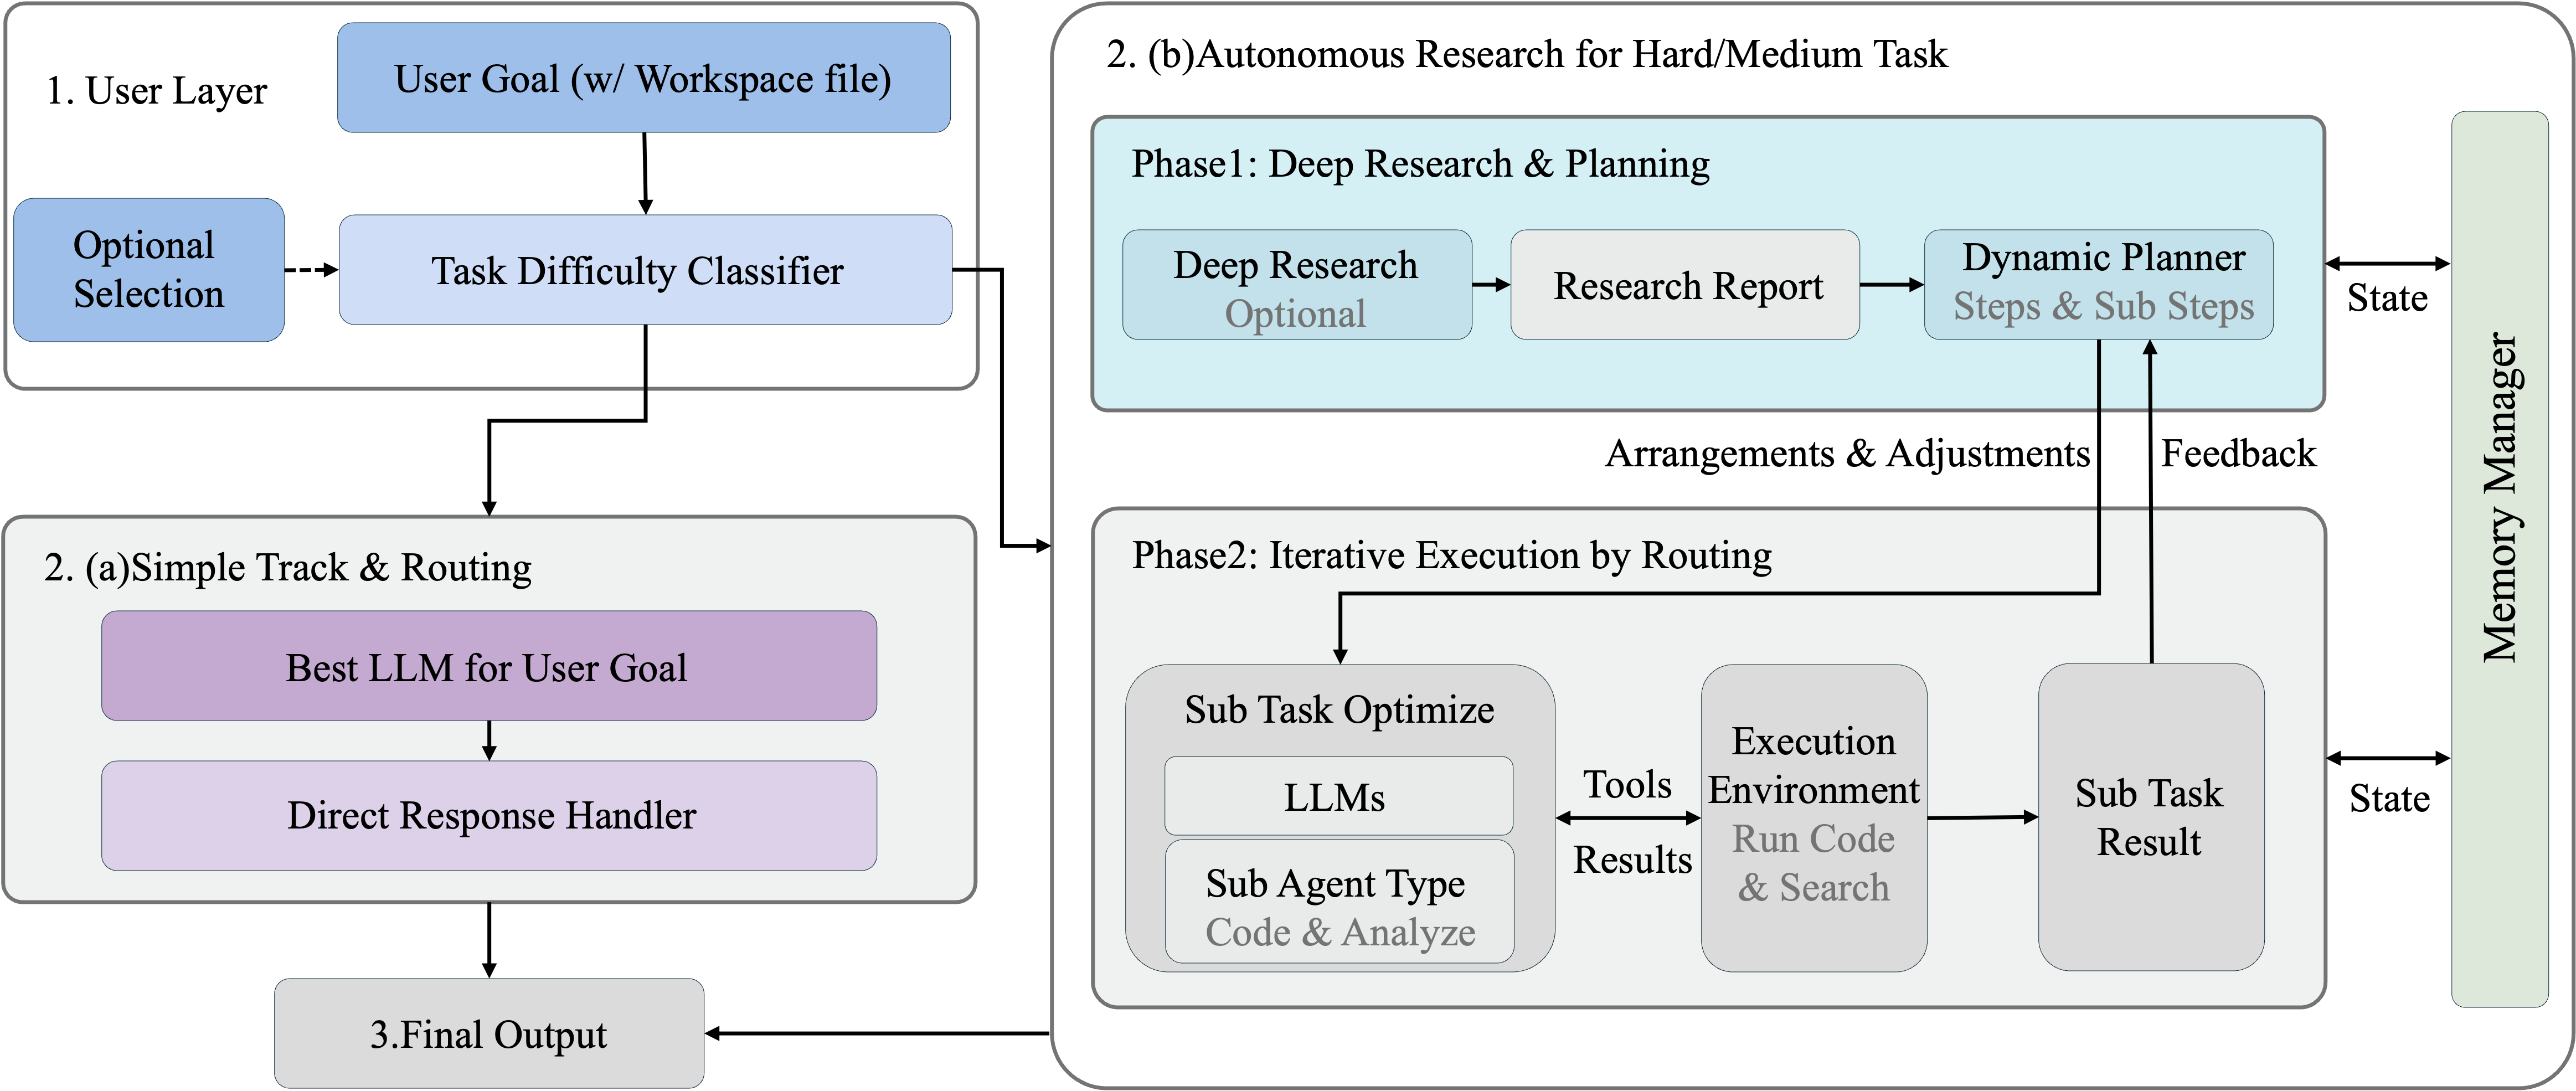
The system follows a hierarchical agent architecture:
| Component | Description |
|---|---|
| AgentSystem | Main orchestrator coordinating all agents |
| Deep Research | Pre-planning research phase (optional) |
| Planner | Goal decomposition and task planning |
| Selector | Dynamic task routing based on requirements |
| Executors | Code, Analyst, Memory agents for task execution |
| Reporter | Final report generation and summarization |
We welcome contributions! Please feel free to submit issues and pull requests.
- Fork the repository
- Create your feature branch (
git checkout -b feature/amazing-feature) - Commit your changes (
git commit -m 'Add amazing feature') - Push to the branch (
git push origin feature/amazing-feature) - Open a Pull Request
This project is licensed under the MIT License - see the LICENSE file for details.
AutoDS Agent 是一个强大的多智能体系统,专为自动化端到端数据科学工作流而设计。从数据探索到模型训练再到报告生成——让 AI 智能体为您完成繁重的工作。
只需用自然语言描述您的目标,智能体们就会自动规划、执行并交付结果。
- 深度研究智能体 — 通过网络爬取和搜索进行背景研究
- 规划智能体 — 将复杂目标分解为可执行的步骤
- 选择智能体 — 智能地将任务路由到专业智能体
- 代码智能体 — 编写和执行 Python 代码进行数据处理和机器学习
- 分析智能体 — 提供统计分析和洞察
- 记忆智能体 — 在工作流中维护上下文
- 报告智能体 — 生成详细的 Markdown 报告
- 自然语言目标输入
- 实时执行流式输出
- 关键决策点的人机协作 (HITL) 交互
- 可折叠的步骤详情和进度追踪
- 简洁响应式设计,支持深色/浅色模式
- 5 阶段可视化进度指示器
- 集成文件管理器,支持预览功能
- 运行时配置调整面板
- 支持多种 LLM 提供商(Ollama、OpenAI 等)
- 每个智能体可独立配置模型
- 可配置功能开关(深度研究、搜索、HITL)
- 支持 Docker 或本地部署
- Python 3.10+
- Node.js 18+
- Ollama(推荐)或其他 LLM 提供商
# 克隆仓库
git clone https://github.com/your-org/autods-agent.git
cd autods-agent

# 设置 Python 环境
python -m venv .venv
source .venv/bin/activate  # Windows: .venv\Scripts\activate
pip install -r requirements.txt

# 安装前端依赖
cd frontend
npm install
cd ..方式一:一键启动
./start.sh方式二:手动启动
# 终端 1:启动后端
cd src
python server.py
# 后端运行在 http://localhost:8000

# 终端 2:启动前端
cd frontend
npm run dev
# 前端运行在 http://localhost:3000- 在浏览器中打开
http://localhost:3000 - 看到欢迎界面,展示示例任务
- 点击示例或输入您的目标
- 按 Enter,观看智能体工作!
编辑 src/agent_config.yaml 进行自定义:
defaults:
  provider: "ollama"
  model_id: "qwen2.5:14b"
  host: "http://localhost:11434"

enable_search_tool: false     # 启用搜索工具
enable_hitl: true             # 启用人机协作
enable_deep_research: true    # 启用深度研究

agents:
  planner:
    provider: 'ollama'
    model_id: 'qwen2.5:14b'
  code_agent:
    model_id: "qwen2.5-coder:14b"
# ... 更多智能体配置启用 HITL 后,系统会在关键节点暂停等待人工确认:
- 注意对话中的黄色高亮提示
- 输入您的响应(如
approve、reject或自定义输入) - 按 Enter 继续
- 点击右上角 📁 打开文件管理器
- 上传数据文件到工作区
- 预览、下载或删除生成的文件
| 组件 | 描述 |
|---|---|
| AgentSystem | 主编排器,协调所有智能体 |
| 深度研究 | 规划前的研究阶段(可选) |
| 规划器 | 目标分解和任务规划 |
| 选择器 | 基于需求的动态任务路由 |
| 执行器 | 代码、分析、记忆智能体执行任务 |
| 报告器 | 最终报告生成和总结 |
我们欢迎贡献!请随时提交 Issue 和 Pull Request。
- Fork 本仓库
- 创建特性分支 (
git checkout -b feature/amazing-feature) - 提交更改 (
git commit -m 'Add amazing feature') - 推送分支 (
git push origin feature/amazing-feature) - 提交 Pull Request
本项目采用 MIT 许可证 - 详见 LICENSE 文件。
Made with ❤️ by AutoDS Team