- 硬件:XPS 13-9360/Intel(R) Core(TM) i7-8550U CPU @ 1.80GHz
- 操作系统:Ubuntu 18.04 LTS
- 在BIOS中打开SGX选项;
- 安装基本依赖:
sudo apt-get install build-essential ocaml automake autoconf libtoolsudo apt-get install libssl-dev libcurl4-openssl-dev libprotobuf-dev
- 下载iclsClient并安装
- 进入
https://software.intel.com/en-us/sgx-sdk/download,选择64bit,需要注册信息才能完成下载 sudo apt-get install alien- 利用脚本生成deb包:
sudo alien --scripts iclsClient-1.45.449.12-1.x86_64.rpm - 安装deb包:
sudo dpkg -i iclsclient_1.45.449.12-2_amd64.deb
- 进入
- 下载安装dynamic-application-loader-host-interface
git clone git@github.com:intel/dynamic-application-loader-host-interface.git- 安装依赖
sudo apt-get install uuid-dev libxml2-dev cmake - 进入文件夹后,编译安装
cmake .;make;sudo make install;sudo systemctl enable jhi
- 安装SGX Driver:
sudo ./sgx_linux_x64_driver_1bf506e.bin安装失败,改为编译安装,编译安装方式在https://github.com/intel/linux-sgx-driver - 安装psw:
sudo ./sgx_linux_x64_psw_2.1.103.44322.bin - 安装sdk:
sudo ./sgx_linux_x64_sdk_2.1.103.44322.bin
使用make进行debug模式的编译,编译正常。之后运行./app时出错。
错误1
- 提示信息:
./app: error while loading shared libraries: libprotobuf.so.9: cannot open shared object file: No such file or directory - 原因分析:Ubuntu 18.04 使用的是libprotobuf.so.10,这就有点坑了,需要重新装一下9。apt仓库中没有,只能编译安装
恩这些错误都忽略吧,终极解决方案:==用docker,保平安==
docker pull tozd/sgx:ubuntu-bionicdocker run -d --device /dev/isgx --device /dev/mei0 --name test-sgx tozd/sgx:ubuntu-bionicdocker exec -ti sgx bash- docker中的bash:
source /opt/intel/sgxsdk/environment - done! perfect!
docker启动方式:
docker run -d --device /dev/isgx --device /dev/mei0 --cap-add=SYS_PTRACE -v /home/reece/workspace/sgx:/mnt/sgx --name sgx tozd/sgx:ubuntu-bionic
- 如何调试
使用sgx-gdb进行调试:$SGX_SDK/bin/sgx-gdb ./app
- 库函数使用
使用strncpy而不是strcpy
- 传递指针变量
用户空间调用enclave的函数时,如果函数的参数有指针变量,需要在edl文件中这样声明函数public uint32_t set_enclave_aes_key(sgx_enclave_id_t src_enclave_id, sgx_enclave_id_t dest_enclave_id,[in, size=key_len]char* aes_key,uint32_t key_len);
- Enclave中的真正入口
对于Enclave1.cpp中的函数例如func(),若函数是一个Ecall对外提供调用接口,则会在Enclave1_u.c中生成一个函数Enclave1_func()作为其真正的接口。在Enclave1_func()中,是通过使用sgx_ecall()函数,并到一个函数表中去查找真正的func()函数的。那这里该如何进行gdb调试呢?怎样才能进行到真正的func()函数?看了一下sgx_ecall的反汇编,没有找到真正的入口。
通过gdb找到了真正的函数入口,以Enclave1.cpp中的sgx_set_enclave_aes_key()函数为例,从接口到真正函数的调用栈为:
==Enclave1_sgx_set_enclave_aes_key()== -> sgx_ecall() -> ... -> enclave_entry() -> enter_enclave() -> ( do_ecall() [jmp eax] to sgx_set_enclave_aes_key ) -> ==set_enclave_aes_key()==
因此,下断点的正确方式:对于在Enclave1.cpp中要下断点的函数,直接在Enclave1/Enclave1_t.c中找到对应的函数下断点。注意区分_t和_u结尾的文件是不一样的。
- set_enclave_aes_key()函数发生了core dump
dump的位置在send_request_receive_response() -> send_request_ocall() -> sgx_ocall()就跑到库函数里面去了。
按照上面的方式进行调试。
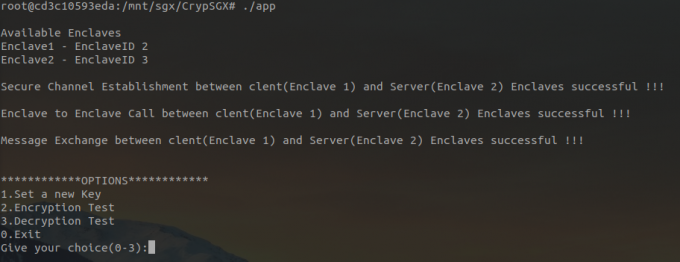
代码主要分为APP部分和Enclave部分,其中APP是测试程序的主要入口,Enclave中Enclave1作为Client,Enclave2作为Server。功能分为三个:设置key,测试加密,测试解密
app首先输出通信的EnclaveID,并依次检测Enclave合法性、建立安全信道、测试Enclave call和测试信息交换。之后输出主菜单,进行三个主要测试功能的选择。运行演示如图:
该功能通过在APP生成一个随机的KEY,将其通过ECALL机制传递给Enclave1.cpp中的set_enclave_aes_key()函数,再由该函数调用Enclave2.cpp中的e2_set_enclave_aes_key()函数来设置Enclave2中的AES密钥,保持Enclave1和Enclave2中的密钥信息同步更新。
主要函数:
- Enclave1/Enclave1.cpp
set_enclave_aes_key() - Enclave2/Enclave2.cpp
e2_set_enclave_aes_key() - Enclave1/Utility_E1.cpp
marshal_input_parameters_e2_aes() - Enclave1/Utility_E1.cpp
unmarshal_retval_and_output_parameters_e2_aes() - Enclave2/Utility_E2.cpp
unmarshal_input_parameters_e2_aes() - Enclave2/Utility_E2.cpp
marshal_retval_and_output_parameters_e2_aes()
此外,还需要在Enclave1/Enclave1.edl中的trusted{}增加函数声明。运行演示如图:

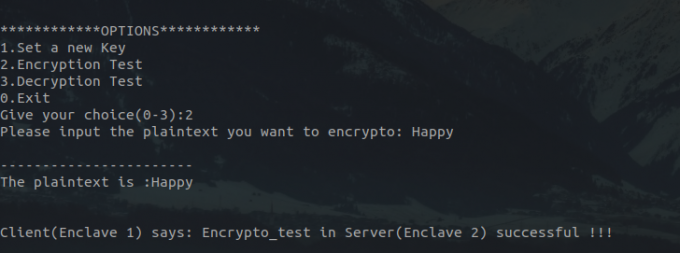
该功能由用户输入一个明文字符串,将字符串传递到Enclave1.cpp中的encrypto_test()函数,该函数将明文传递给Enclave2.cpp中的e2_encrypto_test(),该函数加密字符串并返回密文,此时Enclave1自己也加密,并比较两次加密结果是否相等。
主要函数:
- Enclave1/Enclave1.cpp
encrypto_test() - Enclave2/Enclave2.cpp
e2_encrypto_test() - Enclave1/Utility_E1.cpp
marshal_input_parameters_e2_aes() - Enclave1/Utility_E1.cpp
unmarshal_retval_and_output_parameters_e2_aes() - Enclave2/Utility_E2.cpp
unmarshal_input_parameters_e2_aes() - Enclave2/Utility_E2.cpp
marshal_retval_and_output_parameters_e2_aes()
运行演示如图:
解密函数与加密函数是基本一致的,主要是把内部的sgx_rijndael128GCM_encrypt()函数换成了sgx_rijndael128GCM_decrypt()函数,然后就是对应变量的修改,具体可以见代码,这里不再赘述。不过需指出的事,由于密文多包含不可见字符,这里主要是输入明文,先调用加密,再测试解密。
- Install Intel(R) Software Guard Extensions (Intel(R) SGX) SDK for Linux* OS
- Make sure your environment is set: $ source ${sgx-sdk-install-path}/environment
- Build the project with the prepared Makefile: a. Hardware Mode, Debug build: $ make b. Hardware Mode, Pre-release build: $ make SGX_PRERELEASE=1 SGX_DEBUG=0 c. Hardware Mode, Release build: $ make SGX_DEBUG=0 d. Simulation Mode, Debug build: $ make SGX_MODE=SIM e. Simulation Mode, Pre-release build: $ make SGX_MODE=SIM SGX_PRERELEASE=1 SGX_DEBUG=0 f. Simulation Mode, Release build: $ make SGX_MODE=SIM SGX_DEBUG=0
- Execute the binary directly: $ ./app
- Remember to "make clean" before switching build mode