Chapter 3 Configuring Signature Requests
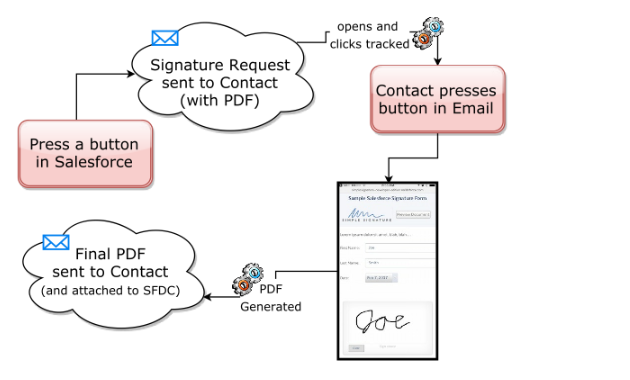
The first two usages of Simple Signature, where you sign forms independently in the free version, and where you can set up Signatures to be tied to a parent object, are both fairly easy to set up and use. Requesting Signatures from a Contact in your Salesforce org is a bit more complicated, and requires several steps in order to work correctly:
-
Create a VisualForce page to be used in the Signature process. This is the PDF that you will want to be the final result of the signature process.
-
Configuring the App to use this page.
-
Creating a Signature Request button to trigger the request.
The end result of setting all of this up will be a full-cycle signature request process that can be used in one or more places at your organization.
Regardless of which object will be the parent of the signature, where the signature request is requested from, here are the steps you must accomplish:
- Create a VisualForce page for the final PDF form with signature
- Configure default settings for signature requests
- Create a signature request button
- Set up the Salesforce Site for end-users to sign on
- Set up the email template to go out when requesting signature
For using Signature Requests with Quotes, please see our Quote-specific instructions.
The first thing to do is to set up a VisualForce page that will be used as the PDF where the final signature will be merged onto. This VisualForce page will usually be formatted in a particular way, with the logo and other information of your company. This is the most difficult part of the process and it cannot really be explained in a step-by-step tutorial. If you do not already know how to create VisualForce pages, then you must either ask someone internally to do it, or you can contact us at support@toafinish.com in order to do it for you. We offer hourly services for this type of work if you don't have someone with the skills or time to do it. To get you started, you can use the included signature__BasicSignaturePDF page that is included with the app. This page only list the legal wording, selected fields, and the signature on a simple form.
If you are using Opportunities as the parent object, we also provide a sample VisualForce page that you can use as a starter. Use these instructions to build it in a Sandbox or Dev org. You will NOT be able to do it directly in Production, but rather, you need to do it in a Sandbox and then deploy it to Production.
1) First you will need to add a static resource to your org that allows the signature process. Go to Setup > custom code> Static Resources and press the "New" button. Call the Static Resource "sampleinvoice", change the Cache Control to "Public" and then select a file called SampleInvoice.zip which you will need to download from the "resources" folder in our GitHub repository.
| GitHub.com Simple Signature Sample Code Repository | . |
|---|---|
| https://github.com/ToAFinish/simplesignature | . |
2) Next, create controller for your VisualForce page. Go to Setup > custom code> Apex Classes and press the "New" button. Note that this will only work inside of a Sandbox or Development org. You will not be able to do it directly in Production, so if you do not see a "New" button, that is probably the reason.
3) Go back to the GitHub repository, in the "classes" folder, and open the SampleOpportunityPDFController file and copy all of the contents, without the line numbers. Paste all of it into the Apex Class Salesforce window and Save.
* You should also copy the SampleOpportunityPDFControllerTest file as another Apex Class if you intend to deploy it into production.
4) Finally, you will now need to create a new VisualForce page. Go to Setup > custom code> VisualForce Pages and click the "New" button.
5) Once you see a new bank VisualForce page, fill out the Label and Name fields and then delete all of the default content that is in the main VisualForce Markup area. Now you are ready to put the actual code in.
6) Go back to the GitHub repository and this time go into the "pages" folder and click on the "SampleOpportunityPDF" entry. Copy all of the text in this page (without the line numbers), starting with <apex:page and ending with </apex:page>. Paste all of this text into the VisualForce Markup area in Salesforce and then Save the page.
7) First, go back to Setup > custom code > VisualForce Pages and find your new page on the list at the same page. Click on the "Security" link next to the name of the new page. A list of the profiles that can view this page will show up, you want to select all of them, or at least all of the ones who will use Simple Signature, and give them access. Save. Once you are finished creating the page, you will need to assign it as the one to use in your Org.
Once you have the VisualForce page that you want to use as the default for PDFs to be generated for signatures, you will need to configure the app to use it.
1) Go to Setup > Apps > packaging > Installed Packages and click on the "Configure" link next to the Simple Signature app. If the paid version is enabled, you will see these options:
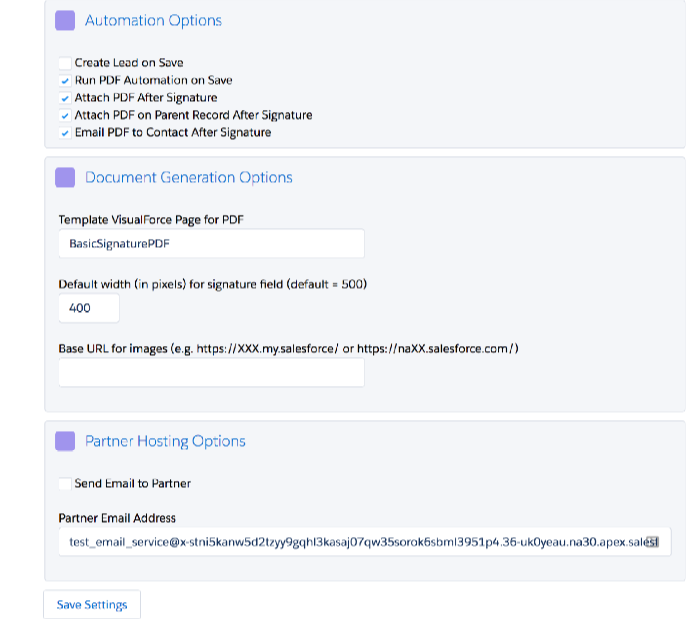
2) Turn on or off the options according to what is defined below, and fill out any fields that are necessary. Then click the Save Settings button.
| Option | Description |
|---|---|
| Run Batch on Save | Run a job to email the blank and completed PDFs once the Signature is finished. |
| Attach PDF After Signature | Attach the completed PDF to the Signature record. |
| Attach PDF on Parent Record After Signature | Attach the completed PDF to the parent record. |
| Email PDF to Contact after Signature | Email the completed PDF to the Contact on theSignature record. |
| Template VisualForce Page for PDF | This field must be populated with the name of the VisualForce page that will be used.If either of the above items is set, then this one must also be set. If you do not have a VisualForce page, you can use the default one: signature__BasicSignaturePDF . |
| Default width (in pixels) for signature field (default = 500) | This is the width of the signature that will be saved for merging into an s-Docs template. The smaller the value, the smaller the signature will appear. If you are OK with the default of 500, then no need to enter anything different here, but it is a good idea to enter a number to avoid confusing in the future. |
| Base URL for images (e.g. https://XXX.my.salesforce/ or https://naXX.salesforce.com/) | This value can be gotten by clicking on the Home tab, and then copying the first part of the URL. This is a critical component, so don't get this wrong or images will be broken. |
| Send Email to Partner | This should be turned on only if you are working with To A Finish technical support to enable the Partner option, where the signature requests are hosted in our Org. This is used in particular with |
| Profession edition. | |
| Partner Email Address | This should be the email address given to you by To A Finish technical support. |
Creating a button on the parent object where you need a signature will allow you to request one. For example, if you need a signature on a Case, or an Opportunity or on your own custom object, you would set up the button on this object. For these instructions, we will give you instructions for buttons off of a Contact, an Opportunity, and a Quote.
-
Create a New Button. Using Opportunities as an example: In Lightning, go to Setup > Object Manager > Opportunity > Buttons, Links and Actions, and click the New Button or Link button. In Classic, at the top-right of the page click on Setup > Customize > Opportunities > Buttons, Links and Actions, and click the New Button or Link button.
-
Give the button a Name and Label like "Request Signature", set the Display Type as "Detail Page Button", set the Behavior to "Display in existing window without sidebar or header" and make sure the Content Source is URL.
-
Add code to the button. In the main code area below, paste the following if you are starting from Contact parent record:
/apex/signature__RequestSignature
?Id={!Contact.Id}
&templateName=c__MyVFPage
Or from a Quote:
/apex/signature__RequestSignature
?Id={!Quote.Id}
&templateName=c__MyVFPage
&contactField=ContactId
Or from an Opportunity (use your own custom Contact lookup field API name):
/apex/signature__RequestSignature
?Id={!Opportunity.Id}
&templateName=c__MyVFPage
&contactField=PrimaryContact__c
Or from a Custom object (use your own API names):
/apex/signature__RequestSignature
?Id={!Custom_Object__c.Id}
&templateName=c__MyVFPage
&contactField=Custom_Lookup_to_Contact__c
You will need to change the parameters Id, templateName, and contactField as explained below:
| Parameter | Description |
|---|---|
| Id | The Id field of the parent object. For Opportunities it would be {!Opportunity.Id}, for Contacts {!Contact.Id}, for Quotes {!Quote.Id} or for a custom object {!Custom_Object__c.Id}. (Use the Insert Field functionality provided to make sure you enter it correctly.) |
| templateName | This is optional if you want to use a different VisualForce page from that one you set up in the Configuration step above. You can create multiple buttons for different forms, if you change this one parameter. More about PDF templates here. |
| contactField | This is the API name of the Contact lookup field on the Parent object. For Quotes it would be ContactId, for Contacts it is not needed, since you are starting from a Contact, and for other objects like Opportunity or Account or custom objects, it needs to be a custom lookup field to the Contact object. Note that this field is needed whenever doing a Signature Request because it is automatically emailed when the button is pressed. The process needs to know which Contact field to use. If you do not include this parameter, then you must somehow let the signature record know which email address to send to. See the advanced options below. |
-
Save the button
-
Add the button to the page layout Using Opportunities as an example: In Lightning, go to Setup > Object Manager > Opportunity > Page Layouts, and add it into one or more page layouts (you will find the button in the "Mobile & Lightning Actions" category. In Classic, go to Support > Customize > Opportunities > Page Layouts and add it into one or more page layouts (you will find the button in the "Buttons" category).
You may continue your configuration of signature requests by Setting up the Site, or read on below for advanced options.
In order to tell Simple Signature who to send the signature request to, you must do one of the following:
-
Use the "contactField" parameter when creating the signature request, as described above.
-
Use a process or trigger to populate the Email (signature__Email__c), First Name (signature__Name__c), and Last Name (signature__Name_2__c) fields when the Signature record is created. If the Contact field is not populated, then this is the way to get the request out.
-
Use a process or trigger to populate the Contact (signature__Contact__c) lookup field with a valid Contact Id. Here is a sample trigger (and test class) to accomplish that for Opportunities.
Continue your configuration of signature requests by Setting up the Site.
Signature requests for Quotes in Salesforce is a special case because there are many ways of doing it, and none of them are very easy to do. The main issue is that most Salesforce Sites (but not all of them) are unable to see Quotes or Quote Lines due to licensing restrictions. So it becomes very difficult to show the customer the quote when the site licensing is not allowing you to.
Here are several different ways of doing signature requests with standard Salesforce Quotes:
In this scenario, you would treat Quotes just like any other object and not try to use the pre-built Salesforce Quote functionality, including templates. If you want to go this route, you can use the same instructions given with Opportunities as the example beginning wth building the Quote PDF.
Note: If you are considering this option, please consider also possibly just using Opportunities instead of Quotes. Some companies have been using Quote just for the quote template functionality, but this can also be provided just as easy with Opportunities, simplifying the process by removing the step where the sales person has to create a quote record.
In this scenario, we use the standard Salesforce Quote Template, but generate it via code. This enables us to have just one custom button on the Quote that does all the work. The process feels the same as it would with a different object.
-
First, we must build some code that will generate the template. You can find some sample code in our "classes" folder.
-
Next, we must build a button to call this code. Below is code for a JavaScript button. We will be working towards providing a different button, as this is no longer a recommended option due to security concerns:
{!REQUIRESCRIPT("/soap/ajax/43.0/connection.js")}
{!REQUIRESCRIPT("/soap/ajax/43.0/apex.js")}

var qId = '{!Quote.Id}';
var errorMsg = sforce.apex.execute("GenerateQuotePDF", "generateQuotePdf", {quoteIdList:qId});

if (errorMsg != '') alert(errorMsg);
else window.location.reload();- Finally, we must add a trigger to the Attachment or File object so that when the quote PDF is created, it will automatically send out the Signature Request using the quote. You can find the trigger code for attachments or trigger code for files in the "triggers" folder.
In this scenario, we use the standard Salesforce Quote Template, and use the standard Create PDF button to generate the PDF. Then, when the PDF is saved (not emailed), the same trigger in the prior scenario would be utilized to send out the signature request.
Other, more advanced, scenarios exist. If you need help with a more advanced solution, please contact us using the Contact Form in the Signature App.
These basic instructions will help you set up a Salesforce Site that allows you to process signatures from customers who do not have access to Salesforce. It is potentially dangerous from a security standpoint as you could be opening up your Salesforce database to be read or even changed by people who are not logged in, so it is essential to know what you are doing and not do configuration changes that you do not understand.
Again, this part of the configuration will be complicated if you do not know Salesforce Sites well. Ask a Salesforce Administrator to help you set it up, if you haven't done it before. If you need us to help, we can do that. Please open a case with our support team by going to the Contact Us tab with the app and filling out the form.
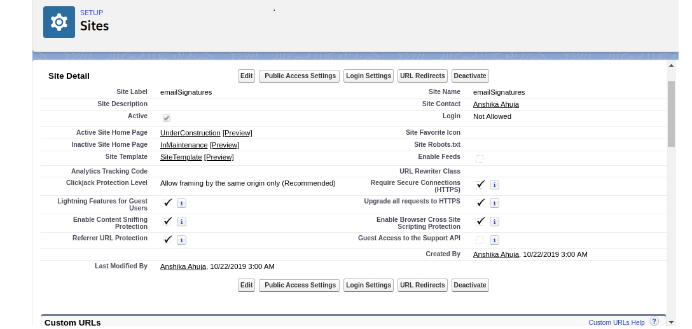
- If you don't already have a Site you want to use, Create a new Site In Lightning, go to the Setup > User Interface > Sites and Domains > Sites and create a new Site. In Classic, go to the Setup > Develop > Sites and create a new Site. If you have not set up your Domain Name it will ask you to do this before you can create a site.
- The site you set up can be called anything you like, and the critical items to consider are as follows:
- You will need to know the Site URL. You will need this in the next step, so copy this to a text file for later use.
- In the Public Access Settings, you will need to give this Site user access to the Signature object, as well as all of the fields that you are using. It is a good idea to initially give it access to ALL of the fields, and then remove the ones that you think are not necessary, testing as you go so that you will know for sure when one of them is needed.
- You will need to add the following pages into the Site VisualForce Pages, along with any custom pages you want to use in this process.
| VisualForce Pages to Add |
|---|
| Signature.Signature |
| Signature.EmailSignature (only for older installs) |
| Signature.PartnerSignature (only for Professional users) |
| Signature.TrackEmail |
| Signature.TrackPartnerEmail |
Now with your Site URL in hand, proceed to the next step of Setting up the Email Template. Keep in mind that you might have to come back to this one in order to adjust the security of the site after you test following the next section.
This will help you configure the two Email Templates that go out as a part of the Signature Request process. The confirmation email is straight forward and will not be covered in this implementation guide, but the request email is a bit more complicated and needs to be configure.
-
Change the header logo (Optional) In Lightning, you can go to Setup > Email > Letterheads to edit the "Simple" letterhead and add your logo and other information. In Classic, you can go to Setup > Communication Templates > Letterheads to edit the "Simple" letterhead and add your logo and other information.
-
Browse to the Email Template Folder In Lightning, go to Setup > Email > Classic Email Templates and open the Simple Signature folder. In Classic, go to Setup > Communication Templates > Email Templates and open the Simple Signature folder.
-
Open the Email Template Click on the email template called "EmailSignature". This is the email that you need to edit. Once in the email, click on the "Edit HTML Version" button.
-
Edit the Email Template Content Update the Subject Line to say what you want it to say, and then click inside of the email body and select all of the content. Use the Ctrl+A key combination or use whatever way you are best comfortable to ensure that you have selected ALL of the content. Now, CUT the content to the clipboard, leaving the email completely blank. Do not save it.
- Go over to your favorite HTML editing program. If you do not have one, then you can use a free HTML editor online Delete any content currently in the window, and then PASTE from the clipboard the content you cut in step #4. If you are using the online editor, it should look like this:
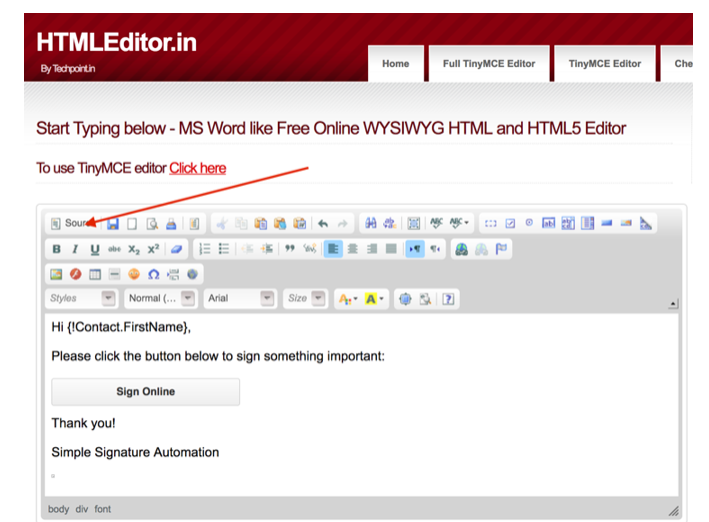
- Now click on the Source button in the editor, so that you can now see the code that is behind the scenes. You need to do this because you have to edit the URLs in the links.
- Find the two places in the code where the following URL is found:
simplesignature-developer-edition.na30.force.com
and replace it with the Site URL you pulled back in the Site Setup section. Note that you should leave the http:// at the beginning, and the / plus whatever is after that at the end. You are only replacing the middle section, which directs it to your own Salesforce org.
- Now click the Source button again to switch out of Code mode, and again select ALL content in that window. Copy or Cut it to the clipboard.
- Switch back to Salesforce, go to the email that should be blank, and Paste the content into the HTML Email Content area.
* Note that you might see a tiny square, or what looks like blank space around the button. Do not remove that square. It is a 1x1 image that is used to track when the email is opened. Unless you understand this, use the above instructions to edit the email and not the standard Salesforce edit function.
-
Make any other changes you want to the email. This will be what the custom sees when the signature request button is pressed, so you want them to understand what you are asking for, and respond accordingly. Please note that an unsigned version of the PDF you are requesting them to sign might be attached to the email, so you might want to say something about it.
-
Save the email.
You are now done with all the steps. It is time to Test signature requests!
In this page we will discuss setting up a VisualForce page that will be used as the PDF where the final signature will be merged onto. This VisualForce page will usually be formatted in a particular way, with the logo and other information of your company.
- This is the most difficult part of the process and it cannot really be explained in a step-by-step tutorial. If you do not already know how to create VisualForce pages, then you must either ask someone internally to do it, or you can use the Contact Us page in the app in order to ask us to do it for you. We offer hourly services for this type of work if you don't have someone with the skills or time to do it.
To get you started, you can use the included signature__BasicSignaturePDF page that is included with the app. This page only list the legal wording, selected fields, and the signature on a simple form. You can also download a copy of this page if you just want to make slight modifications to it, like adding your own logo.
GitHub.com Simple Signature Sample Code Repository
On the other hand, if you are using Opportunities or Quotes as the parent object, we also provide a sample VisualForce page that you can use as a starter. Use these instructions to build it in a Sandbox or Dev org. You will NOT be able to do it directly in Production, but rather, you need to do it in a Sandbox and then deploy it to Production.
- Note: these instructions assume you are setting it up for Opportunities, with Quotes change the instructions accordingly.
-
First you will need to add a static resource to your org that allows the signature process. In Lightning, go to Setup > Custom Code > Static Resources. In Classic, go to Setup > Develop > Static Resources. Then press the "New" button. Call the Static Resource "sampleinvoice", change the Cache Control to "Public" and then select a file called SampleInvoice.zip which you will need to download from the "resources" folder in our GitHub repository.
-
Next, create controller for your VisualForce page. In Lightning, go to Setup > Custom Code > Apex Classes. In Classic, go to Setup > Develop > Apex Classes. Then press the "New" button. Note that this will only work inside of a Sandbox or Development org. You will not be able to do it directly in Production. You will also need to have admin-level rights. It also will not work in the Professional edition or below. So if you do not see a "New" button, it will likely be one of those three reasons.
-
Go back to the GitHub repository, in the "classes" folder, and open the SampleOpportunityPDFController file and copy all of the contents, without the line numbers. Paste all of it into the Apex Class Salesforce window and Save.
- You should also copy the SampleOpportunityPDFControllerTest file as another Apex Class if you intend to deploy it into production.
-
Finally, you will now need to create a new VisualForce page. In Lightning, go to Setup > Custom Code > Visualforce Pages. In Classic, go to Setup > Develop > VisualForce Pages. Then, click the "New" button.
-
Once you see a new bank VisualForce page, fill out the Label and Name fields and then delete all of the default content that is in the main VisualForce Markup area. Now you are ready to put the actual code in.
-
Go back to the GitHub repository and this time go into the "pages" folder and click on the "SampleOpportunityPDF" entry. Copy all of the text in this page (without the line numbers), starting with <apex:page and ending with </apex:page>. Paste all of this text into the VisualForce Markup area in Salesforce and then Save the page.
-
Now go back to Setup > Custom Code > VisualForce Pages (or in Classic: Setup > Develop > VisualForce Pages) and find your new page on the list. Click on the "Security" link next to the name of the new page. A list of the profiles that can view this page will show up, you want to select all of them, or at least all of the ones who will use Simple Signature, and give them access. Save.
Once you are finished creating the page, you will need to assign it as the one to use in your Org. For that, we need to go to Configure the default settings.
You are now ready to test the full-cycle functionality. Go to a record of the type you determined to be the parent of the Signature object, and press the "Request Signature" button. After a few seconds, the contact connected to that parent object should receive an email request. When they fill it out, they should then receive the completed PDF, with the embedded signature.
If you run into any issues, please contat us using the SS Contact page. We will be happy to help.