Course number: IM-UH 1010 Section: 1 (Michael Shiloh's section) Credit Hours: 4 Prerequisites: None
Shortcut to today's lecture
Course website: https://github.com/michaelshiloh/IntroductionToInteractiveMedia Wordpress site: intro.nyuadim.com/
Instructor: Michael Shiloh mshiloh@nyu.edu Office hours: If you want to meet schedule an appointment here
Meeting times:
- 3:35-6:15pm Tuesday
- 5:00-6:15pm Thursday
Session: Spring 2025
Class location: C3-029 (IM Lab)
Everything here is subject to change
This document: Lecture notes
- Administration
- Introduction (to the course, to each other, etc.)
- Introduction to programming (if we have time)
- Phones
-
Join Discord
-
Join Wordpress site
-
What are some examples of IM projects? Spend a few minutes Googling and put links in Discord
-
What is IM?
- Discussion
-
Homework, projects, and grading
- Most of you come into this class with different backgrounds, skills, and knowledge, so in IM, we grade by creativity, imagination, communication, effort and progress, not by a fixed level of accomplishment.
- In IM we strongly encourage experimentation, thinking outside the box,
and risk taking.
However taking risks is only possible
if failure doesn't have catastrophic results.
If failure results in a poor grade,
how does that encourage risk taking?
- Discussion
- MVP
- Discussion
-
Introductions
- Syllabus etc.
- Digital computation beyond computers (sometimes called "physical computing") considering humanistic needs in design and usability
- Computers traditionally lacked knowledge of outside world beyond a keyboard, mouse
- Look critically at products and designs
- As artists and designers, we can explore new paradigms of interaction with machines and each other
- Relatively easily and inexpensively explore creative computation through open source software and hardware
- No background needed, strong DIY attitude
- Low barrier to entry, high ceiling
- Carlos Guedes' wonderful Phobos, Orquestra Robótica Disfuncional (1 min)
- Sudhu Tewari's Yasmin Electro Mechanical Sequencer
- List of inspirational movies collected by Barney Haynes (also here) and shown at his interface classes.
- List collected by J.D. Zamfirescu
- Tree-climbing robot
- Insect robot
- Treadbot
- Murmur Wall
- Floating Couch
- Wooden Segment Mirror
- Generative design
- Textile weaving
- Projection mapping
- Laser harp
- Arc-o-matic
- Eggbot
- Textspresso
- Shapoko / tinyg
- Makerbot Replicator
- Roomba
- Golan Levin: Art that looks back at you
- Drawdio
- Claire Neel's reactive eye
- Professor Aaron Sherwood's Reactive Wall
- Digital Graffiti Wall
- Space Simulator
- Wind based jug organ
- Atmospheric Touch Lamp
- The Dipinator
- Jitterbox
- Youtube DDR
- I Hand a Dream
- Boundry Function
- Carl Pisaturo
- Servo Motor
- Introduction to programming in p5.js
- Primitive drawing functions
- How to tell where you are on the canvas
- Homework (see weekly schedule above)
Open the p5.js editor by visiting editor.p5.js
If you don't already have an account on p5.js you might want to do so now, or after class. If you do it now you can save what you do in class
type this in:
function setup() {
  circle(50, 80, 30);
  square(80, 30, 40);
}circle()square()ellipse()rect()fill()
Spend a few minutes playing with this
Make an account on: p5js.org
function setup() {
  createCanvas(200, 200);
  let foo = 20;
  circle(50, 50, foo);
  square(90, 90, foo);
}
Now let's break this down one step at a time
setup()circle()letcreateCanvas()
More primitive drawing functions
triangle()line()point()
What does this all mean?
- Functions
- Variables
- Arguments or parameters
- Order of execution
- Computer does what you tell it to do, not what you are thinking
- Errors happen when what you tell it is different from what you want it to do
Controlling fill, stroke, and color
stroke()noStroke()fill()background(240)
- Attendance
- Apply for student assistant https://app.joinhandshake.com/emp/jobs/9559510
- Review
- More p5.js
createCanvas()background()stroke()noStroke()fill()noFill()
arc(100, 100, 100, 100, 0, 180)arc(100, 100, 100, 100, 0, radians(180), CHORD)
Working in pairs, try to make a simple picture of a house
- Anything surprising?
- Any questions?
Sometimes it's hard to know the coordinates of where you want to put stuff. Wouldn't it be nice if you could put your mouse somewhere, and have the computer tell you the coordinates of that point?
Good news everyone!
function setup() {
  createCanvas(200, 200);
  background(220);
  print(mouseX + "," + mouseY);
}
What's going on here:
print()- Built-in variables
mouseXandmouseY - Build strings of characters using the
+sign
but that's not very useful. Why does it only print the coordinates once?
- Hint: the function
setup()only runs once at the beginning. Maybe there is another function that runs more than once?
function setup() {
  createCanvas(200, 200);
  background(220);
  rect(30, 50, 60, 90);
}

function draw() {
  print(mouseX + "," + mouseY);
}If the draw() function runs continuously, can we use it to make things
change?
function setup() {
  createCanvas(200, 200);
  let xPosition = 0;
}

function draw() {
  circle(xPosition, 50, 30);
  xPosition = xPosition + 1;
}Variable scope:
let xPosition; // this is now a global variable

function setup() {
  createCanvas(200, 200);
  xPosition = 0; // don't recreate the variable, but do initialize it
}

function draw() {
  circle(xPosition, 50, 30);
  xPosition = xPosition + 1;
}mouseX,mouseYwidth,height- many others; we will discover more as we go along
- Attendance
- Administration
- Look at homework
- Review
- New material (time permitting)
- Wordpress problems?
- Homework schedule. Note the deadline "Assignments due midnight before first class of following week"
- Late homework
- Let's look at some of your homework
- Javascript is not a typed language: you don't need to declare a variable's type
let myNumber = 4.5;let myString = "the quick brown fox";let myArray = ["the", "quick", "brown", "fox"];let myRandomNumber = random(255);let myRandomNumber = round(random(255));
It's important to be aware of the difference between a variables name and a variable's value
-
How can we find out what a variable's value is?
print() -
Scope: Local vs. Global variables
-
Built-in variables
// Example usage of a global variable

let count; // this is now a global variable

function setup() {
  circle(50, 50, 30);
  count = 7; // the variable is initialized here
}

function draw() {
  count = count + 1; // not algebra!
  // The result of the right hand side calculation
  // replaces whatever value was stored in the variable
  // on the left side of the '=' sign
  // end result: the variable "count" is incremented by 1

  print(count);
}Use the draw() function to draw something different in each frame. This can
be the location of a shape but you can manipulate anything such as color also:
The draw() function is called once per frame. Think of it as drawing a new
page on a "flip book"
let foo = 0;

function setup() {
  createCanvas(300, 300);
}

function draw() {
  ellipse(foo, 50, 40, 40);
  foo = foo + 1;
}
By default, the previous frame is not erased. Sometimes this is useful.
Use the background() function to "paint" over any previous drawings.
function setup() {
  createCanvas(500, 500);
}

let triangleTopLeftX = 0;
let redValue = 255;

function draw() {
  // erase previous drawings
  background(10, 255, 255);

  // Move the triangle
  triangleTopLeftX = triangleTopLeftX + 1;

  // If the triangle reaches the right edge, move to the left edge
  if (triangleTopLeftX >= width) {
    triangleTopLeftX = 0;
  }

  // Change the value of red
  redValue = redValue - 1;

  //If red reaches a certian level, reset it
  if (redValue === 55) {
    redValue = 255;
  }

  // Select the fill for the triangle
  fill(redValue, redValue - 100, redValue - 100);

  // Draw the triangle
  triangle(
    triangleTopLeftX,
    20, // top left corner
    triangleTopLeftX + 100,
    30, // top right corner
    triangleTopLeftX + 50,
    200
  ); // bottom corner

  // Select the fill for the circle
  fill(10, 20, 240);

  // Draw the circle
  circle(mouseX, mouseY, 30);
  print("mouse coordinates = " + mouseX + ", " + mouseY);
}function setup() {
frameRate(10); // frameRate() is a function
print(frameRate()); // framerate does not change immediately
}
function draw() {
print(frameRate());
}One of the most important features of computer programming is the ability to do different things based on the outcome of some previous event
function setup() {
  createCanvas(300, 300);
}

function draw() {
  if (mouseIsPressed === true) {
    background(0, 0, 255);
  } else {
    background(200, 0, 0);
  }
}Notes:
mouseIsPressedis another built-in variable. There are many others.mouseIsPressedis a new type of data, namely aboolean, which means it has only one of two values,trueorfalse- Note that
{and}indicate the blocks - The
elsepart of anif()statement is optional (what happens if we remove it?)
In class exercise:
- Using the cursor to draw
- Now use a mouse press to clear the screen
- Clear the screen if the mouse is pressed inside a certain circle
- Combine these to create a primitive painting program
- Attendance
- Loops
- In-class exercise
- Next week's homework
while()is likeif()but it keeps on doing it as long as condition is true- Whereas
if()does it only once - The assumption is that something changes while you're doing the loop which might eventually make the condition false, otherwise you'd be stuck there forever
- Whereas
function setup() {
  createCanvas(300, 300);

  let foo = 50; // create and initialize a variable

  while (foo < width) { // keep going as long as the condition is true
    ellipse(foo, 50, 40, 40);
		// modify the variable so something different happens next time
    foo = foo + 50;
  }
}- You should get in the habit of giving meaningful names to your variables.
- What is a better name for the variable foo?
- What would happen if you replace the
while()withif()?
In the example below we use the concept of a boolean flag to indicate
whether we are "done" or not.
function setup() {
  let done = false;
  let counter = 0;
  while (!done) {
    print(counter++);
    if (counter >= 10) {
      done = true;
      print("done");
    }
  }
}
The example from Tuesday, modified to draw more rows of squares
function setup() {
  createCanvas(300, 300);
  let xCord = 20;
  let yCord = 20;

  while (yCord < height) {
    rect(xCord, yCord, 40);
    if (xCord >= width) {
      xCord = 20;
      yCord = yCord + 45;
    }
    xCord = xCord + 45;
  }
}
Things to think about:
- Why is the last rectangle cut off?
- Why is first rectangle in every row but the first missing?
Note that in all the examples above we need three things:
- A variable that tells the
while()loop whether to run or not (the condition) - The variable must be initialized to something
- The variable must change in some way so that eventually the
while()loop will end
Another way to make a loop is the for() loop.
The for()
loop structure combines the initialization step and the change step
into the for() loop construction:
function setup() {
  createCanvas(300, 300);

  // initialization, condition, and incrementation all in one line
  for (let foo = 50; foo < width; foo = foo + 50) {
    ellipse(foo, 50, 40, 40);
  }
}
Which should you use? Whichever is easier for you to understand. Remember that most of the time spent programming is fixing problems, and whatever you understand best will probably have fewer problems.
Both for() loops and while() loops can be nested, meaning a loop inside a
loop:
function setup() {
  createCanvas(700, 700);
  background(230);
  fill(0);

  let yPos;
  let xPos;

  for (yPos = 30; yPos < height; yPos = yPos + 40) {
    for (xPos = 20; xPos < width; xPos = xPos + 40) {
      circle(xPos, yPos, 5);
    }
  }
}
Note that I've done all the above looping examples in setup() and not in
draw(), so there is no animation in these examples. Loops can be used in
draw() as well.
Here is a more complex example. See if you can figure out how this works:
// Welcome to the Circle Diagonator
// Please choose a number of circles to draw

let TOTAL_CIRCLES = 3;
let CANVAS_SIZE = 800;
let CANVAS_COLOR = "#FFCA39";

let my_number = 0;
let circle_diameter = 0;

function setup() {
  colorMode(HSL);
  createCanvas(CANVAS_SIZE, CANVAS_SIZE);
  background(CANVAS_COLOR);

  circle_diameter = (width + height) / TOTAL_CIRCLES / 2;
  let random_hue = random(360);

  while (my_number < TOTAL_CIRCLES) {
    print("I'm in a loop, drawing circle " + my_number);
    if (random_hue + 15 > 360) {
      random_hue -= 345;
    } else {
      random_hue += 15;
    }
    fill(color(random_hue, 90, 50));
    strokeWeight(3);
    circle(
      (width / TOTAL_CIRCLES) * my_number + circle_diameter / 2,
      (height / TOTAL_CIRCLES) * my_number + circle_diameter / 2,
      circle_diameter
    );
    my_number = my_number + 1;
  }
}- Using either a
while()loop or afor()loop draw 10 nested squares. Use only thesetup()function and nodraw() - Move your code to the
draw()function and have the squares move across the canvas all together - Move the squares to follow the mouse
- Attendance
- We will look at homework on Thursday
- Questions?
- Functions
- Arrays
- Object Oriented Programming
- Arrays of objects
Every time you use one of the built-in commands, you are really using (or
more properly calling) a built-in function. Functions are a very important
building block of programming, and in addition to using built-in functions,
you can also create your own. In fact, you've already been doing that, when
you created the setup() and draw() functions. In the case of
setup() and draw() you have to use those names, but when you create other
functions you can make up your own names. Just like variables names, good
function names make your programs easier to understand.
Why create your own functions?
- Reuse (if it's something you might do again)
- Clarity (remember your three important audiences: yourself, others learning from you, me when I grade your work)
- Easier to debug (what is debugging?)
- One of the most powerful ways to approach a bug is to reproduce it with simplest possible example. This is much easier when the thing that's causing the problem is already a function.
- Modularity
- Flexibility (with good choice of parameters)
function setup() {
  createCanvas(300, 300);

  // initialization, condition, and incrementation all in one line
  for (let foo = 50; foo < width; foo = foo + 50) {
    rect(foo, 50, 40, 40);
    line(foo, 50, foo + 20, 30);
    line(foo + 20, 30, foo + 40, 50);
  }
}
Now let's make a function called drawOneHouse(). If we want to
draw a house at different locations, we need a way to tell
the function drawOneHouse() where to put the house. Functions accommodate
this by allowing us to pass information into the function by putting
that information in the parenthesis. In the function, we store this
information in temporary variables that we can use within the function:
function setup() {
  createCanvas(300, 300);

  for (let foo = 50; foo < width; foo = foo + 50) {
    drawOneHouseAt(foo);
  }
}

function drawOneHouseAt(x) {
  rect(x, 50, 40, 40);
  line(x, 50, x + 20, 30);
  line(x + 20, 30, x + 40, 50);
}
Notes
- I've said this before and I'll keep saying:
Choose descriptive names for your variables and functions!
foois a bad name,xPosis a good name,houseXPosis a better name. - The value of
foo(50, 100, 150 ...) is the information passed to the function so that the function can do it's work. The proper name for this information is an argument - The variable
xis a temporary variable that only exists in the function. This variable is used to store the argument that was passed into the function so that the function can do its work. Once the function is finished, this variable is no longer needed and is destroyed. A variable used in this way is called a parameter - Functions may take zero, one, or multiple arguments. When you write a function, you decide how many arguments you need. For example, we might have included the house size or roof height or house y location or color.
- Functions can return information as well, for example as the
random()function does. Functions can either return one piece of information, or none. We will see later how to do this.
let foo; // this is a global variable, visible in all functions

function setup() {
  foo = 7;
}

function draw() {
  print(foo);

  let bar; // this is a local variable, visible only inside of draw()

  for (let i = 0; i < width / 2; i++) {
    // i is a local variable visible only inside this for() loop
    ellipse(i, height / 2, 10, 15);
  }
}
Arrays are like boxes in which you can put multiple things, and then you can reference each individual thing in the array by using it's index. If you put five marbles in a box, you can refer to each individual marble by the order in which you put it: the first marble, the second marble, and so on.
let numbers = [3, 5, 19, 230, 1, 4.93];

function setup() {
  print(numbers);
  print(numbers[3]);
  print(numbers[3] + numbers[0]);
  print(numbers.length);
}
You can remove elements from an array:
let numbers = [3, 5, 19, 230, 1, 4.93];

function setup() {
  print(numbers);
  print("setup is done");
}

function draw() {
  if (numbers.length) {
    let something = numbers.pop();
    print("something = " + something);
    print("here is the array " + numbers);
  } else {
    print("the array is empty");
  }
}
There is also an array.push() function to add things to an array.
A simple bouncing ball example:
- First, let's make a ball bounce off all 4 walls of the canvas
- Identify carefully and isolate what's in
setup(), what does the moving, and what does the drawing?
function setup() {
  createCanvas(400, 400);
  xPos = width / 2;
  yPos = random(100, 300);
  xSpeed = 4;
  ySpeed = 7;
}

function draw() {
  background(220);

  // move the ball
  xPos += xSpeed;
  yPos += ySpeed;

  // check for collisions
  // check first for left and right wall
  if (xPos <= 15 || xPos >= (width-15)) {
    xSpeed = -xSpeed;
  }

  // do the same for the ceiling and the floor
  if (yPos <= 15 || yPos >= (height-15)) {
    ySpeed = -ySpeed;
  }

  circle(xPos, yPos, 30);
}- Now carefully write the class:
- The code in
setup()is most likely the constructor. You can think of theconstructoras thesetup()function of the class - The moving code and the drawing code are most likely the two member functions you'll need. Member functions are the functions that make the object do stuff
- The code in
class BouncingBall {
  constructor() {
    this.xPos = width / 2;
    this.yPos = random(100, 300);
    this.xSpeed = 4;
    this.ySpeed = 7;
  }

  move() {
    // move the ball
    this.xPos += this.xSpeed;
    this.yPos += this.ySpeed;
  }

  checkForCollisions() {
    // check first for left and right wall
    if (this.xPos <= 15 || this.xPos >= width - 15) {
      this.xSpeed = -this.xSpeed;
    }

    // do the same for the ceiling and the floor
    if (this.yPos <= 15 || this.yPos >= height - 15) {
      this.ySpeed = -this.ySpeed;
    }
  }

  draw() {
    circle(this.xPos, this.yPos, 30);
  }
}

let myBouncingBall;

function setup() {
  createCanvas(400, 400);
  myBouncingBall = new BouncingBall();
}

function draw() {
  background(240);
  myBouncingBall.move();
  myBouncingBall.checkForCollisions();
  myBouncingBall.draw();
}
Notes
- What does
thismean? - Functions in a class are mostly like any other functions
- For example, it's often useful to pass initialization information to the constructor, like this example
Here then is the bouncing ball example, this time creating 10 balls, and storing them in an array:
class BouncingBall {
  constructor(xSpeed0, ySpeed0) {
    this.xPos = width / 2;
    this.yPos = random(100, 300);
    this.xSpeed = xSpeed0;
    this.ySpeed = ySpeed0;
  }

  move() {
    // move the ball
    this.xPos += this.xSpeed;
    this.yPos += this.ySpeed;
  }

  checkForCollisions() {
    // check first for left and right wall
    if (this.xPos <= 15 || this.xPos >= width - 15) {
      this.xSpeed = -this.xSpeed;
    }

    // do the same for the ceiling and the floor
    if (this.yPos <= 15 || this.yPos >= height - 15) {
      this.ySpeed = -this.ySpeed;
    }
  }

  draw() {
    circle(this.xPos, this.yPos, 30);
  }
}

let ball = [];

function setup() {
  createCanvas(400, 400);

  for (let i = 0; i < 10; i++) {
    // each ball will have a slightly different
    // initial speed in the X axis, but all balls
    // will have the same speed in the Y axis
    ball[i] = new BouncingBall(i + 1, 2);
  }
}

function draw() {
  background(240);

  for (let i = 0; i < 10; i++) {
    ball[i].move();
    ball[i].checkForCollisions();
    ball[i].draw();
  }
}random()noise()- Interactive array example
- Something unexpected
- State
modulo()
let foo = random();let foo = random(5);let foo = random(5, 22);let foo = random([some array]);
Random example 1:
function setup() {
  createCanvas(700, 700);
  background(230);
  fill(0);

  for (let yPos = 30; yPos < height; yPos = yPos + 40) {
    for (let xPos = 20; xPos < width; xPos = xPos + 40) {
      circle(xPos, yPos, random(1, 5));
    }
  }
}
Random example 2:
function draw() {}

function mouseClicked() {
  background(50 * random(6),
             50 * random(6),
             50 * random(6));
}function draw() {
background(204);
let n = random(0, width);
line(n, 0, n, height);
}What if we wanted the line to move in a more organic, lifelike fashion? Organic things (e.g. butterflies, leaves blowing in the wind, clouds) don't jump instantly from one place to another, they tend to move close to where they were last time
Perlin noise example 1:
let offset = 0.0;

function draw() {
  background(204);
  offset = offset + 0.01;
  let n = noise(offset) * width;
  line(n, 0, n, height);
}
Perlin noise example 2:
function setup() {
  createCanvas(400, 400);

  for (let yPos = 0; yPos < height; yPos = yPos + 40) {
    for (let xPos = 0; xPos < width; xPos = xPos + 40) {
      offset = offset + 0.1;
      square(xPos + noise(offset) * 20, yPos + noise(offset) * 20, 40);
    }
  }
}
let offset = 0.0;
Things to notice:
- Why is the variable
offsetglobal? (Remember our discussion of variable scope)
- Attendance
- Questions from last week: arrays, classes, functions,
random(),noise() - Transformations (briefly)
- Text
- Data Visualization
Transformations move the coordinate system so you can draw in different places with the same code
- Available 2D transforms are
translate()rotate()scale()
push()andpop()allow you to remember (record) where the canvas was, and then return to a stored position later
Example: Draw a house at a given location, no transform:
function house(x, y)
{
  triangle(x + 15, y, x, y + 15, x + 30, y + 15);
  rect(x, y + 15, 30, 30);
  rect(x + 12, y + 30, 10, 15);
}
Same result, but using a transform:
function house(x, y)
{
	// Using transformations, no need for clumsy
	// offsets to each drawing function
  translate(x, y);
  triangle(15, 0, 0, 15, 30, 15);
  rect(0, 15, 30, 30);
  rect(12, 30, 10, 15);
}
Why do this?
- Easier to read (and hence less likely to have errors)
- Easier to code complex motions relative to other motions
Notes
- Just like with
fill()andrectMode(), once you've moved the origin it stays there unless you return it to its starting position. E.g. try putting a circle in the center of the canvasellipse (width/2, height/2, 20); - Whenever you do a transformation, it's good practice to always
- Store where you were before the transformation using
push() - return where you were after the transformation using
pop()
- Store where you were before the transformation using
function house(x, y)
{
  push();
  translate(x, y);
  triangle(15, 0, 0, 15, 30, 15);
  rect(0, 15, 30, 30);
  rect(12, 30, 10, 15);
  pop();
}
Suggestion
- I encourage you to see what the other section is up to; the other teacher and I often exchange ideas and build on each other's examples and lectures. In particular, Mang has curated a very nice list of Additional Resources on transformations.
function setup() {
  createCanvas(400,400);
  background(240);

  // the red rectangle is drawn before the rotation so
  // it will stay in place
  fill(255, 0, 0);
  rect(200, 200, 100, 100);
  line(0, 0, 200, 200);

  // Now a green rectangle
  fill(0, 255, 0);

  // rotation is done here. all subsequent drawing
  // is done post-rotation
  rotate(radians(10));

  // the green rectangle is drawn after rotating the canvas
  rect(200, 200, 100, 100);
  line(0, 0, 200, 200);
}
Work through this nice explanation of transformations with great examples
Basic default text:
function setup() {
  createCanvas(400, 400);

  text("My Important Message", width / 2, height / 2);
}
function setup() {
  createCanvas(400, 400);
  textFont("Courier New", 25);

  text("My Important Message", width / 2, height / 2);
}
- Fonts that seem to be available are 'Courier New' (monospace), and 'Helvetica' (non-monospace)
- You can also load your own fonts but that requires uploading them to the p5.js server. For more information look at the p5 reference for typography: Help->Reference->LoadFont Typography
- Note that p5.js is asynchronous and that
loadFont()is non-blocking, meaning thatsetup()will continue even if theloadFont()hasn't finished. - What are blocking vs. non-blocking functions?
- There are two ways to force your program to
wait for the font to load:
- Use
preLoad() - Specify an optional callback function in
loadFont()
- Use
Note that loading a font takes time, so if you expect to use multiple fonts
it's best to preload all of them, and then switch between them using
textFont()
There are of course many other things you can do with text. You can look at Help->Reference->Typography and File->Examples->Typography for ideas and examples.
Some advanced examples using text are here
Some awesome examples alas without code:
What is data visualization? Here are some examples:
- Ben Fry
- Aaron Koblin
- Jer Thorp e.g. Just Landed
####### Finding data
Sources
- https://www.springboard.com/blog/free-public-data-sets-data-science-project/
- https://www.ndbc.noaa.gov/rt_data_access.shtml
- https://www.kaggle.com/datasets
- Professor Mathura's list of data sources
####### Data formats
- The most common format is CSV, especially as you can use any spreadsheet (Excel, OpenOffice Calc, Google Sheets) to export any table in CSV format
- Other formats are JSON and XML. We won't spend much time on them, but there are p5.js libraries available for parsing them
- Attendance
- Finish example of data visualization
- Look at homework
- Discuss reading
####### Worked example: Getting and working with a CSV file
- A database of energy generated by wind turbines
- Click "Get Data"
- Scroll down a bit to "Tabular Data: CSV format" and click on "CSV
format".
- This will download a
.zipfile.
- This will download a
- Unzip the file.
- This will create
uswtdb_v4_1_20210721.csv
- This will create
- This is a plain text file; you can view it with a text editor
- You will see that the first line is the heading of each column
- Some of the fields are numerical (e.g. case_id)
- Some of the fields are text (e.g. t_state, t_county)
- Some of the fields are missing (e.g. faa_ors, faa_asn)
- Upload the file into your sketch (Sketch Files -> Upload Files)
- Now you can load this file into an array of
Stringsand then process each line one at a time, pulling out individual fields:
/*
 * example to process a CSV file containing data
 * about wind turbines in the USA
 * Source: https://eerscmap.usgs.gov/uswtdb/
 */

// An array of strings to hold the entire file
let strings = [];

// For scaling, we want to know the minimum and maximum latitude and longitude
let minLat;
let maxLat;
let minLong;
let maxLong;

function preload() {
  // The text from the file is loaded into an array.
  strings = loadStrings("uswtdb_v5_3_20230113.csv");
}

function setup() {
  createCanvas(500, 400);
  background(235);

  // Did we succeed to load anything?
  if (strings == null) {
    print("failed to load the file, stopping here");

    // this is an endless loop; it's a common way
    // to prevent a program from continuing when
    // something is so wrong that there is no sense
    // in continuing
    while (true) {}
  }

  print(
    "strings loaded from file successfully, read " + strings.length + " lines"
  );

  // Find the minimum and maximum latitude
  // and longitude
  findMinMaxLatLong();
}

function findMinMaxLatLong() {
  let singleRow = [];

  // loop over each row in the file
  for (let csvRowNumber = 1; csvRowNumber < strings.length; csvRowNumber++) {
    // get a single row and split that row
    // into individual words
    singleRow = split(strings[csvRowNumber], ",");

    // We know that the last two fields are the
    // latitude and longitude and so they are
    // numerical:
    let longitude = float(singleRow[26]);
    let latitude = float(singleRow[27]);

    // The file may be missing a field, in which case
    // the converstion to a float might have failed
    if (isNaN(longitude) || isNaN(latitude)) {
      print("conversion to float failed; skipping row " + csvRowNumber);
    } else {
      if (csvRowNumber == 1) {
        minLat = latitude - 10;
        maxLat = latitude + 10;
        minLong = longitude - 10;
        maxLong = longitude + 10;
      }

      if (latitude < minLat) minLat = latitude;
      if (latitude > maxLat) maxLat = latitude;
      if (longitude < minLong) minLong = longitude;
      if (longitude > maxLong) maxLong = longitude;
    }
  } // end of for() loop

  print("Latitude (min, max) = (" + minLat + "," + maxLat + ") ");
  print("Longitude (min, max) = (" + minLong + "," + maxLong + ")");
} // end of findMinMaxLatLong

let csvRowNumber = 1;
// Skip the first line, since we know it's a header

function draw() {
  let singleRow = [];

  // get a single row and split that row into
  // individual words
  singleRow = split(strings[csvRowNumber], ",");

  // This really slows things
  // down so use only when debugging
  //print("Row " +
  // csvRowNumber +
  //   " contains " +
  //   singleRow.length +
  //   " fields" );

  // We know that the last two fields are the
  // latitude and longitude and so they are
  // numerical:
  let longitude = float(singleRow[26]);
  let latitude = float(singleRow[27]);

  // use only when debugging
  // print("Latitude " +
  // latitude +
  //   " longitude " +
  //   longitude );

  // Check for non-numerical strings.
  if (isNaN(longitude) || isNaN(latitude)) {
    print("conversion to float failed; skipping row " + csvRowNumber);
  } else {
    // scale that to fit on our canvas
    //print(csvRowNumber);
    let ypos = map(latitude, minLat, maxLat, 0, height);
    let xpos = map(longitude, minLong, maxLong, 0, width);

    // Put a mark there
    point(xpos, ypos);
  } // end of valid data

  csvRowNumber++;
  if (csvRowNumber >= strings.length) {
    print("finished");
    noLoop();
  }
}
Things to notice:
- The
split()function does half the magic - The
int()orfloat()function does much of the rest - Data files might have errors in them and you need to defend your program against them
loop()andnoLoop()can be used anytime you want to start or stop thedraw()function from repeating
JSON and XML are other format for organizing data in a file. They are more complex than CSV, and again p5.js provides functions.
Pull words from a CSV file
and by using random() in a clever way,
write poems or slogans or whatever.
Here is a terribly lame example.
- Look at homework (generative art, reading discussion)
- More array examples and observations
- State
- Modulo
let numbers = [];

function setup() {
  printInstructions();
  print("your turn: ");
}

function draw() {}

function printInstructions() {
  print("d = delete last number");
  print("a = add a number to the array");
  print("p = print the array");
  print("5 = print the sixth element of the array");
  print("l = print the length of the array");
}

function keyPressed() {
  if (key == "d") {
    numbers.pop();
  }

  if (key == "a") {
    numbers.push(frameCount);
  }

  if (key == "p") {
    print(numbers);
  }

  if (key == "l") {
    print(numbers.length);
  }

  if (key == "5") {
    print(numbers[5]);
  }

  print("\n");
  printInstructions();
  print("your turn:");
}
Notes
- What is this
keyPressed()function? Where is it called? - Can you guess what
keyis?
Why doesn't this produce the expected result?
let numbers = [6, 42, 7];

function setup() {
  print(numbers);
  let last_number = numbers.pop();
}- How to remove elements from an array
- Adding unique IDs to objects in an array for identification
- Randomly choosing elements from an array [example](https://editor.p5js.org/mangtronix/sketches/
From Wikipedia:
"... a system is described as stateful if it is designed to remember preceding events or user interactions; the remembered information is called the state of the system. "
Example:
let currentState = 0;

function setup() {
  background(currentState);
}

function draw() {}

function mouseClicked() {
  if (currentState === 0) {
    currentState = 255;
  } else {
    currentState = 0;
  }
  background(currentState);
}How to use the modulo function to make something happen less often than every frame:
let shade = 0;
let changeAmount = 5;

function setup() {
  createCanvas(400, 400);
}

function draw() {
  background(shade);

  // change the shade only on every other frame
  if (frameCount % 2 == 0) {
    shade += changeAmount;

    // make sure the shade stays between 0 and 255
    if (shade <= 0 || shade >= 255) {
      changeAmount = -changeAmount;
    }
  }
}
What's the difference between these two if statements:
if ("d" === key) { if (key === "d") {Tool Training
- Introduce Midterm Project
- Working with images
- Sounds (download files for use in class)
- Computer Vision (time permitting)
The p5.Image class
- Just another class, i.e. it has
- Data (the pixels, width, height, etc.)
- Functionality
(image(),get(), etc.)
let catImg;
function preload() {
  photo = loadImage("https://placekitten.com/400/400");
}
function setup() {
  createCanvas(400, 400);
  background(255);
  image(photo, 0, 0); // this actually displays the image
}
image(photo, positionX, positionY, width, height)- display this image at this location and scale to this sizephoto.resize(w,h)- scale to this size. If one of the arguments is zero, then scale to the remaining argument and retain the original aspect ratio.photo.get(x,y,w,h)- Returns a new p5.Image containing a portion of the imagephoto.get(x,y)- Returns the color of the pixel at this location
let catImg;
function preload() {
  catImg = loadImage("https://placekitten.com/400/400");
}
function setup() {
  createCanvas(400, 400);
  background(255);
  image(catImg, 0, 0);

  let newImg = catImg.get( 50,60, 100,50);
  image (newImg, 250, 200);
}
For more information and ideas
- Reference page for p5.Image for other methods
- Examples -> image
You can access individual pixels
from the canvas (and whatever is on the canvas)
using the special built-in array called pixels.
Before using this array you must load everything from the canvas
into the pixels array using the loadPixels() function,
and after making any changes you must call updatePixels()
to write from the pixels array back to the canvas
if you want to make the changes visible
function setup() {
  let pink = color(255, 102, 204);
  loadPixels();
  let d = pixelDensity();
  let halfImage = 4 * (width * d) * ((height / 2) * d);
  for (let i = 0; i < halfImage; i += 4) {
    pixels[i] = red(pink);
    pixels[i + 1] = green(pink);
    pixels[i + 2] = blue(pink);
    pixels[i + 3] = alpha(pink);
  }
  updatePixels();
}
- The pixels array is one-dimensional, meaning if you want to go to a different row on the canvas you need to offset by that many widths
- Each pixel occupies 4 positions in the array
- Thus the equation for accessing a given pixel is (x + y * width) * 4
- Remember to set
pixelDensity(1);in case you have a high resolution display
function setup() {
  pixelDensity(1);

	// blue background
	// makes it easier to see the pink
  background(0, 102, 204);

  loadPixels();

	// Here is the equation
	// for the start (red value)
	// of a pixel
	// at a particular coordinate (x,y)
  // (x + y*width) * 4

  // Change most of the fiftieth row to pink
  // instead of the whole line,
	// only do from x = 10 to x = 90
  for (let i = (10 + 50 * width) * 4;
       i < (90 + 50 * width) * 4;
       i += 4) {

		// pink
    pixels[i + 0] = 255;
    pixels[i + 1] = 102;
    pixels[i + 2] = 204;
    pixels[i + 3] = 100;
  }

	// this puts the array back on the screen
  updatePixels();
}
It's important to remember that a pixel is just four numbers so you can manipulate pixels mathematically e.g. make it fade:
function setup() {
  pixelDensity(1);
  background(0, 102, 204);
}

let redValue = 0;

function draw() {

  loadPixels();

  for (let i = 0; i < width * height * 4 ; i+=4) {
    pixels[i] = redValue;
  }
  updatePixels();

  redValue = (redValue + 1 ) %255
  print(redValue);

  updatePixels();

}
Just for fun, here is the last example from one of the Coding Train videos in which Dan created a random (only in the green channel) background:
function setup() {
  createCanvas(256,256);
  pixelDensity(1);
}

function draw() {
  loadPixels();
  for (let y = 0; y < height; y++) {
    for (let x = 0; x < width; x++) {
      let index = (x + y * width) * 4;

      pixels[index + 0] = x;
      // red value changes horizontally

      pixels[index + 1] = random(255);
      // green value random

      pixels[index + 2] = y;
      // blue value changes vertically

      pixels[index + 3] = 255;
      // no transparency
    }
  }
  updatePixels();
}
Look at the reference page for the pixels array
A fun examples from Professor Sherwood:

let tiles = [];
let tileSize = 100;

function preload() {
  img = loadImage("aiweiwei.jpeg");
}

function setup() {
  createCanvas(400, 400);
  let numTiles = img.height / tileSize;
  while (numTiles > 0) {
    tiles.push(
      img.get(
        int(random(img.width - tileSize)),
        int(random(img.height - tileSize)),
        tileSize,
        tileSize
      )
    );
    numTiles--;
  }
  imageMode(CENTER);
}

function draw() {
  push();
  translate(width / 2, height / 2);

  let numSegments = 10;
  let eachAngle = TWO_PI / numSegments;
  let whichImage = int(random(tiles.length));

  for (let i = 0; i < numSegments; i++) {
    let x = cos(eachAngle * i) * tileSize + 1;
    let y = sin(eachAngle * i) * tileSize + 1;
    push();
    translate(x, y);
    rotate(eachAngle * i);
    image(tiles[whichImage], 0, 0);
    pop();
  }

  pop();
  noLoop();
}

function keyPressed() {
  loop();
}
Can we use a sequence of images for animation?

Download this to your laptop: https://github.com/michaelshiloh/IntroductionToInteractiveMedia/blob/master/media/walking.png
How would we use them?
let spritesheet;
let sprites = [];
let direction = 1; // 0 up
let step = 0;
let x;
let y;
let speed = 3;

function preload() {
  spritesheet = loadImage("walking.png");
}

function setup() {
  // fullscreen(true);
  createCanvas(500, 450);

  // 12 images across, 4 down, in the spritesheet

  let w = int(spritesheet.width / 12);
  let h = int(spritesheet.height / 4);

  for (let y = 0; y < 4; y++) {
    sprites[y] = [];
    for (let x = 0; x < 12; x++) {
      sprites[y][x] =
        spritesheet.get(x * w, y * h, w, h);
    } // iterate over rows
  } // iterate over columns

  x = width / 2;
  y = height / 2;

  imageMode(CENTER);

	// Display first sprite
  image(sprites[direction][step], x, y);
}

// nothing to do here because all the action
// happens in the keyPressed() callback
function draw() {}

function keyPressed() {
  // look at sprite sheet to determine
  // which direction is which row

  if (keyCode === DOWN_ARROW) {
    direction = 0;
    y += speed;
  }

  if (keyCode === LEFT_ARROW) {
    direction = 1;
    x -= speed;
  }

  if (keyCode === RIGHT_ARROW) {
    direction = 2;
    x += speed;
  }

  if (keyCode === UP_ARROW) {
    direction = 3;
    y -= speed;
  }

	// Every so often
	// advance to the next sprite
  if (frameCount % speed == 0) {
    step = (step + 1) % 12;
  }

	// Finally draw paint the sprite
  background(255);
  image(sprites[direction][step], x, y);
}
You can probably find many sprite sheets by googling "sprite sheet" + whatever you want.
Download this to your laptop: https://github.com/michaelshiloh/IntroductionToInteractiveMedia/blob/master/media/doorbell.png
File -> Examples -> Sound
Preload Soundfile
Very basic example:
/*
Must upload doorbell.mp3
Must include sound library in index.html
*/

function preload() {
  song = loadSound('doorbell.mp3');
}

function setup() {
  background(234);
  song.play();
}

function draw() {
  if (song.isPlaying()) {
    print("song is playing")
  } else {
    print("song is not playing")
    noLoop
  }
}

function mouseClicked() {
  if (song.isPlaying()) {
    song.stop();
  } else {
    song.play();
  }
}
As always, it's useful to explore the examples and the reference page
- Sound examples
- File -> Examples -> Sound
- Record Save
- Live Input
- File -> Examples -> Sound
Remember Sound requires a separate library which must be included
The other way to make sounds is to create them mathematically
- Sound examples
- File -> Examples -> Sound
- Oscillator Waveform
- Filters
- File -> Examples -> Sound
We can create our own complex sounds starting with basic oscillators and then changing the envelopes. Example
Basic sketch showing how to get input from camera:
let capture;

function setup() {
  createCanvas(200, 200);
  capture = createCapture(VIDEO);
  capture.hide();
}

function draw() {
  image(capture, // what image to display
        0, 0,    // where to place the image on the canvas
        width,   // width to display

        // the height is more complicated:
        // we want the capture height to be
        // the width multiplied by the aspect ratio
        width * capture.height / capture.width);
}
- Simple frame differencing, similar to the method in Golan Levin's article
- A more complex example by Prof. Aaron that uses frame differencing to detect which vertical slice of the camera image has the most motion, and trigger a corresponding sound clip
Other video tricks
- Video Mirror (flipping the x)
- If you wanted to display white (instead of the color of the difference) wherhttps://editor.p5js.org/aaronsherwood/sketches/cK59ueQ6aever motion above a certain threshold is detected, how would you do this?
- Can you trigger sounds according to where there is motion? You may start with Aaron's complex example and simplify here
- Mang added some useful game techniques here
- In the reading introduction to computer vision, the code examples use a language called Processing which is very similar to p5.js. My example for frame differencing is based on this article.
- P5.js version of the color tracking example from Dan Shiffman's book Learning Processing
- Share midterm projects
- Homework feedback
- Interactivity
- Debugging
- Arduino!
- Make it easy for me to give you a good grade
- Code comments
- Usage instructions
- Technical
- Avoid duplicating information
- Creative concept
- Don't put all your code in the blog post - only little sections that you
discuss in your post
- If you put a little section of your code in your blog post, explain it well
- If you use any features (libraries, techniques, etc.) that we have not discussed in class explain them and provide a link to where you learned about it (as appropriate)
- Your writing must be good: Use complete sentences, correct grammar, correct spelling, etc.
- "Creating a __ and __ experience"
- In your reading responses, do not summarize the reading. Rather, talk about what it means to you: Did you learn anything new? Does it change the way you look at the world? Did it give you ideas that you can use in your projects?
Great chapter on Interactivity Especially note the sections on Mouse Buttons, Keyboard Data, Coded Keys, and Events. Especially note:
The mousePressed() function works differently than the mouseIsPressed
variable. The value of the mouseIsPressed variable is true until the
mouse button is released. It can therefore be used within draw() to have a
line of code run while the mouse is pressed. In contrast, the code inside the
mousePressed() function only runs once when a button is pressed. This
makes it useful when a mouse click is used to trigger an action, such as
incrementing a value
- Don't just randomly change stuff! At best, you might fix the problem but you won't learn anything. At worst, you'll make the problem much worse
- Bugs are opportunities to learn! Remember what I did with the array removal bug
- Beginners often forget the most useful, built-in debugging aid:
print()! - Think carefully about what is happening, what should be happening, and what information you can print to help you understand why there is a difference
- Use the steps above to try to narrow down the bug as much as possible.
	Show that you have tried to solve the problem yourself and are not
	just being lazy.
- Create a small test program which reproduces your bug in the least
	amount of code.
    In my experience I usually find the bug during this step.
- Explain clearly what you think should be happening, and what you observe
	happening instead
blink()- Solderless breadboard
- Inputs and outputs, sensors and actuators
- Analog vs. digital
- TouchDesigner workshop
- Share midterm projects
We are excited to be announcing a TouchDesigner for Beginners workshop that will be led by artist and engineer Weeratouch (Wave) Pongruengkiat. This hands-on session will introduce basic node programming, data visualization, and generative animation techniques.
Monday, March 10 | 7:30 - 9:00 PM C3-153 (Arts Center upper floor, near IM Lounge)
Weeratouch (Wave) is an artist and engineer from FREAK Lab, TomorrowLab Thailand. His work explores animism as a lens to connect with non-human entities, including nature and artificial intelligence.
- Introduction to Arduino
- IDE
blinkdigitalWrite()digitalRead()
Make sure everything is working
- Change the parameter in
delay() - Upload again and verify that the LED blinks at the new rate
Upload the Blink example (File -> Examples -> Basics -> Blink)
Let's extend this circuit to the breadboard:


Adding a switch


void setup() {
  pinMode(8, OUTPUT);
  pinMode(13, OUTPUT);
  pinMode(A2, INPUT);
}

void loop() {

  int switchPosition = digitalRead(A2);

  if (switchPosition == HIGH) {
    digitalWrite(8, HIGH);   // turn the LED on (HIGH is the voltage level)
    digitalWrite(13, LOW);
  } else  {
    digitalWrite(8, LOW);    // turn the LED off by making the voltage LOW
    digitalWrite(13, HIGH);
  }
}
An example:
const int pushButton = A2;
const int redLEDPin = A0;
const int greenLEDPin = 8;

void setup() {
  pinMode(redLEDPin, OUTPUT);
  pinMode(greenLEDPin, OUTPUT);
}

void loop() {

  int buttonState = digitalRead(pushButton);

  if (buttonState == HIGH) {
    digitalWrite(redLEDPin, HIGH);
    digitalWrite(greenLEDPin, HIGH);
    delay(500);
    digitalWrite(greenLEDPin, LOW);
    delay(300);
    digitalWrite(redLEDPin, LOW);
    digitalWrite(greenLEDPin, HIGH);
    delay(700);
  }
  allOff();
  delay(1000);
}

void allOff() {
  digitalWrite(redLEDPin, LOW);
  digitalWrite(greenLEDPin, LOW);
}
Add another switch on a different pin


Now write a program that will blink different patterns depending on which switch is pressed. Using two switches you can select between four patterns. How is that possible?
Do you see a similarity between this circuit and something we learned earlier?
- Review
- Analog Input
- Analog Output
- Homework
- Outputs, actuators, and
digitalWrite() - Inputs, sensors, and
digitalRead() - Circuits
- Schematics
- Solderless breadboard
- Debugging
- Announcements
- Review
- Analog Input and Output
- Mixing it all up (A/D, I/O)
- Homework
Build this circuit. Try to follow the schematic and not the breadboard view:


Upload the AnalogRead example (File -> Examples -> Basics -> AnalogRead)
- Analog Inputs,
analogRead(), and (some) sensors go together- This only works on the six analog input pins (A0-A5)
- Digital sensors, like a switch, have only one of two values and so are more suited to a digital input
- Remember that the so-called analog input pins can do digital input and output as well
- Since you have so few analog input pins, when you decide which pins to use for which device, reserve the analog input pins for analog input devices as much as possible
map()constrain()if()
Remember how we used print() in p5.js to help us find problems in our
program? You can do that in Arduino to but the function has a slightly
different name: Serial.println()
- Must be initialized
Serial.begin() - Can not concatenate strings with the
+function- Instead, you need multiple calls to
Serial.print()e.g.:
- Instead, you need multiple calls to
Serial.print("First value = ");
Serial.print(firstValue);
Serial.print(" Second value = ");
Serial.print(secondValue);
Serial.println();
Example using an analog input to control the brightness of an LED
const int LED_PIN = 3;           // the PWM pin the LED is attached to
const int POT_PIN = A2;
int brightness = 0;    // how bright the LED is

// the setup routine runs once when you press reset:
void setup() {
  // declare pin 9 to be an output:
  pinMode(LED_PIN, OUTPUT);
  Serial.begin(9600);
}

// the loop routine runs over and over again forever:
void loop() {
  int pot_value = analogRead(POT_PIN); // 0-1023
  brightness = map(pot_value, 0, 1023, 255, 0);
  Serial.println(brightness);
  analogWrite(LED_PIN, brightness); // 0-255
}
What sketch should you use?
- What role does Arduino play?
- Switches and other sensors
- LEDs and other actuators
- Inputs and outputs
- Code
- Circuit
- Input and Output (I/O) pins
- 20 IO pins
- All 20 pins can do digital input and digital output
- Many of the pins have additional special functionality
- Built-in LED
- On the Arduino Uno this LED is on pin 13
- On the Arduino Uno LED_BUILTIN = 13
- Look above and see the schematics for what we made last week
- Schematics are ways to capture the important features of a circuit without getting distracted by details (e.g. subway maps)
- What's important in an electrical circuit?
- Where is the power coming from?
- What other components are there in the circuit?
- How are they connected?
- Schematic conventions
- Positive voltage on top, ground at the bottom
- Inputs on the left, outputs on the right
- Information flows from left to right
- Unused pins can be left off
Schematics are an important way to show a circuit. You will be required to understand and use them
-
Analog output uses the
analogWrite()function -
The
analogWrite()function only works on the six PWM pins (3, 5, 6, 9, 10, and 11). -
Analog Outputs,
analogWrite(), PWM and (some) actuators go together- LEDs, motors, and some other actuators respond properly to PWM
- Other actuators, like a solenoid, do not respond well to PWM and really should be considered digital actuators
- Since you have so few analog outputs, when you decide which pins to use for which device, reserve the analog output pins for analog output devices as much as possible
-
Not true analog voltage. PWM = Pulse Width Modulation
-
Works for LEDs and motors
tone()
- Schematic
- Before you try that code, just try
tone(spkrPin, 440);andtone(spkrPin, 440, 1000); - Reference page
- Remember homework due on Thursday
- Review
- Servo motor
- Homework for next week
- A/D I/O
- Tone
Notes
- "Use of the
tone()function will interfere with PWM output on pins 3 and 11"- The word "interfere" is rather vague.
I think they mean that it
prevents
analogWrite()from working on pins 3 and 11
- The word "interfere" is rather vague.
I think they mean that it
prevents
- The
tone()function is non-blocking - Arduino supports tabs
- Arduino has arrays
- What is resistor for?
- LED needs a resistor to limit current so it doesn't burn out
- LDR needs a resistor to form a voltage divider
- Piezo buzzer neither burns out nor needs a voltage divider
- So why a resistor?
Notes
- Use of the servo library disables
analogWrite()(PWM) on pins 9 and 10- Compare to note above about the
tone()function
- Compare to note above about the
- The
Servo.write()function is non-blocking
- How do you suppose
analogWrite()makes an LED dimmer? - PWM
- What do
analogWrite(),tone()andServohave in common? - What is sound?
- How does a servo motor work?
Notes
- You may have noticed that the built-in LED blinks 3 times when you turn on your Arduino. In fact it does this every time it resets, which also happens when you upload a new program. Since this LED is connected directly to pin 13, it means that whatever you have attached to pin 13 will be activated 3 times briefly whenver the Arduino resets. So, if you make a big robot, you probably should not use pin 13 for the motor
- Pins 0 and 1 are used for communication with your laptop, and this has two
effects:
- Connecting anything to pins 0 or 1 might interfere with laptop communication (which includes uploading!)
- Anything connected to pins 0 or 1 might be activated during communication!
- For these reasons it is best to avoid pins 0, 1, and 13. If you run out of pins and need to use them there are ways around this.
- Hand drawn schematics in your homework are fine! Here is an example:

-
Hand drawn switches can use the simple symbol
-
Resources are available to help you with homework, but only if you start your homework early enough. If you wait until the last minute and then don't have time to get help, that is unexcusable.
-
Use constants for pin numbers
-
Blink without delay
-
Ask me anything
-
In-class exercises
-
Theory
- What is the problem
- Built in example
- How would you modify the toneMelody program?
- Adafruit [tutorial](https://learn.adafruit.com/multi-tasking-the-arduino-part-1?view=all)
- For example, did anything come up while doing homework?
- Discuss reading
- Practice
- More without delay
- Physical Computing’s Greatest hits and misses
- Making Interactive Art: Set the Stage, Then Shut Up and Listen
- Use one of the analog sensors to select which of two LEDs lights up
- Use one of the analog sensor to control how fast two LEDs alternate
- Use a momentary switch (often called a pushbutton or a button in the Arduino literature) to select a different range for mapping an analog sensor to an analog output device
- Use a potentiometer to select from 4 different behaviors of a circuit
- Use a momentary switch to enter a mode where the minimum and maximum values from the LDR are stored. When the switch is released, use those values to map the range of values from the LDR to the full range of the LED brightness
Note Some analog sensors are resistive, some are not. Resistive sensors all use the same pattern: a voltage divider. Note the similarity to the circuit we used for a switch. The switch circuit is also effectively a voltage divider, one that has only two values instead of an infinite range of values
Unlike in p5.js, you must declare what type of data you want to store in a variable:
int- whole numbers onlyfloat- a number with a fractional part ('floating point number')char- a characterboolean- only eithertrueorfalse
-
When drawing schematics
- All sensors on the left
- All inputs on the left side of the Arduino
- All actuators on the right
- All outputs on the right side of the Arduino
- There are exceptions e.g.
- If using CAD you can't control where the pins are on Arduino
- Some devices (e.g. the ultrasonic distance measuring sensor) that have both inputs and outputs
-
When wiring your circuits
- All 5V connections should use red wire, and don't use red for anything else
- All GND connections should use black wire,
and don't use black for anything else
- If you run out of black you may either
- Color some white cables black with a Sharpie
- Dedicate green as an additional black, and then don't use green for anything else either
- If you run out of black you may either
- All other connections can use any other colors
- If you use the buses on the sides of the breadboard
- Red bus for 5V only
- Black or Blue bus for GND only
- Blink without
delay()(Files -> Examples -> Digital -> BlinkWithoutDelay - Excellent tutorial
showing classes for blinking an LED and sweeping a servo motor without using
delay() - Example using a class to play a melody
without using
delay() - An improved
class which lets you play different melodies, also
without using
delay() - Playing a melody and blinking an LED without using
delay(), not using a class
-
Build a circuit with a switch (pushbutton) and a servo motor, and when you press the switch go to one position, when you don't press the switch go to another
-
Add a piezo buzzer so that when the switch is pressed it plays a tone for half a second, then a tone for another half a second as long as the switch is pressed
-
Modify the code so that it plays the two tones only once when the switch is pressed
-
Add an LED and make the LED change brightness according to which tone is playing
-
Add a potentiometer which controls how fast the servo motor moves from one position to the next
- Remember homework due on Thursday
- Review
- Serial Communication
- Introduce final project
- Soldering
Some examples using the piezo speaker, servo motor, and a potentiometer:
// Moving the servo motor first to one position and then to another,
// and then stopping:

const int servoPin = 7;

#include <Servo.h>
Servo myservo;

void setup() {
	myservo.attach(servoPin);
	myservo.write(10);
	delay(1000);
	myservo.write(130);
}

void loop() {
}
// Moving the servo motor first to one position and then to another,
// continuously:

const int servoPin = 7;

#include <Servo.h>
Servo myservo;

void setup() {
	myservo.attach(servoPin);
}

void loop() {
	myservo.write(10);
	delay(1000);
	myservo.write(130);
	delay(1000);
}
// Minimal example of the tone() function
// Make a tone, never stop

const int spkrPin = 7;

void setup() {
	tone(spkrPin, 440); // starts a tone on pin 7 at frequency 440
}

void loop() {
 // Arduino always needs a loop, even if it's empty
}
Is the tone() function blocking?
// If tone() is a blocking function, the LED will be off while the tone sounds
// If the LED comes on as soon as the tone starts,
// it must mean that the tone() function is non-blocking
const int spkrPin = 7;

void setup() {
	pinMode(LED_BUILTIN, OUTPUT);

	digitalWrite(LED_BUILTIN, LOW);
	tone(spkrPin, 440, 1500); // starts a tone and then automatically stops it after 1500 milliseconds
	digitalWrite(LED_BUILTIN, HIGH);
}

void loop() {
}
// Using a potentiometer to control the position of a servo motor

#include <Servo.h>

Servo myservo;  // create servo object to control a servo

int potpin = A0;  // analog pin used to connect the potentiometer

void setup() {
	myservo.attach(9);  // attaches the servo on pin 9 to the servo object
}

void loop() {
	int val = analogRead(potpin); // reads the value of the potentiometer (value between 0 and 1023)
	val = map(val, 0, 1023, 0, 180); // scale it for use with the servo (value between 0 and 180)
	myservo.write(val);   // sets the servo position according to the scaled value
	delay(15);            // waits for the servo to get there
}
	// Use a potentiometer to control the position of a servo motor
	// and the pitch of a tone

	#include <Servo.h>
	Servo myservo;

	void setup() {
		// initialize serial communication at 9600 bits per second:
		Serial.begin(9600);
		myservo.attach(7);
	}

	void loop() {
		// read the input on analog pin 0:
		int sensorValue = analogRead(A2);
		// print out the value you read:
		Serial.println(sensorValue);

		// servo motor stuff
		int servoPosition = map(sensorValue, 0, 1023, 0, 180);
		myservo.write(servoPosition);

		// piezo buzzer stuff
  int pitch = map(sensorValue, 0, 1023, 200, 4000);
  tone(8, pitch);

  delay(1);        // delay in between reads for stability
}
Only Google Chrome web browser is known to work
What's going on here?
- Arduino waits for a message from p5.
- Arduino expects two values separated by a comma. It uses these two values to control two LEDs.
- Arduino then reads two sensors and sends the values back to p5, separated by a comma.
- p5 reads these two values from Arduino. One value controls the text color, the other controls the text transparency
- p5 sends two values back to Arduino indicating if the mouse was clicked, and if so, which half of the screen it was in.
- Meanwhile, Arduino is waiting for a message from p5
- Repeat
Things to notice
- Each side only sends a message when it receives a message from the other. This way, neither side is flooded by too many messages
- The amount of information in each message is arbitrary. You can reduce it or extend it by changing the code appropriately on both ends. However you always need to send something.
- Another way of saying this is that the number of sensors on Arduino is arbitrary. You can have more or less (as long as you change the code on both sides to agree). Likewise you can change what you are detecting in p5 and sending to Arduino (keypresses, mouse coordinates, colors, whatever)
- What the information conveys is also arbitrary. Arduino sends messages to p5, it has no idea what p5 does with this information. Similarly p5 sends information to Arduino and has no understanding of what happens with it. Either side can be arbitrarily complex, or can in fact ignore the information after reading it.
Make it your own
- Duplicate Mang's project so that you get the other files as well
- Modify the data that is exchanged. You may need a digital sensor on the Arduino instead of an analog sensor. Similarly, on the p5 side, you may need something different from a mouse click or changing the text color and transparency.
- Once you are reliable sending information back and forth you can start adding the rest of your program
Caution There are many different ways to communicate between Arduino and p5, such as using different synchronization methods or different libraries. Unless you thoroughly understand how they work, they are best avoided, and certainly don't mix code based on one library with code using another library.
In-class exercise (break class into groups of 2-3 students)
- Make something that uses only one sensor on arduino and makes the ellipse in p5 move on the horizontal axis, in the middle of the screen, and nothing on arduino is controlled by p5
- Make something that controls the LED brightness from p5
- Use p5 to control a servo motor and make a sound using
tone()on Arduino - Use one or more sensors on Arduino to control some aspect of your midterm project on p5
- Take the gravity wind example and make it so every time the ball bounces one led lights up and then turns off, and you can control the wind from one analog sensor
- Announcement
- Thursday
- Discuss final projects on Tuesday (if you are ready)
- Capstone Festival opening
- Discuss reading:
- A Brief Rant on the Future of Interaction Design
- A follow-up article
- Show your homework:
- Musical Instrument (working in pairs)
- Motors
- Final Project Proposal
- DC motors
- Fabrication and Construction Techniques
An LED can make light, what makes motion?
=> **Electromagnetism**
Electrical devices that rely on the principle of electromagnetism:
- Electromagnets
- Loudspeakers and headphones
- Solenoid
- Relays
- All kind of motors
- AC motors
- DC motors
- Brushless DC motors
- Stepper motors
- Servo motors (which actually consist of a DC motor + servo circuitry)
- Take the DC motor and connect it directly to 5V and GND
- Now reverse the wires
Can we connect the motor to an Arduino output just like we did with the piezo buzzer?
- No!
Why not?
- Arduino current limitations
- What is current? It is the rate of flow of electrons through a conductor.
- You don't get to control the current.
- The voltage depends on the current and the resistance (Ohm's law: I=V/R)
- You can provide a voltage (with Arduino, the voltage is always 5V)
- Each device has it's own "resistance"
LEDs have relatively high "resistance", and so consume low current. Motors have relatively low "resistance", and so consume high current
- Current flowing through any resistance causes heat (P = I^2/R)
- Everything has resistance
Therefore, anytime electricity is flowing there will be heat
Heat causes damage
(We've not had to worry about that up to now because everything we've done uses very little current)
Arduino can not protect itself from damaged caused by overheating. It does not limit current, it is damaged by too much current
The amount of heat a component can withstand before it is damaged is governed, to a large extent, by its size
The transistors that make up Arduino are tiny
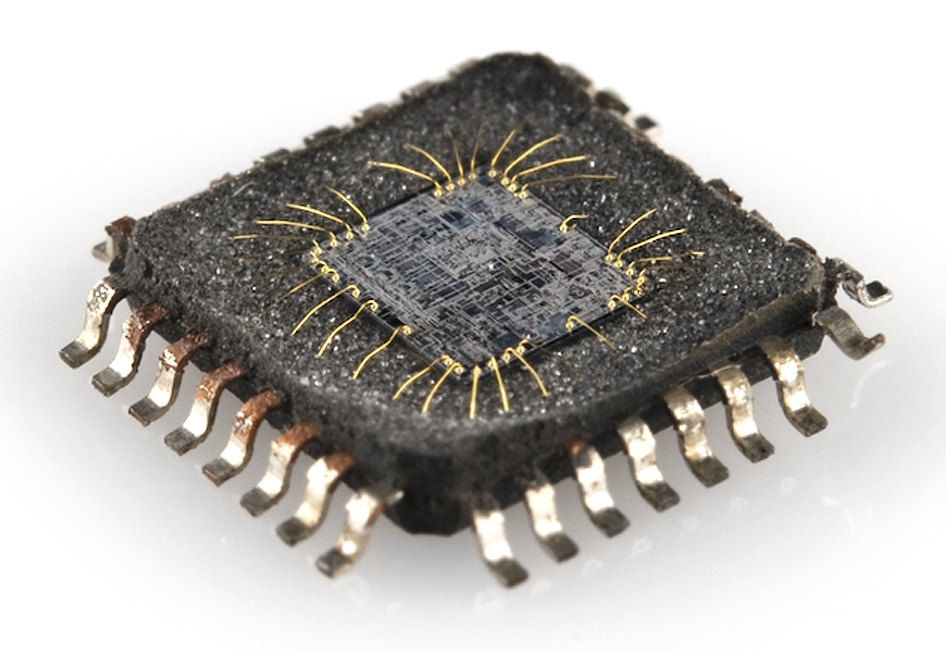
(Image courtesy of SparkFun)
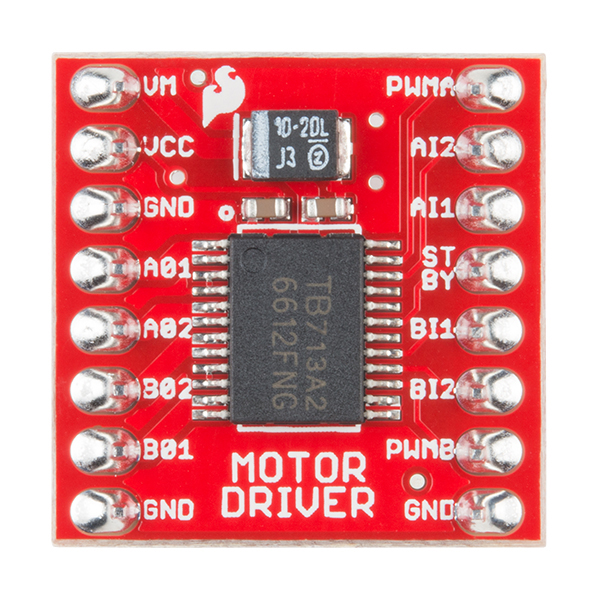
In order to control a motor with Arduino we need a separate device called a motor driver
How does the motor driver avoid overheating?
It has much bigger transistors
Circuit Schematic

Here's a closeup of the motor driver with pins clearly labeled:
How did I choose which pins to use?
- Never use pins 0 and 1 (dedicated for USB communication)
- Avoid pin 13 if possible (it flashes 3 times on reset)
- Directional control pins (ain1, ain2, bin1, bin2) only require digital signals so avoid pins with extra functionality (analog input, SPI, PWM)
- Inclusion of the servo library
disables
analogWrite()on pins 9 and 10 (I'm not using the servo library now but perhaps I'll add it later) - Use of the
tone()function disablesanalogWrite()on pins 3 and 11 (I'm not using thetone()function now but perhaps I'll add it later) - This leaves PWM pins 5 and 6 for the speed controls (pwma and pwmb)
- Might as well choose nearby digital pins
Code
const int ain1Pin = 3;
const int ain2Pin = 4;
const int pwmAPin = 5;

const int bin1Pin = 8;
const int bin2Pin = 7;
const int pwmBPin = 6;


void setup() {
  pinMode(ain1Pin, OUTPUT);
  pinMode(ain2Pin, OUTPUT);
  pinMode(pwmAPin, OUTPUT); // not needed really
}

void loop() {
  // turn in one direction, full speed
  Serial.println("full speed");
  analogWrite(pwmAPin, 255);
  digitalWrite(ain1Pin, HIGH);
  digitalWrite(ain2Pin, LOW);
  // stay here for a second
  delay(1000);

  // slow down
  Serial.println("slowing down");
  int speed = 255;
  while (speed--) {
    analogWrite(pwmAPin, speed);
    delay(20);
  }
}
Control the motor speed and direction using a potentiometer:
const int ain1Pin = 3;
const int ain2Pin = 4;
const int pwmAPin = 5;

const int bin1Pin = 8;
const int bin2Pin = 7;
const int pwmBPin = 6;

const int potPin = A5;


void setup() {
  pinMode(ain1Pin, OUTPUT);
  pinMode(ain2Pin, OUTPUT);
  pinMode(pwmAPin, OUTPUT); // not needed really
}

void loop() {
  int potVal = analogRead(potPin);
  delay(20);
  if (potVal > 1023 / 2) { //counterclockwise
    digitalWrite(ain1Pin, HIGH);
    digitalWrite(ain2Pin, LOW);
    analogWrite(pwmAPin, potVal / 4);
  } else { //clockwise
    digitalWrite(ain1Pin, LOW);
    digitalWrite(ain2Pin, HIGH);
    analogWrite(pwmAPin, 255 - potVal / 4);
  }
}
Follow this guide
- Discuss reading
- Show homework
- Debugging
- Digital Multimeter
If you want help solving a problem in your assignment, do the following:
- Reduce your problem to the simplest circuit and program that demonstrates your problem. (Don't be surprised if while doing this you solve your problem. This is usually what happens to me.)
- Write a message on Discord, describing carefully
- What you think should happen
- What you observe happens
- Your schematic, code (both p5js and Arduino), and the best picture you can take of your breadboard circuit
Try to think logically what could be the cause of these problems, and try to come up with a test that would tell you if that was the problem
- What would you do if your LED doesn't seem to work?
- Is the LED backwards?
- Is the LED burned out?
- Is the Arduino pin damaged?
- Is one of the jumper wires broken?
- What would you do if your motor doesn't seem to work?
- What would you do if your light sensor doesn't seem to work?
- What would you do if your potentiometer doesn't seem to work?
- What techniques have you learned to help you find problems?
- The three most useful measurements
- Continuity
- Checking connections
- Checking switches
- Voltage
- Checking sensor circuits
- Checking Arduino digital outputs
- Resistance
- Checking resistive sensors
- Checking motorso
- Continuity
- How to connect to Arduino pins or the solderless breadboard
- IM End of Semester Show Timeline
- Course evaluations
We will have a semi-final evaluation of your project on Tuesday. Your project should be completely functional at this date. Aesthetic details can be added between Tuesday and Thursday.
- You will have 20 minutes in class to set up your project. Practice setting it up beforehand, and if it takes longer than 20 minutes, then you need to prepare your project beforehand so that it can be set up in class in 20 minutes or less.
- These 20 minutes are not for debugging projects.
- Projects will be presented and evaluated at 3:55pm sharp!
The showcase takes place on Thursday May 8, 5-8pm
- Set up your project at your designated table
- You can set up any time from Tuesday morning through Thursday at 4:30pm
- Your project must be set up and functioning perfectly by 4:30pm.
- The tables must be cleared of any tools, backpacks, food, etc. Nothing should be on the table apart from your project.
- Exhibit your project in the IM End of Semester Show.
- Deinstall your work at end of show. Do not leave any part of your project behind.
- Return any equipment you have checked out to room 028
- You may keep your kit and any parts from the consumables area
- If you wish to donate any of your electronics to the IM program, leave them in the designated area
- Recycle any part of your project that can be recycled (plastic, cardboard, metal)
- Dispose properly of any parts that can not be recycled. If the waste bin is full, find another one down the hall
- Turn off Soldering Irons!
- 3:35-3:55 set up projects
- 3:55 Semi-final project evaluation
- Review schedule for Thursday
- Visit showcase area
- Our tables are ready. You can set up your projects any time before Thursday at 4:30
- Projects that are not set up by 4:30 on Thursday can not be shown
- See End of Semester Showcase above
------Electric circuit theory reference ----
- Introduction to electricity
- Electricity
- Circuits
- Series and Parallel
Simple circuit using Arduino, LED, and Resistor
The most confusing part of this lecture will be the solderless breadboard:
 Image courtesy of
SparkFun
Image courtesy of
SparkFun
Here is how to build the circuit

Here is the schematic of what you've built

Theory
Electricity is mysterious
- We can predict what it will do quite accurately, but don't really understand it what is it
- Flow of electrons
- Electrons want to move from place of higher potential energy to place of lower potential energy
- Like a rock or water falling from a height
- Unlike a rock or water, electricity can only travel in a conductor
- AC vs. DC - very briefly, will discuss more as it comes up
What makes a circuit?
- Something to provide that difference in potential
that will cause the electrons to want to move.
- Typically a battery, charger, or USB port
- The technical term is "power supply"
- In our case your laptop via the Arduino
- What is the Arduino doing in this case?
- Conductors to allow the electronics to move
- Components or other things that usually convert this electrical energy to some other form of energy (e.g. light, sound, heat, movement)
- Optionally, switches or other sensors to control the flow of energy
- In our circuit the resistor is controlling the brightness of the LED so that it doesn't burn out
- I=V/R
- The math only works for linear components
- But the principle is the same for non-linear components
- is a very important concept:
- For a given resistance, the higher the pressure (voltage), the higher the current
- For a given voltage, the higher the "resistance", the lower the current

- What if we want to turn it the LED on and off?
- Pull out a wire
- That's a switch, but a pretty inconvenient one
- Schematic symbol of switch
- How does it work?
- Breaks the flow of electrons by breaking the continuous path
- Doesn't electricity (the electrons) just flow out the end of the wire?
- The switch can go on either side. How is this possible?
Let's use a real switch


- How is this switch different from the earlier switch?
- Schematic symbol of momentary switch
- What was the previous "switch"?
- Schematic symbol of toggle switch