


Speedarr monitors your Plex streams and dynamically throttles uploads to prevent buffering.
Streaming always gets priority. Will also balance multiple download clients.
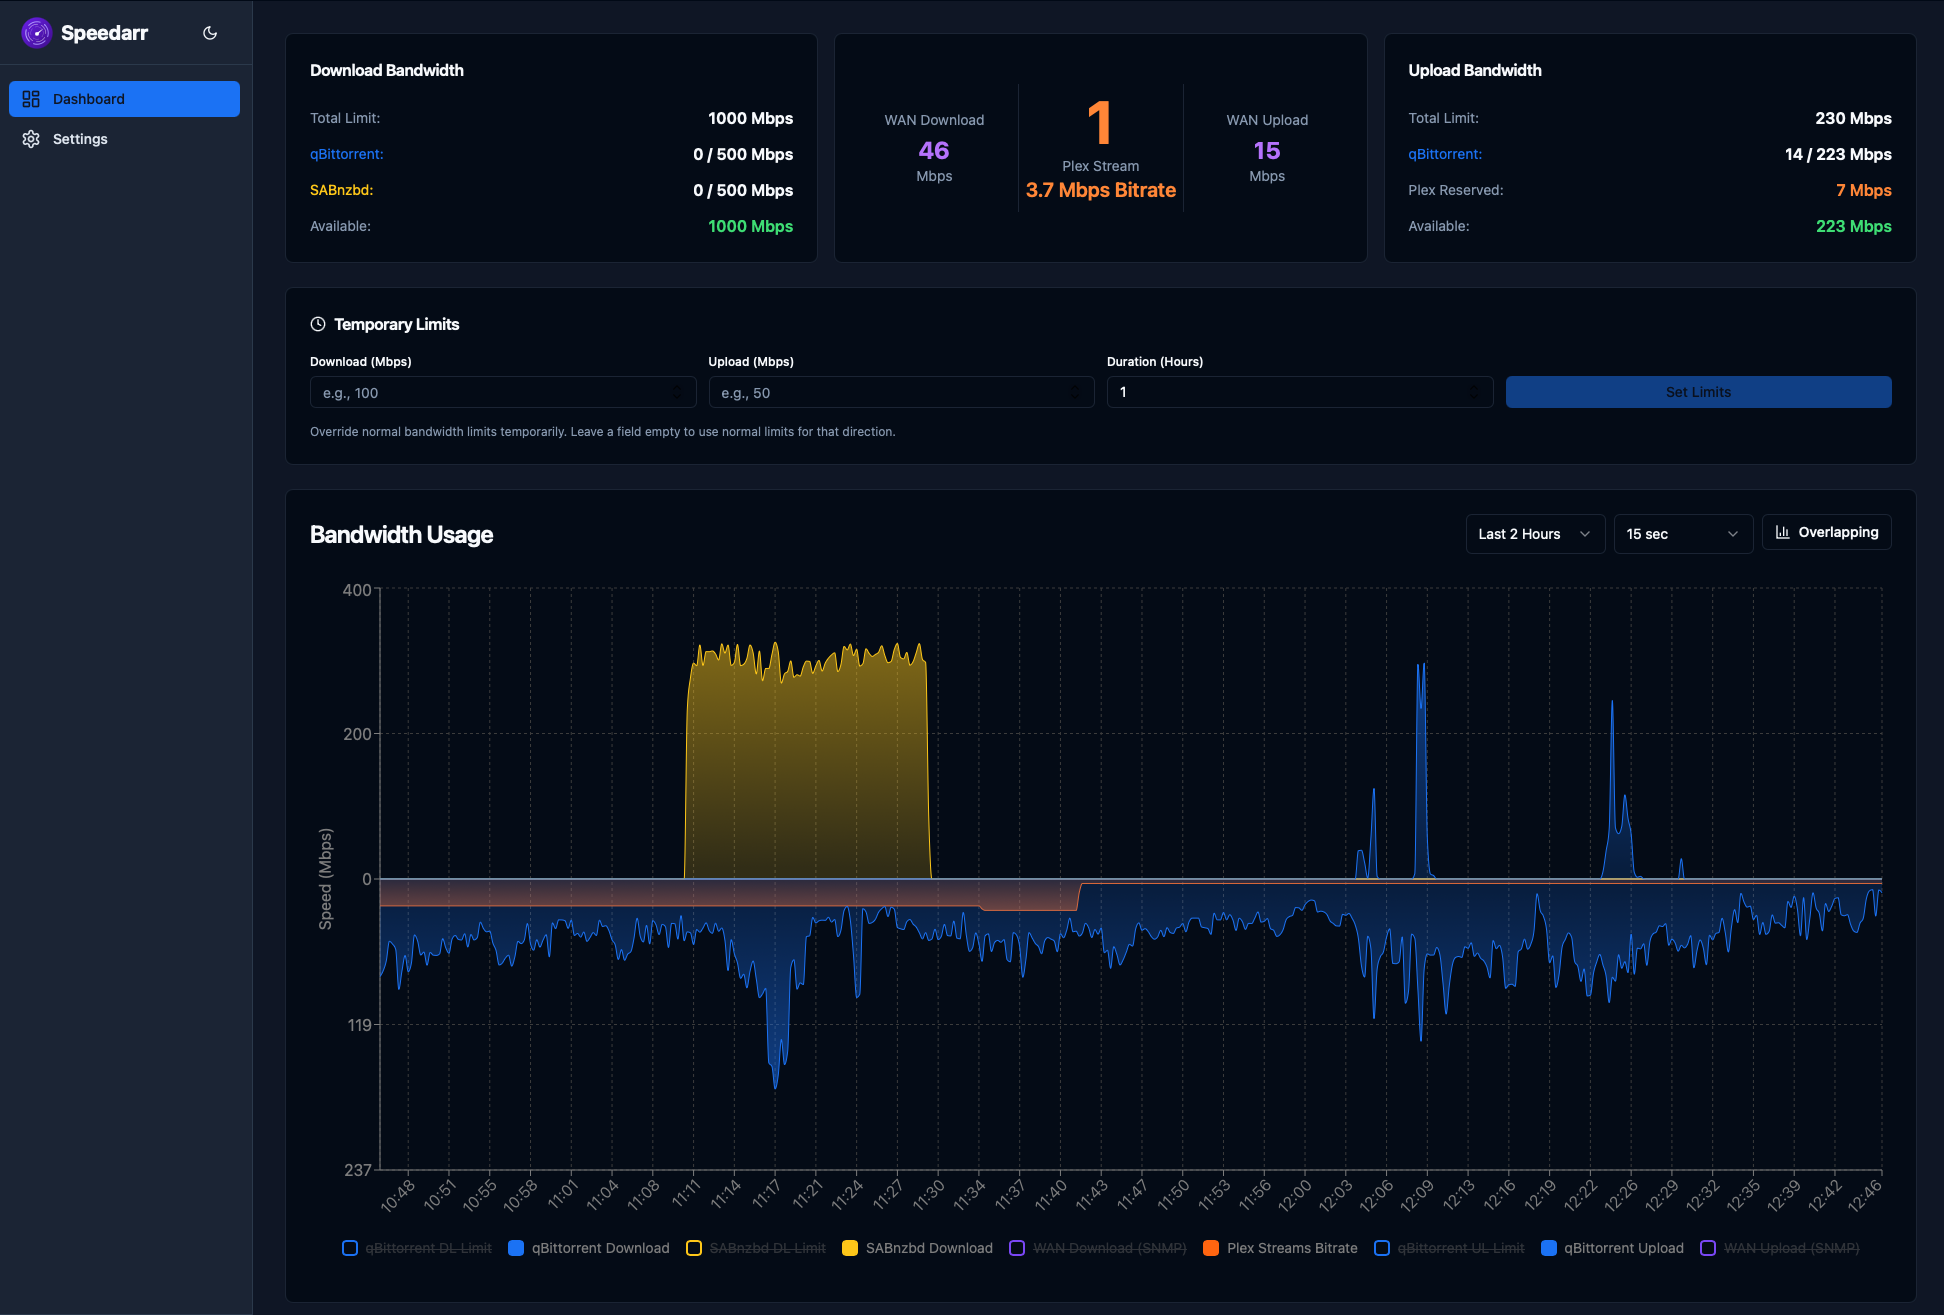
- Real-time dashboard with bandwidth charts, active stream monitoring, and stream history
- Direct Plex API polling for stream detection
- Support for qBittorrent, SABnzbd, NZBGet, Transmission, and Deluge
- Separate upload and download management with per-client allocation
- Scheduled bandwidth limits for time-based rules (e.g. different speeds during peak or off-peak)
- Temporary speed limit overrides with automatic expiration
- Restoration delays based on media type — episodes restore faster than movies
- SNMP monitoring for real WAN bandwidth from your router (Unifi currently, more coming soon)
- Notifications via Discord, Pushover, Telegram, Gotify, ntfy, and custom webhooks
This project is entirely vibe coded using AI (Claude). While I have found it works well, is actively used and I have thoroughly tested, the codebase has not been manually reviewed line-by-line. Use at your own discretion and please report any issues you encounter.
The goal of Speedarr is to help you achieve the following:
- Maximum download speed if you have multiple download clients
- Maximum upload speed for seeding while reserving ample bandwidth for plex streams
This really doesn't add much value for you, except maybe graphing the download speeds, you could use it for alternate speed limits but you're probably better off doing this natively.
Okay now we're talking, Speedarr can help you! Configure the max download bandwidth you want the torrent client to use and then the max upload bandwidth too, strongly recommend 10-20% lower than your actual internet speed to allow some bandwidth for other devices on your network. For arguments sake let's say you have 100Mbps upload, so you configure 80Mbps in Speedarr, what will happen is: If there are no plex WAN streams your torrent client will be allowed to upload at 80Mbps, within a few seconds of a plex stream starting Speedarr will then "rate limit" the torrent upload. For example; An 8 Mbps stream with 100% overhead = 16.0 Mbps reserved leaving 64Mbps for torrent upload (80Mbps - 16Mbps)
Now we're getting into the really cool (in my opinion, and yes I mean mine not Claude). Let's assume a 1000Mbps/100Mbps internet plan. You configure 900Mbps/80Mbps in Speedarr, let's go with qBit and sab and you then set the downloads allocation split of 70/30 for qBit/sab. While the download clients are idle they will evenly split the download bandwidth, Eg 450Mbps/450Mbps, If one download client starts downloading it will get 95% of the configured bandwidth or 855Mbps, this leaves 45Mbps for the other download client to start. Now if a download starts on the other client your configured split above will come into play and one client will get 630Mbps and the other will get 270Mbps. This isn't just limited to 2 clients either, you can have 2 or more and Speedarr will follow the same principles.
- Plex Media Server with an API token
- At least one download client
- Open the Community Applications (CA) plugin
- Search for Speedarr
- Click Install and apply the default template
The container will be available at http://[UNRAID-IP]:9494.
- Download the
docker-compose.ymlfile from this repository. - Pull the latest image:
docker compose pull- Start the container:
docker compose up -dOpen http://localhost:9494 — the setup wizard will walk you through connecting Plex and your download clients.
Tip: If your services use
.lanor.localhostnames, adddns: [192.168.1.1](your router IP) to the service indocker-compose.yml.
- Open any media item in the Plex web app
- Click Get Info → View XML
- Copy the
X-Plex-Tokenvalue from the URL
First time run will present a wizard to guide you through the process
The Wizard will configure the mandatory settings but other options are configurable from the Settings page after setup:
- Plex — Server URL, token, LAN stream handling
- Download Clients — Add/remove clients, set max speeds, assign colors
- Bandwidth — Total limits, allocation percentages, scheduled limits, overhead
- Restoration — Delays for episodes vs movies
- SNMP — Router monitoring with interface auto-discovery
- Notifications — Per-platform setup with event filtering and thresholds
- Failsafe — Plex timeout behavior, shutdown speeds
Plex have an excellent write-up on Bitrates and How They Matter located here, I would recomened reading this before continuing but I will provide a summary below.
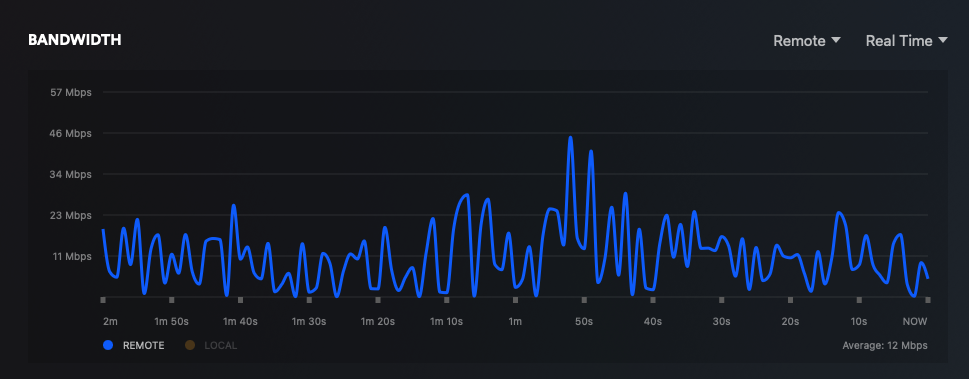
In the below screenshot there are 2 plex streams totalling 21Mbps but as you can see the bandwidth fluctuates greatly. For the most part it's well under the 21Mbps but then with spikes of over double that. After very closely watching my server over the years I found reserving double the bandwidth is sufficient for minimizing buffering. This is why the default protocol overhead in Speedarr is 100%, you can of course lower this or even increase it if you see fit.
The logic behind this feature is that you are likely to start another stream once one ends so Speedarr "holds" this bandwidth until the time specified has been reached, rather than letting your upload clients use this bandwidth. This ensures there is bandwidth already carved out rather than waiting for Speedarr to detect a new stream.
- GitHub Issues — Bug reports and feature requests
To report a security vulnerability, please use GitHub's private vulnerability reporting instead of opening a public issue.