A1. Tutorial: Aftermath Part 1
This tutorial guides you through recreating the very first mission from the core game, “Aftermath”. You won’t need to recreate every single IA mission, Imperial Commander will eventually include them all. It is very helpful as a tutorial, though, because the mission’s scope is limited, but it contains a lot of things elemental to the Imperial Commander Editor.
You can also find a tutorial video guiding you through the creation of the mission "Spearhead" here.
Don’t forget to save the mission throughout!
Take the campaign guide and familiarize yourself with the map and the text. It’s crucial when building your own missions, but also very helpful to follow this tutorial.
If you haven’t already, visit this site to download the Imperial Commander Editor, unzip it to any folder, and click Imperial Commander Editor.exe to launch the editor. In the project manager, click New Mission.

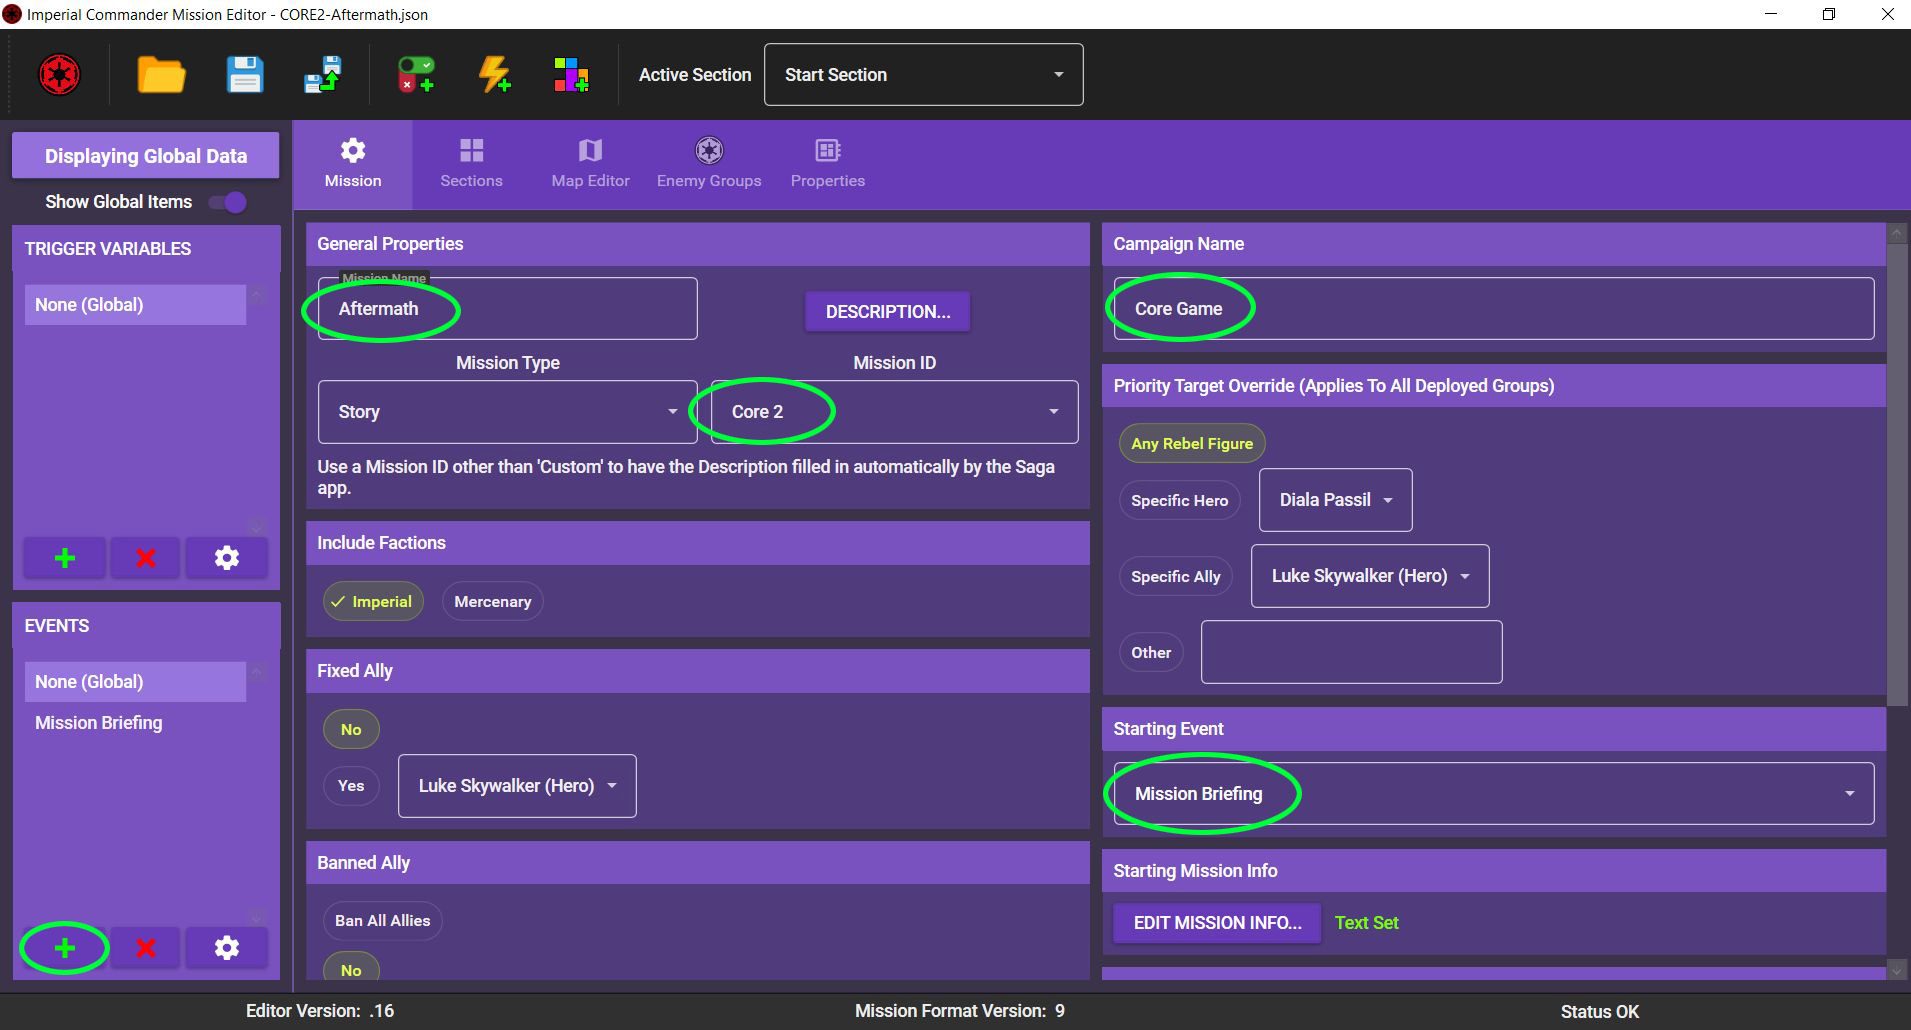
Name the mission “Aftermath”. Since it's an official mission, select the assigned mission ID from this list (Core 2). You can also click on DESCRIPTION and enter a short description of the mission.
The mission works fine with the default priority target, so leave those for now. You can also leave factions, fixed or banned allies, and banned enemy groups the way it is.
You are going to need a starting event, however. Click on the green plus under EVENTS on the bottom left to create an event and call it “Mission Briefing”, then hit ACCEPT. You don’t need to change anything now, we will get back to that later.
Under STARTING EVENT, select the event you just created. This is the first event that is displayed when beginning the mission.
The map from “Aftermath” can be divided into two sections: The exterior (the Start Section) and the Imperial outpost (Section 2). This means that it makes sense to create two sections.
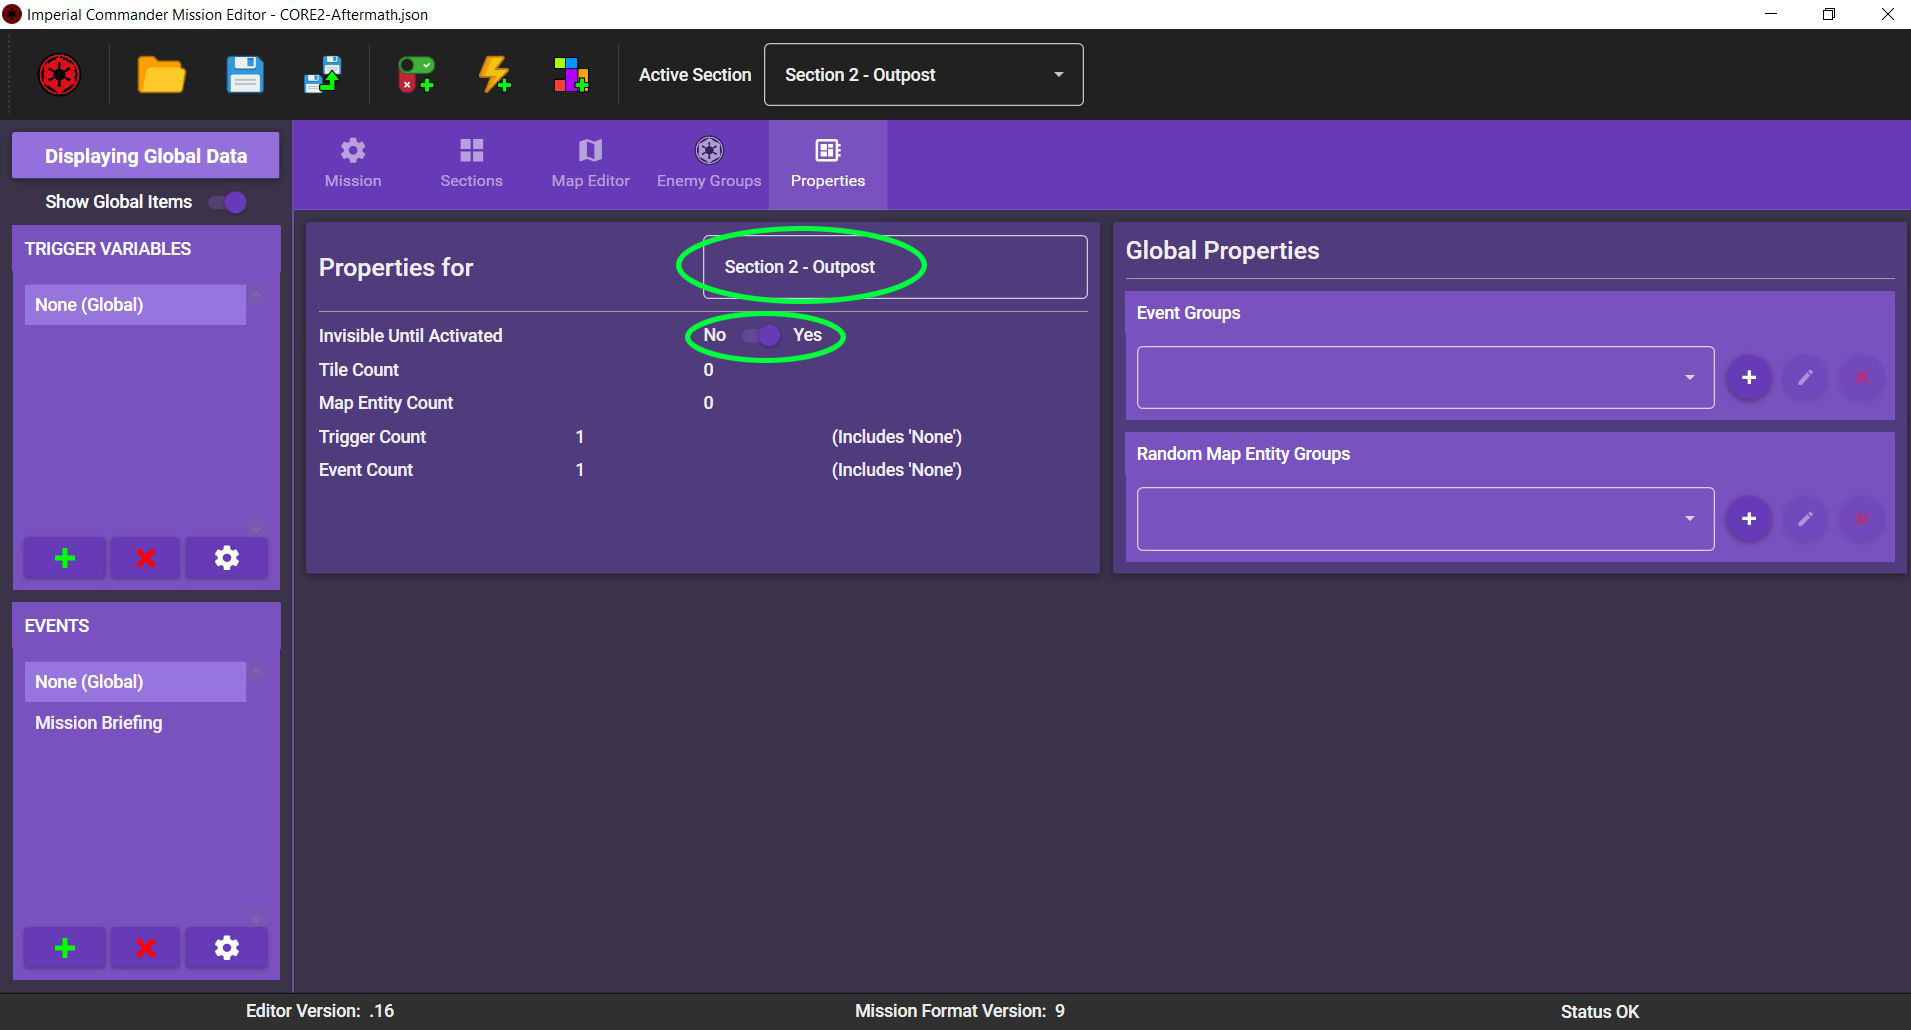
Leave the Start Section as it is. Click Sections in the menu bar to open the section overview, then click the Add a Map Section icon at the top. This creates a section called New Section. Click the 🖉 icon to edit its properties.

In the properties screen, rename the new section “Section 2 – Outpost”. Since we don’t want this section to be visible from the start, toggle Invisible Until Activated to Yes.
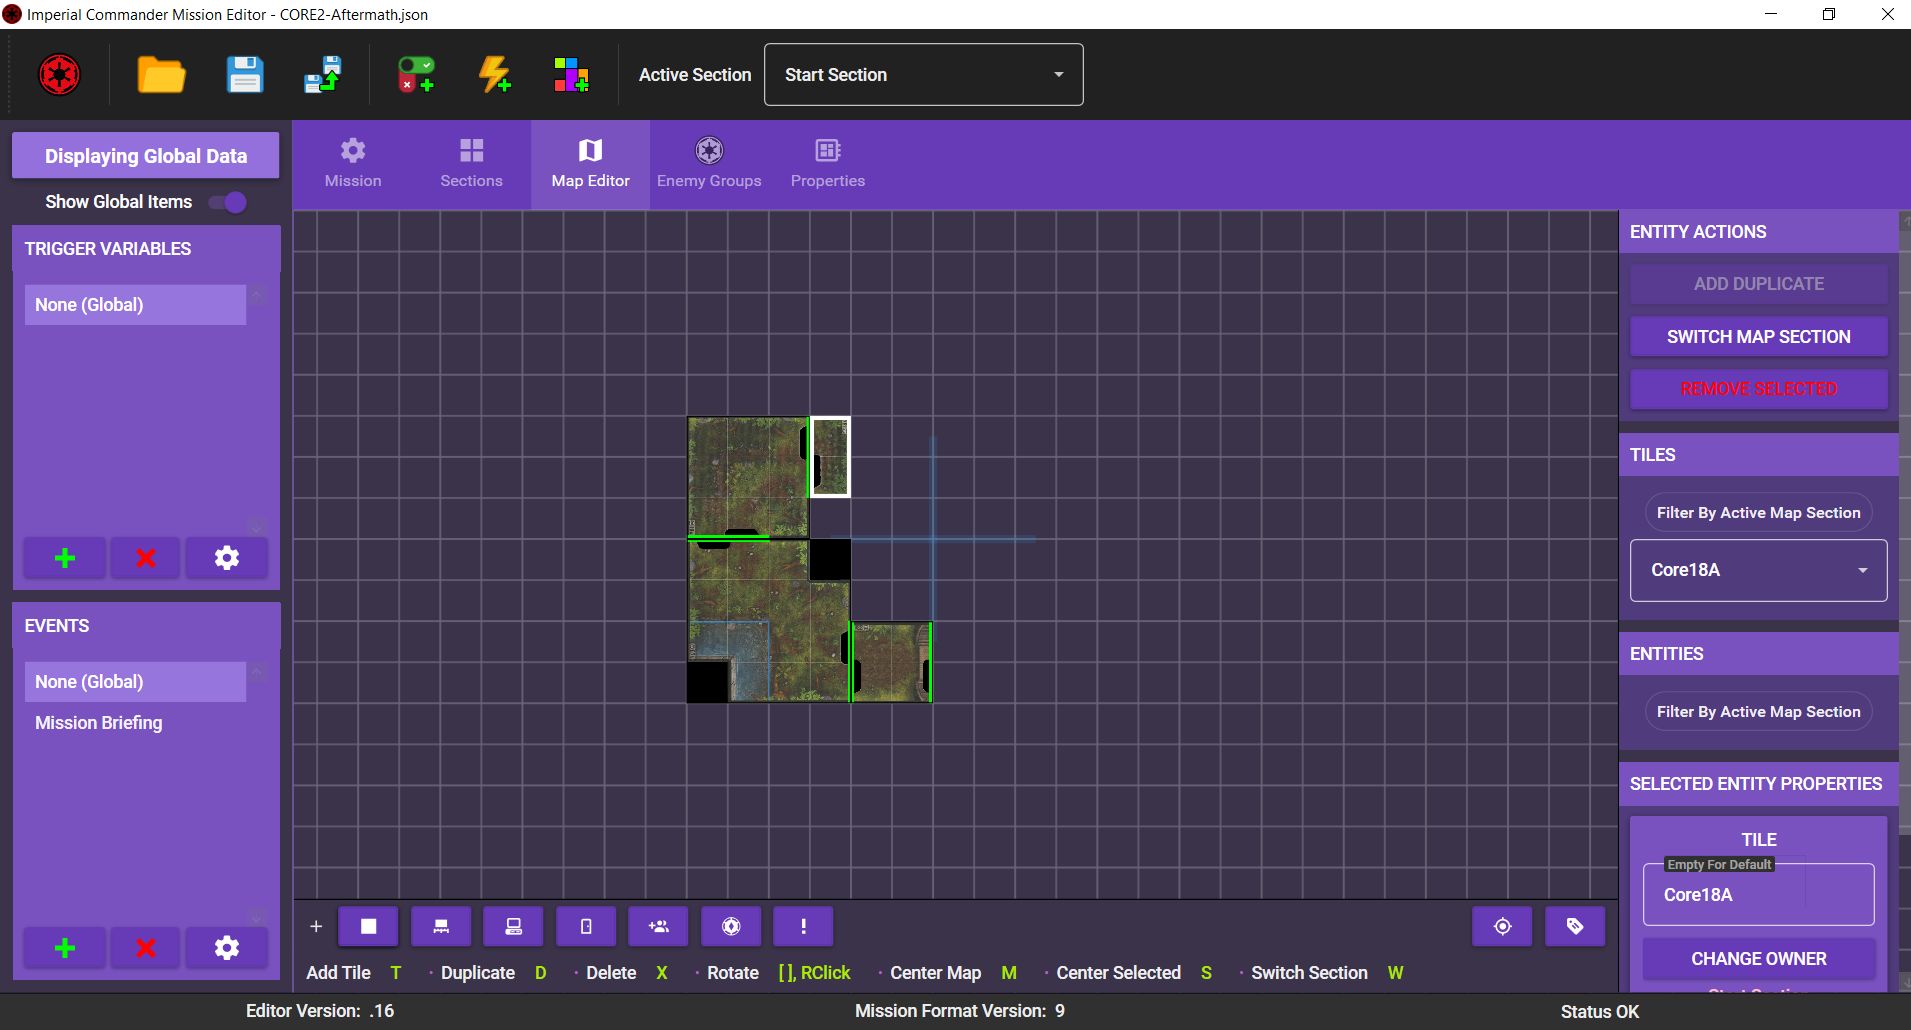
Click Map Editor in the menu bar to open the map editor. You are now going to create the map part for the first section, so make sure you switch the Active Section at the top to “Start Section”.
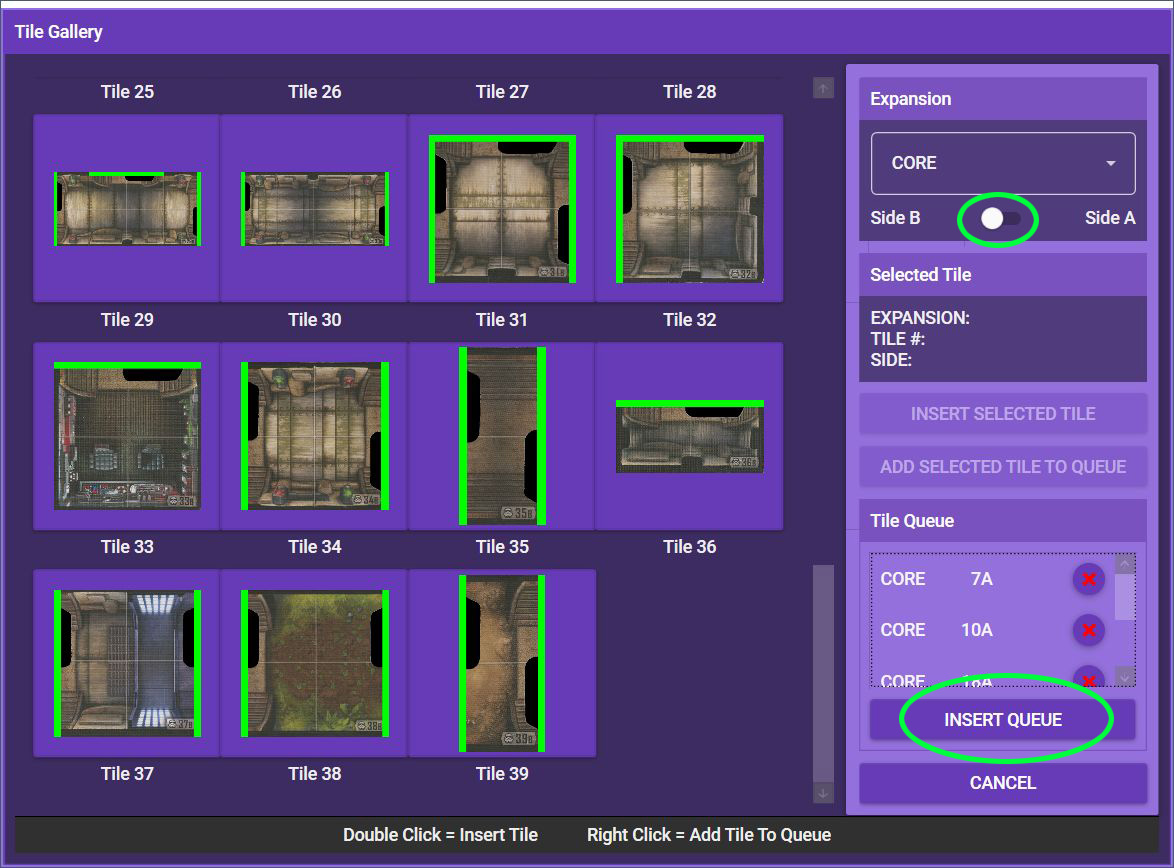
The exterior section from “Aftermath” uses the tiles 07A, 10A, 18A, and 38B from the core game. Click the little square icon at the bottom left of the editor (Add a Tile) to open the tile gallery. In the tile gallery, you can double-click a tile to immediately add it to the map, or right-click it to add it to the “tile queue”. On the top right of the tile gallery, you can switch between side A and side B of the tiles.
Scroll to tiles 07, 10 and 18A and right-click on each. Then turn the toggle at the top right to Side B, scroll to tile 38 and right-click on it, too. Finally, click INSERT QUEUE to drop all tiles in the map editor. Don’t worry if you made a mistake. You can always just remove tiles and re-add them, or select a tile and switch it to side B in the editor.
The tiles are all added at the same position. Zoom in with the scroll wheel and use the mouse to simply drag the tiles into position. Right-click a tile to rotate it. Position the tiles as shown in the campaign guide. If you ever can’t find your map, hit M on the keyboard to center the view, or S to center the view on the selected tile / entity.
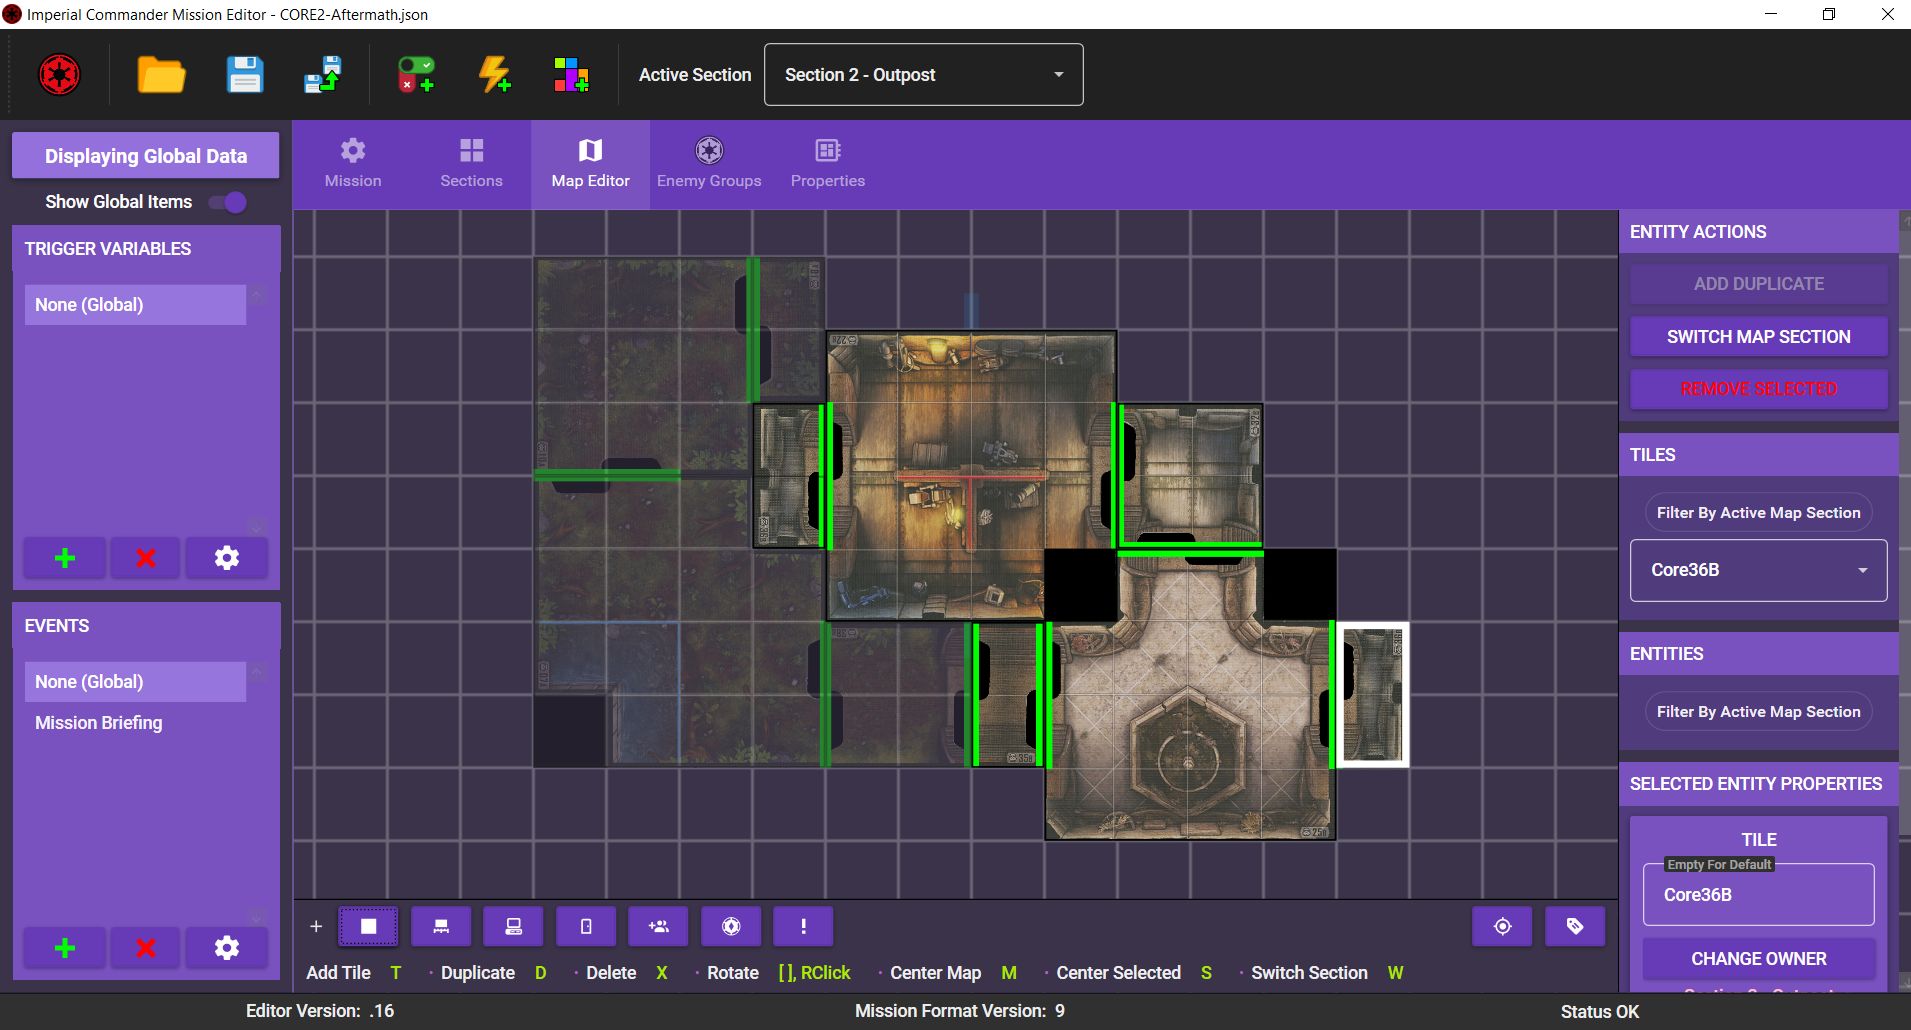
Under Active Section at the top, switch to “Section 2 – Outpost”, then open the tile gallery again. Right-click on tiles 22B, 25B, 32B, 35B, 36B and once more on 36B to add them to the queue, then click INSERT QUEUE to drop them in the editor. As before, use the mouse to drag and rotate them into position. The map is finished now.
You can now start adding map entities to the map. We’ll start with deployment points. According to the campaign guide, we need 1 green and 2 yellow deployment points, plus 1 red deployment point. We also need initial starting positions for the Stormtroopers, the Probe Droid and the Imperial Officer. We are going to represent those with black deployment points.
First, switch the active section to “Start Section” again. Then click the deployment point icon at the bottom of the editor to add a deployment point. On the right side, scroll down to SELECTED ENTITY PROPERTIES and give the deployment point a name, for example “DP Green”. Since green deployment points are active from the start, toggle Is Active? to Yes. Also change the color to green.
Continue with placing the yellow and red deployment points in the same way. Since they are inactive at the start of a mission, leave Is Active? at No.
Last, create 5 black deployment points. Leave them inactive and name them “DP Stormtrooper 1”, “DP Stormtrooper 2”, “DP Stormtrooper 3”, “DP Probe Droid” and “DP Imperial Officer”. Place them at the positions of the Initial Groups.

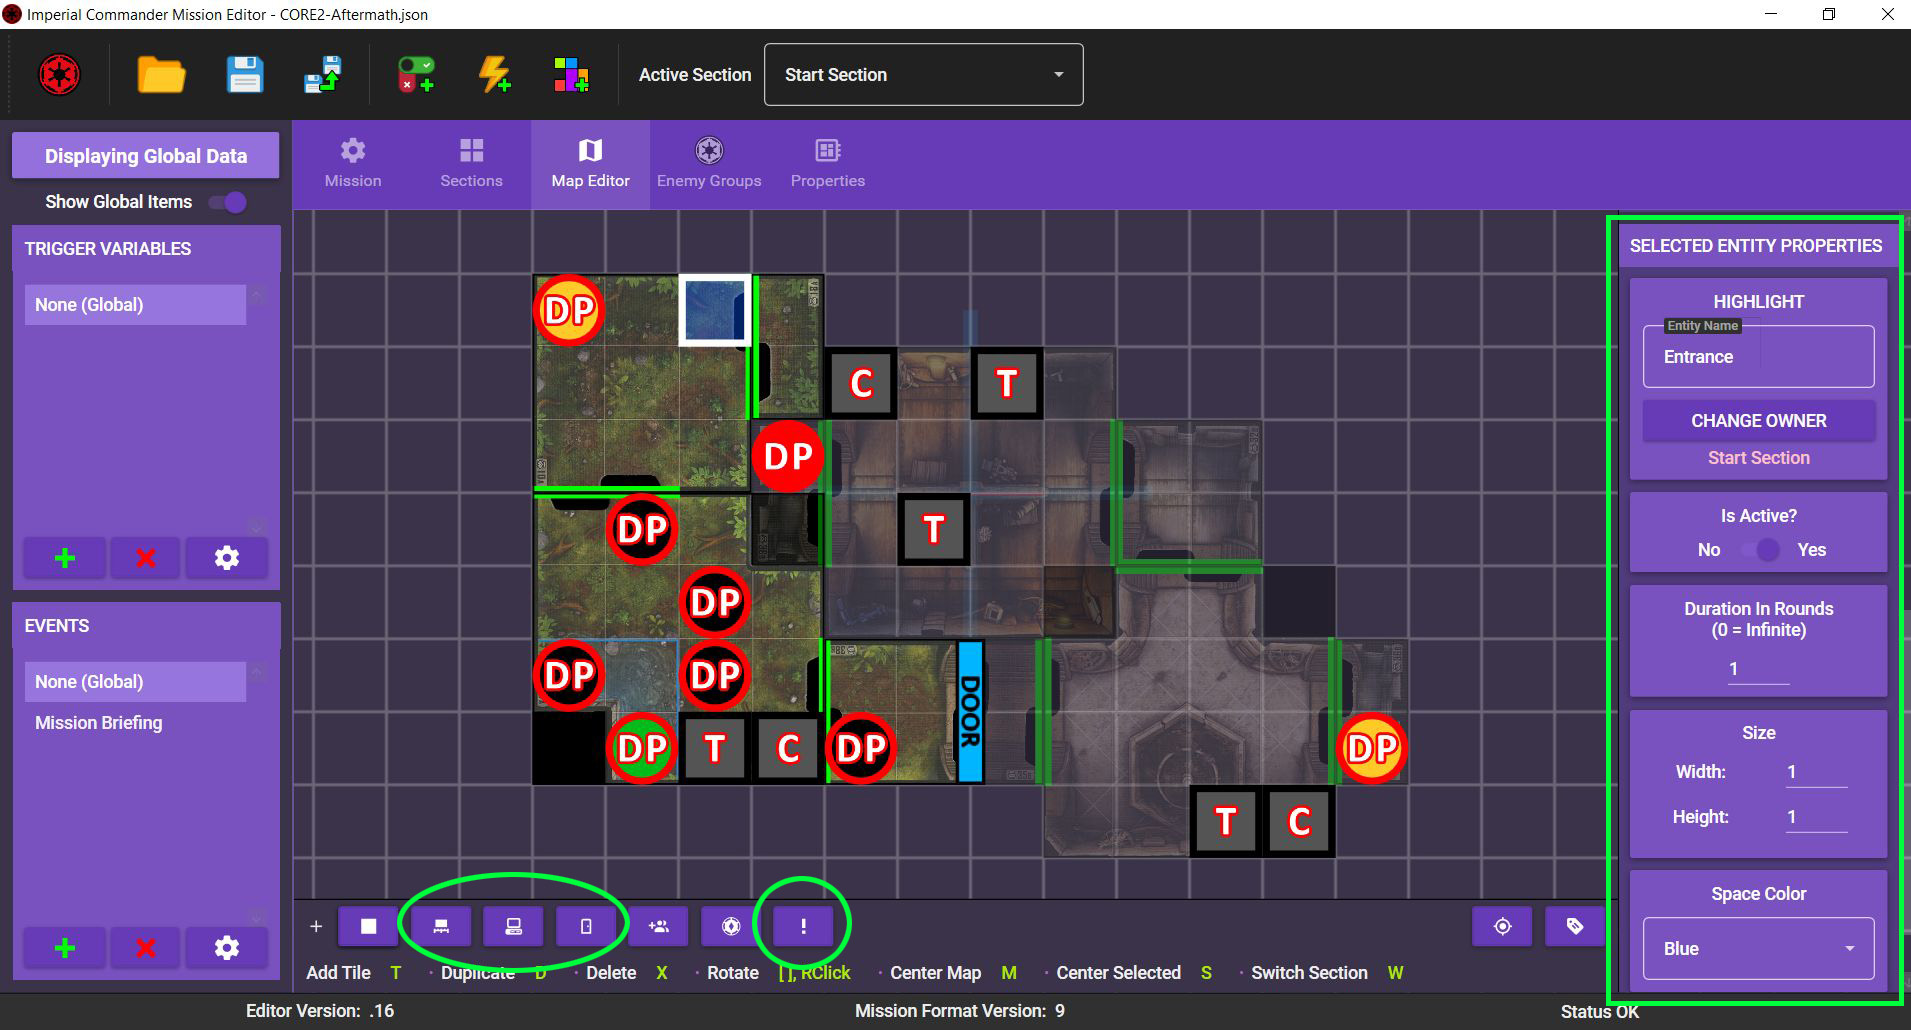
There are more map entities needed before the map is complete. Still missing are doors, crates and terminals. Simply place them with the respective icons at the bottom and drag them in the position assigned by the mission map. Doors can be rotated by right-clicking them. Give them unique names, such as Crate1-3 and Terminal1-4. Leave them all active and at their default color, it’s not necessary to change this in “Aftermath”.
For the entrance, simply place a blue highlight and name it “Entrance”. Set it to Active and set the duration to 1 round (the tile will stop being highlighted after that).
As you might have noticed, all the map entities (deployment points, tokens and highlights) you just added all belong to the Start Section, regardless of where they are placed. You still need to switch all the tokens on Section 2 over to that section.
To do this, select “Section 2 – Outpost” as the active section at the top. Next, click on each map entity on section 2 and click on CHANGE OWNER just below its name to assign it to section 2. This makes sure that they are only placed once section 2 is revealed.

As the last step in part 1 of the tutorial, you need to set the Initial and Reserved Groups for the mission. To do so, click in Enemy Groups in the menu bar to open the Enemy Group Management screen.
“Aftermath” has Stormtroopers, a Probe Droid and an Imperial Officer as Initial Groups. The mission also has an E-Web Engineer, another Imperial Officer and another Stormtrooper group as Reserved Groups.
Note: Since there are sometimes multiple identical deployment groups, every group is assigned a unique ID (DG001 to DG090). Take care not to assign the same group twice. For example, choose “Stormtrooper: DG001” for the Initial Group and “Stormtrooper: DG002” for the Reserved Group.
Simply select “Stormtrooper: DG001” from the dropdown menu. It doesn’t need a custom name or custom instructions, so just leave this out. Set “DP Stormtrooper 1” as its deployment point, then click ADD INITIAL GROUP. Repeat this for the “Probe Droid: DG011” and the “Imperial Officer: DG004”, assigning them to “DP Probe Droid” and “DP Imperial Officer” respectively.
Next, add “Stormtrooper: DG002”, “Imperial Officer: DG005” and “E-Web Engineer: DG007” to the Reserved Groups by selecting them and clicking ADD RESERVED GROUP. Reserved Groups do not need to be assigned a deployment point at the start.
Finally, click the 🖉 icon next to the Initial Stormtrooper group, then click Edit Deployment Points.... Here you can assign each figure an individual deployment point. Assign the figures to the three “DP Stormtrooper” deployment points and hit ACCEPT.

Once you are done, you have successfully created the foundation for the mission. In Part 2 of the tutorial, you find out about how to create events and link them together and to the map.