A2. Tutorial: Aftermath Part 2
Welcome to part 2 of the tutorial for the Imperial Commander Editor. In part 1, you learned how to set the basic mission settings and create the map. Part 2 is all about building the game logic for the mission via events and triggers.
If you haven’t already, load up the mission you created during part 1. Again, don’t forget to save your work throughout.
When beginning with the events for any mission, it’s good to go through the mission and create a list of events and what triggers them. This helps immensely with implementing later. You don’t need to create an actual written list, sometimes a mental list is enough. For the purpose of this tutorial, however, we’ll do one.
Start with the events provided by the mission. In the case of “Aftermath”, there are the following events:
| Event | Triggered by |
|---|---|
| Mission Briefing | Starting the mission (Start Event) |
| Fortified | Door opens for the first time |
| Lockdown | Round ends after the door is opened for the first time |
| End of mission – Rebels win | All terminals are destroyed |
| End of mission – Rebels lose | End of Round 6, or all heroes are wounded |
However, looking closer we notice that “Lockdown” has two options how it can play out, so it’s actually two slightly different events. We need one event that lets you decide between those two options, and two more for the actual events. Let’s refine that list.
| Event | Triggered by |
|---|---|
| Mission Briefing | Starting the mission (Start Event) |
| Fortified | Door opens for the first time |
| Lockdown - selection | Round ends after the door is opened for the first time |
| Lockdown – option 1 | Lockdown option 1 is selected |
| Lockdown – option 2 | Lockdown option 2 is selected |
| End of mission – Rebels win | All terminals are destroyed |
| End of mission – Rebels lose | End of Round 6, or all heroes are wounded |
Next, we need to add all the events to the list that are connected to any token on the map. We already have the door covered, because “Fortified” is tied to the door. However, we also have three crates and four terminals on the map. And when "Lockdown" option 2 is selected, the door closes again, so the new door needs an interaction, too. Let’s add all those to the list.
| Event | Triggered by |
|---|---|
| Mission Briefing | Starting the mission (Start Event) |
| Fortified | Door opens for the first time |
| Lockdown - Selection | Round ends after the door is opened for the first time |
| Lockdown – option 1 | Lockdown option 1 is selected |
| Lockdown – option 2 | Lockdown option 1 is selected |
| End of mission – Rebels win | All terminals are destroyed |
| End of mission – Rebels lose | End of Round 6, or all heroes are wounded |
| Terminal 1 destroyed | Clicking the terminal and selecting “Destroy” |
| Terminal 2 destroyed | Clicking the terminal and selecting “Destroy” |
| Terminal 3 destroyed | Clicking the terminal and selecting “Destroy” |
| Terminal 4 destroyed | Clicking the terminal and selecting “Destroy” |
| Door 2 destroyed | Clicking the new door and selecting “Destroy” |
| Crate 1 opened | Clicking the crate and selecting “Open” |
| Crate 2 opened | Clicking the crate and selecting “Open” |
| Crate 3 opened | Clicking the crate and selecting “Open” |
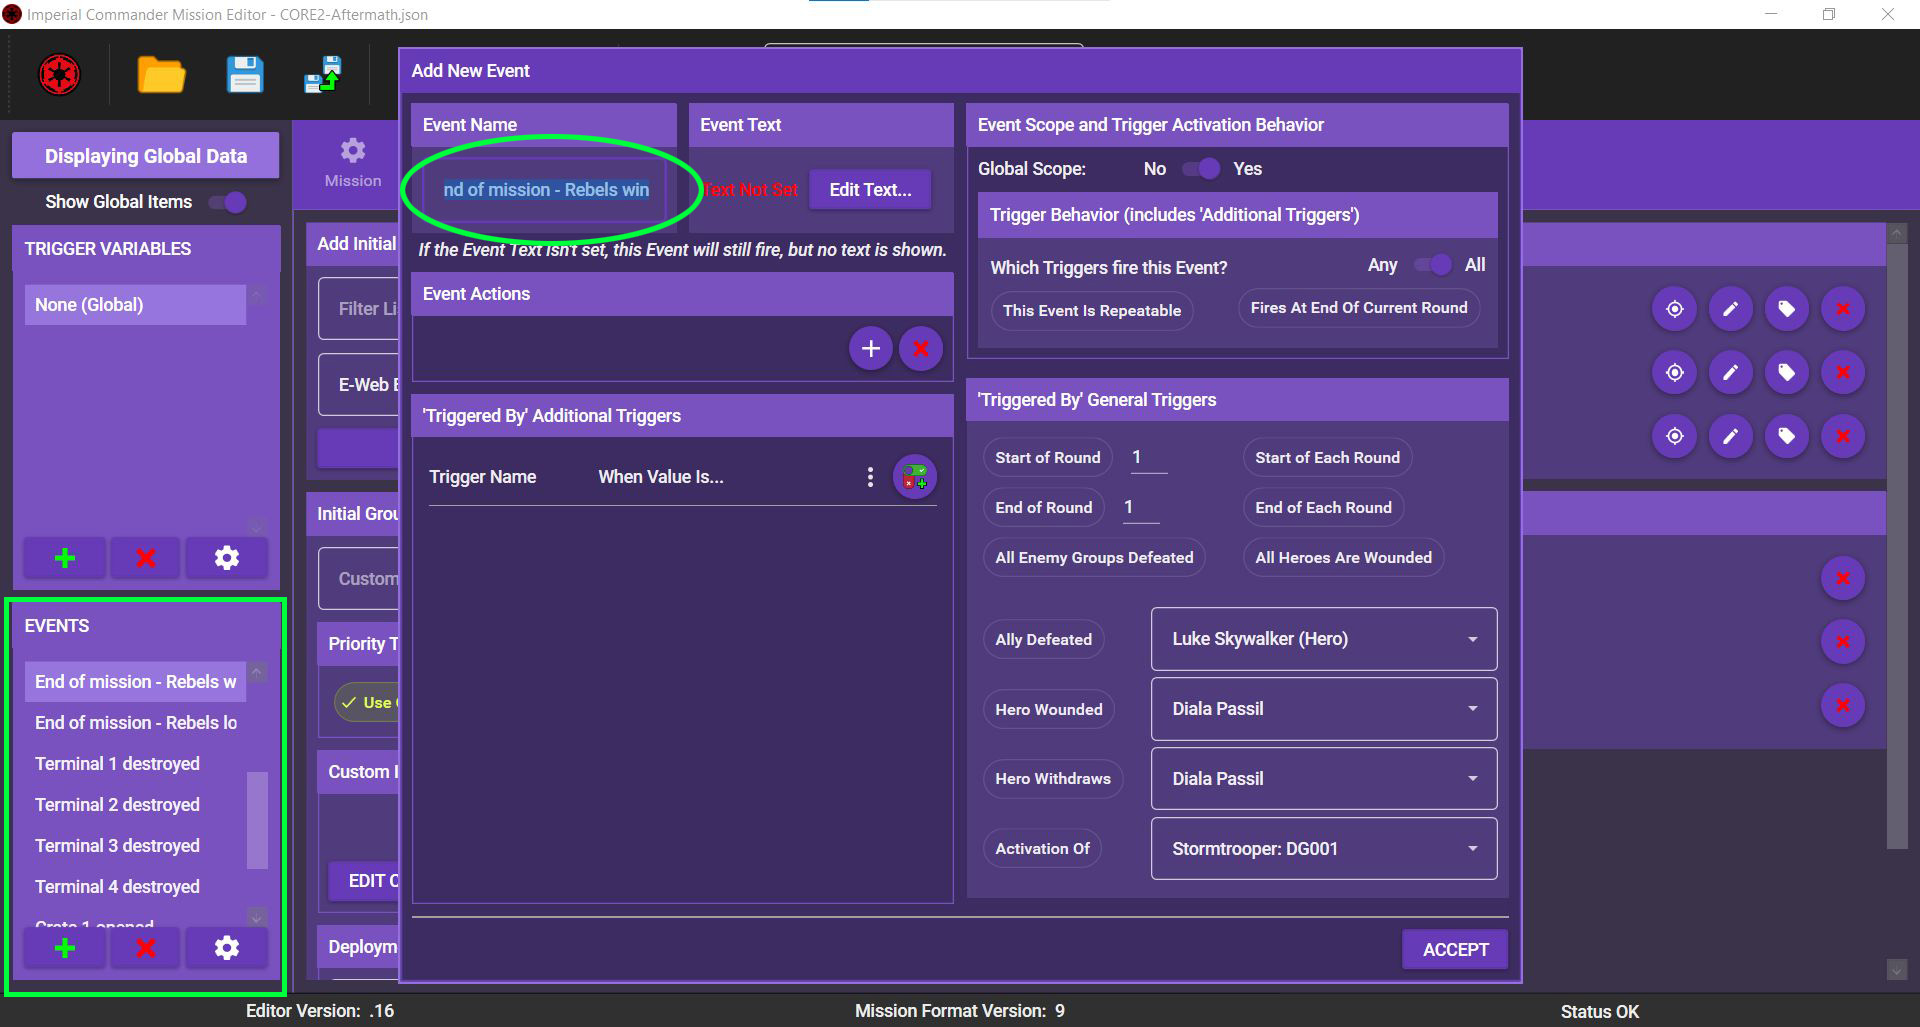
Now that we have a final list, we can simply add those events to the editor. We don’t need to fill anything in yet, just create all the events and name them. (“Mission Briefing” should already be there.)
The next step is to create custom triggers. Generally speaking, you only need custom triggers for events that are not directly linked to an interaction. We don’t need triggers that fall under the category of “general triggers”. We can simply toggle those on and off in the editor. In this case, “End of Round 6”, “End of Round” and “All Heroes Wounded” are general triggers, so we can leave them out. So we only need two triggers:
| Trigger | Used for |
|---|---|
| Door open | Combine with Fires At End Of Current Round to launch event "Lockdown - selection". |
| All Terminals destroyed | Used to count the number of terminals. Once the value reaches 4, the rebels win. |
Create both triggers in the app.
The three events “End of mission – Rebels win”, “End of mission – Rebels lose” and “Lockdown – selection” all are linked to multiple triggers.
| Event | Triggered by |
|---|---|
| End of mission – Rebels win | Terminal 1 destroyed AND Terminal 2 destroyed AND Terminal 3 destroyed AND Terminal 4 destroyed |
| End of mission – Rebels lose | End of Round 6 OR All heroes are wounded |
| Lockdown – selection | Door opened for the first time AND End of current Round |
For two of the events, all linked triggers need to be fired to launch the event. For the Rebel defeat event, only one out of two triggers needs to be fired.
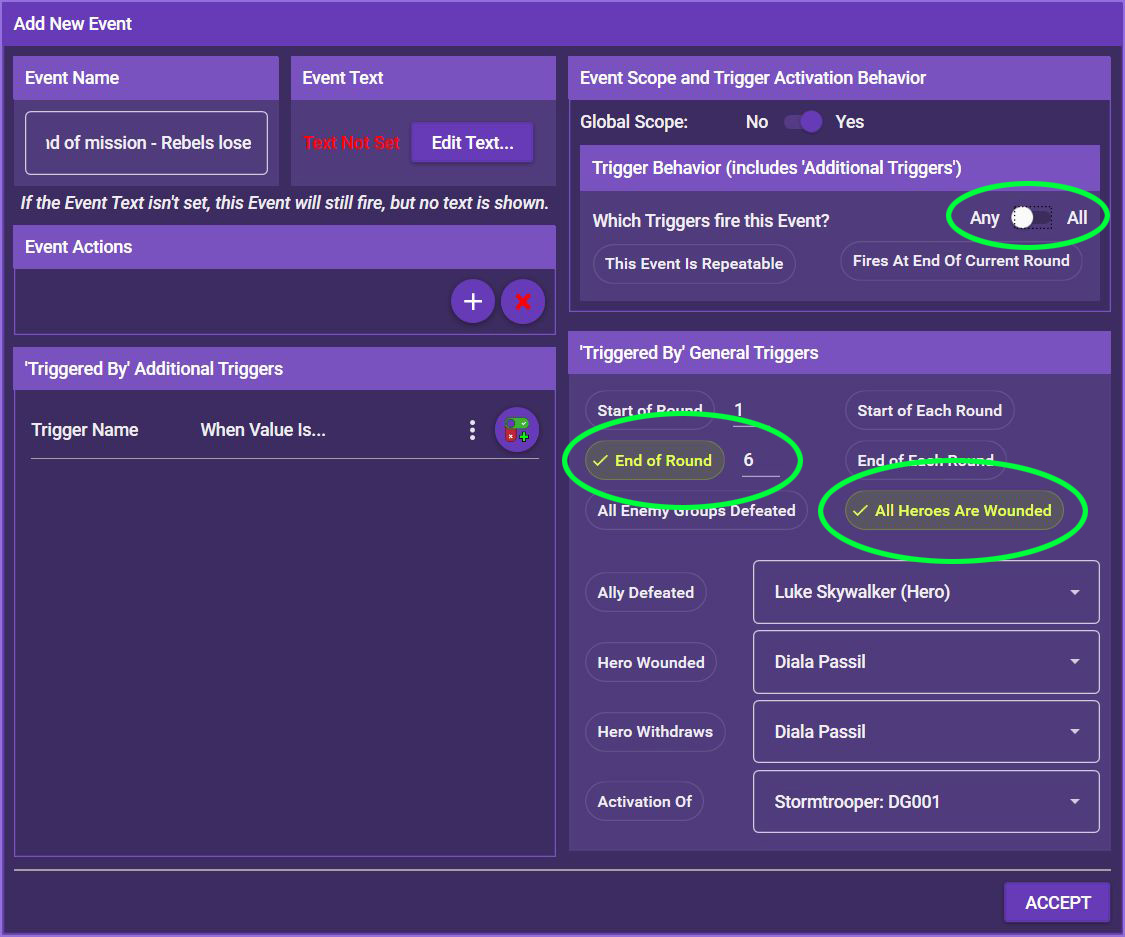
Let’s start with the event “End of mission – Rebels lose”. Double-click the event to open it. In the right section, you can see the general triggers. Activate End of Round __ and enter the number 6. Also activate All Heroes Are Wounded. Finally, toggle Trigger Behavior to Any. This means that the event is fired when ANY of those triggers are met instead of ALL of those triggers. If you don’t toggle this, the mission will only end in Rebel defeat when all heroes are wounded and the end of round 6 is reached.
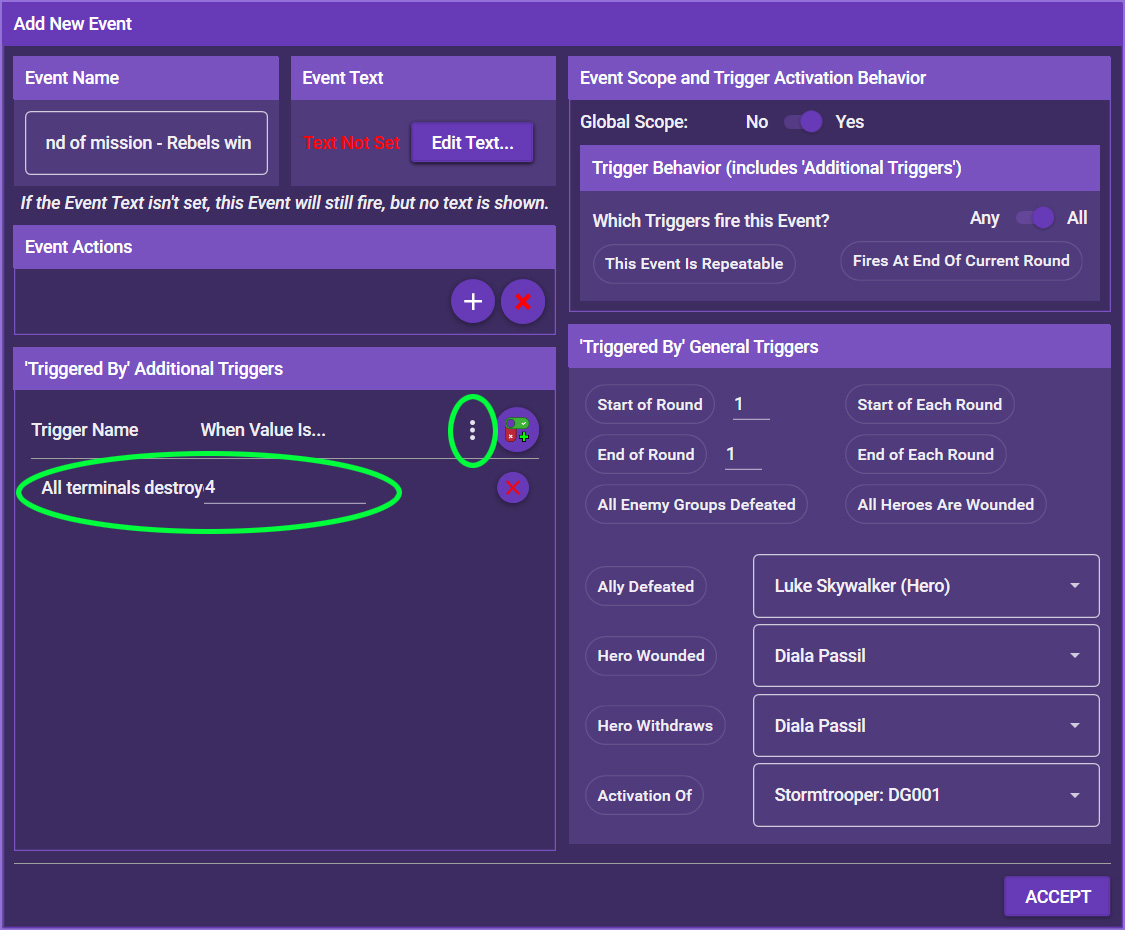
Next, double-click the event “End of mission – Rebels win”. The Rebels win when all four terminals are destroyed. We have already created the trigger “All terminals destroyed”. Triggers usually start with a value of 0. We want this trigger to increase every time a terminal is destroyed. Once it reaches value 4, the event is launched.
Under Triggered By Additional Triggers, click the three dots and select the trigger “All terminals destroyed”, then set its value to 4. This means that the event is launched once this trigger reaches 4.
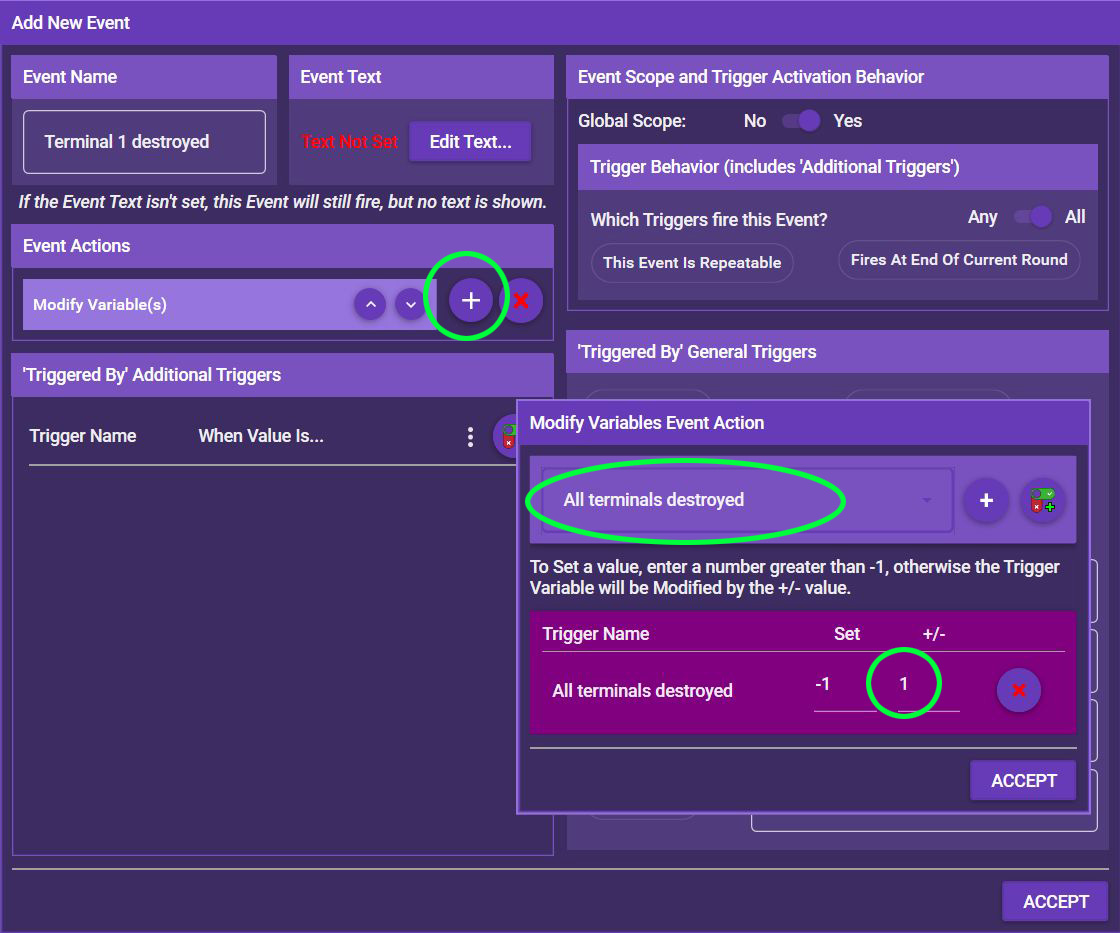
Of course, we need to tell the app to increase the value of that trigger by 1 each time a terminal is destroyed. So now you need to add your first event action. Double-click the event “Terminal 1 destroyed”. Under Event Actions, click the + symbol, then select General and finally Modify Variables. Select the trigger “All terminals destroyed” from the dropdown list and click the + to add it, then write “1” under Modify (+/-).
Repeat this for the events “Terminal 2 destroyed”, “Terminal 3 destroyed” and “Terminal 4 destroyed”. Now, each of those events increases the value of the trigger by 1. Once the last terminal is destroyed, it reaches 4 and the mission ends with a Rebel victory.
Finally, the event “Lockdown – selection” is supposed to be launched at the end of the round when the door is opened for the first time.
Double-click the event and select Fires At End of Current Round under Trigger Behavior. Next, under Triggered by Additional Triggers, add the trigger “Door opens” and set a value of 1. Leave the toggle under Trigger Behavior at All. This means that the event will launch at the end of the current round when the door is open.
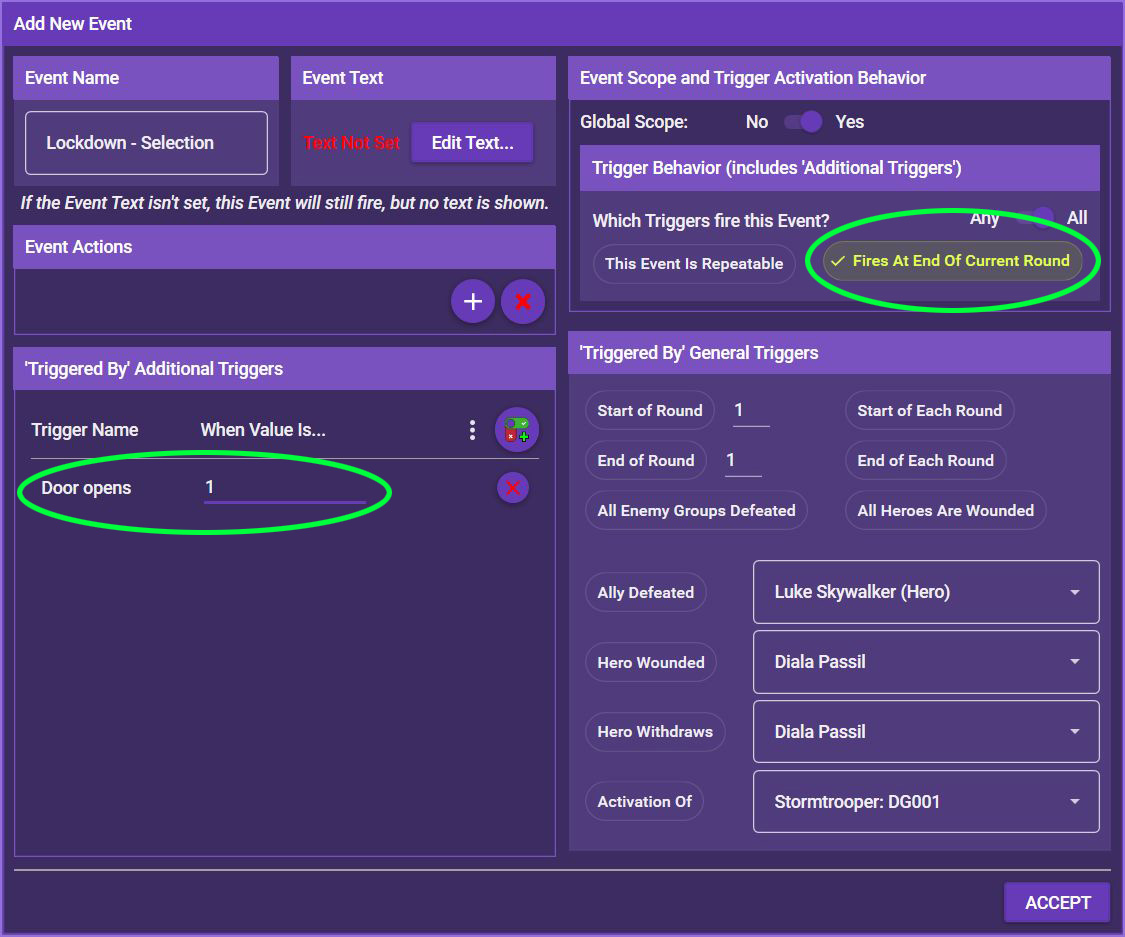
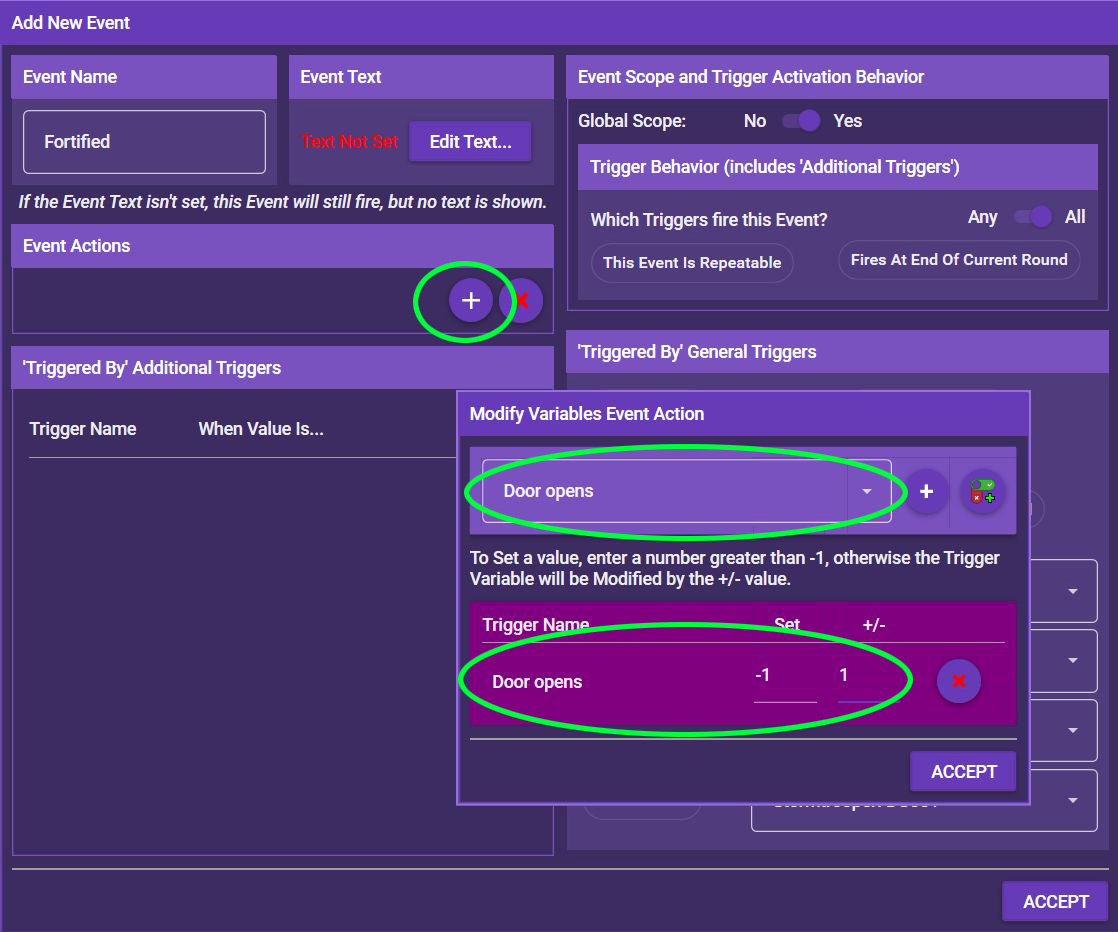
Of course, we need to tell the app that the door is open, too. Again, this is done via event actions. The event when the door opens is the “Fortified” event, so double-click that and add another General --> Modify Variables event action. Add the trigger “Door opens” and set the modification to 1. Now when the door opens, the app will know and, at the end of the round, launch the event “Lockdown – selection”.
What’s left to do before we get to the event actions is adding interactions. Most events require some sort of interaction with the map, for example opening a door, opening a crate, or destroying a terminal. You have already placed the map entities. Now it’s time to use them.
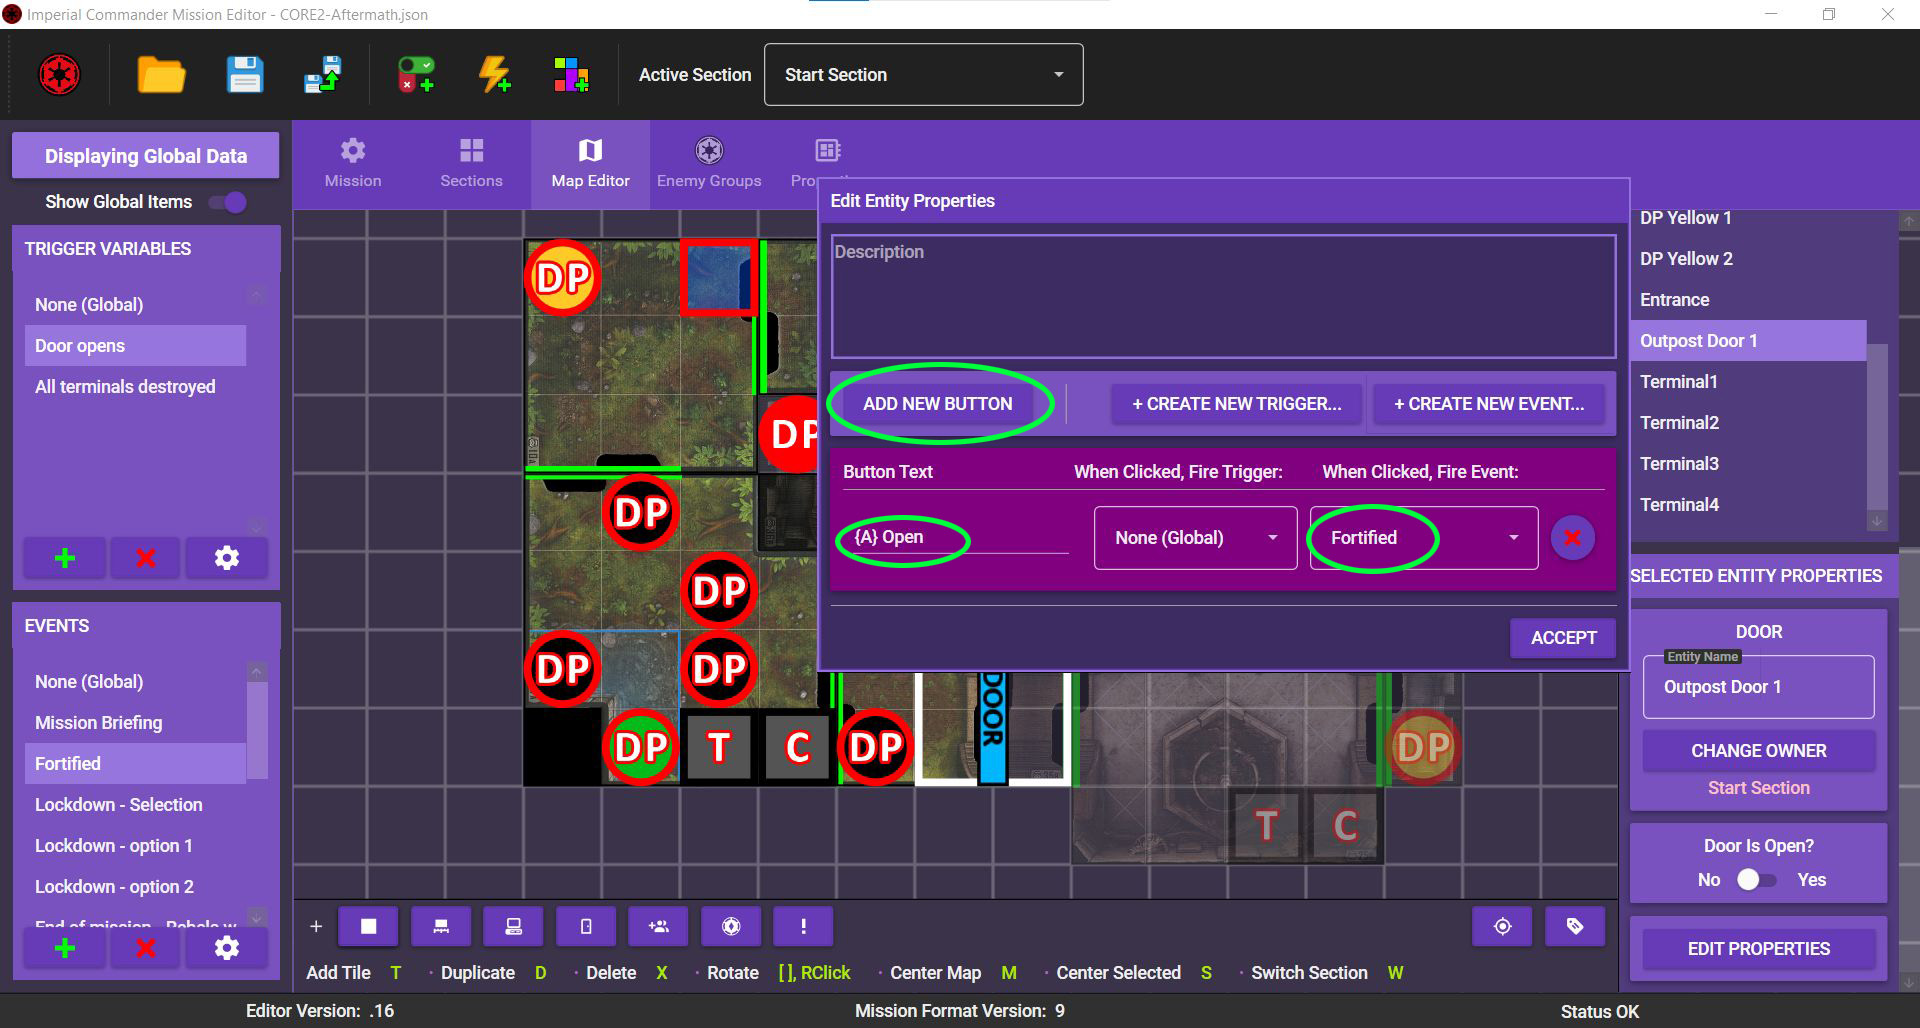
We’ll begin with the door. Open the map editor and click on the door. On the right side of the screen, scroll down until you reach the SELECTED ENTITY PROPERTIES, then click EDIT PROPERTIES. You can also simply double-click the door.
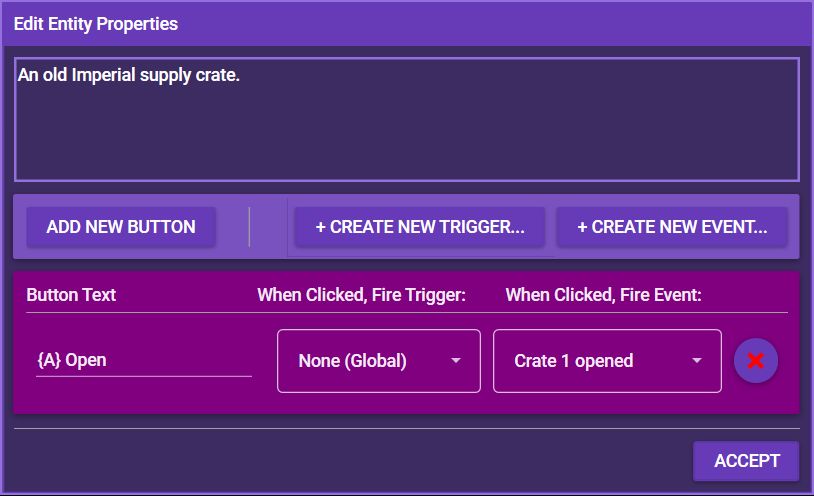
We’ll add a description later. For now, let’s concentrate on the buttons. The door is locked to Imperial figures, but a hero can interact wimh it to open it. So you need to create a button with the label “![]() Open”. Clicking this button starts the event “Fortified”.
Open”. Clicking this button starts the event “Fortified”.
In the Properties screen of the door, click Add New Button* Under Button Text, write “{A} Open”. The {A} will be turned into the ![]() symbol by the app. You can find out more about text formatting here. Under When Clicked, Fire Event select the event "Fortified". Click ACCEPT, and that’s it.
symbol by the app. You can find out more about text formatting here. Under When Clicked, Fire Event select the event "Fortified". Click ACCEPT, and that’s it.
Now repeat this for all the map entities that can be interacted with. Here’s a handy list:
| Map Entity | Link to event | Button text |
|---|---|---|
| Terminal1 | Terminal 1 destroyed | Destroy |
| Terminal2 | Terminal 2 destroyed | Destroy |
| Terminal3 | Terminal 3 destroyed | Destroy |
| Terminal4 | Terminal 4 destroyed | Destroy |
| Crate1 | Crate 1 opened | {A} Open |
| Crate2 | Crate 2 opened | {A} Open |
| Crate3 | Crate 3 opened | {A} Open |
But wasn't there something about a second door? Yes, there was. Let's get to it.
When option two from the “Lockdown” event is selected, the door closes again. We could simply place the original door again, but the closed door works differently. It can’t be opened normally, it has to be destroyed. So it’s easier to simply add a second door at the same place.
Open the map editor again and create another door. Give it a unique name, then place it at exactly the same spot as the first door. If you later need to edit the first door, you can simply drag the second door away temporarily, or select the first door from the Entities list on the right.
Scroll down to SELECTED ENTITY PROPERTIES and give the door a unique name. Because we want this door to be open (invisible) when the mission starts, toggle Door is Open? to Yes. We will later change this via an event action.
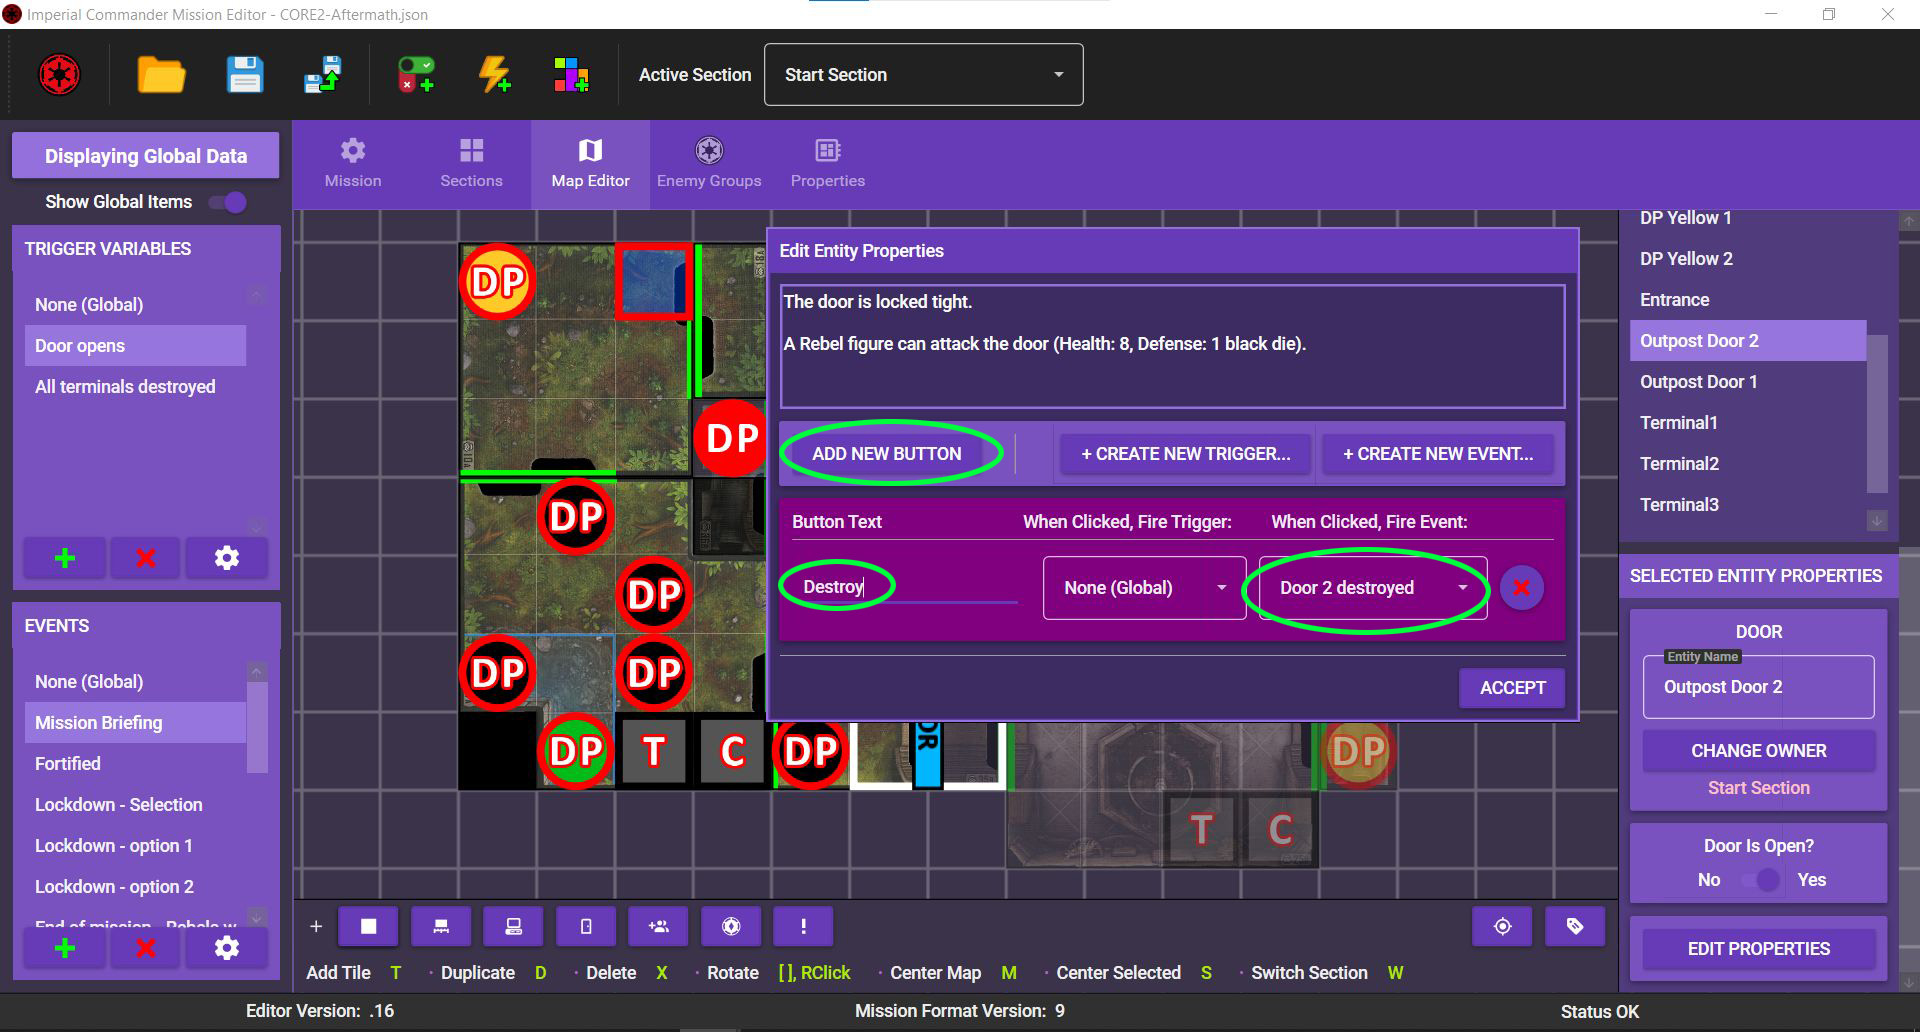
Finally, click EDIT PROPERTIES, add a button labeled "Destroy" and link it to the event “Door 2 destroyed” . Now, destroying the door launches the event “Door 2 destroyed”.
We have placed a lot of entities on the map, but for now they don't have any descriptions. The terminals, crates and doors are going to need basic descriptions. Some of them will just be flavor, but others provide important information about how to deal with the entities.
Open the map editor and click on one of the crates, then, under SELECTED ENTITY PROPERTIES, click EDIT PROPERTIES. Add a description text like this:
An old Imperial supply crate.
Repeat this for all three crates, then add descriptions to the other map entities.
| Map Entity | Description |
|---|---|
| Terminal | The terminal hums with electricity as it broadcasts the signal. A Rebel figure can attack a terminal (Health: 4, Defense: 1 {G}). Apply +1 {G} to the terminal's defense results if it is adjacent to 1 or more Imperial figures. |
| Outpost Door | A door leads into the Imperial outpost. |
| Outpost Door 2 | The door is locked tight. A Rebel figure can attack the door (Health: 8, Defense: 1 black die). |
Now it’s time to tell the editor what the events actually do to alter the game states. You do this by setting Event Actions. Event actions tell the app to, for example, increase threat, deploy groups or reveal new map sections.
Start from the top of the event list and simply work your way down. The first in the list is the event “Mission Briefing”.
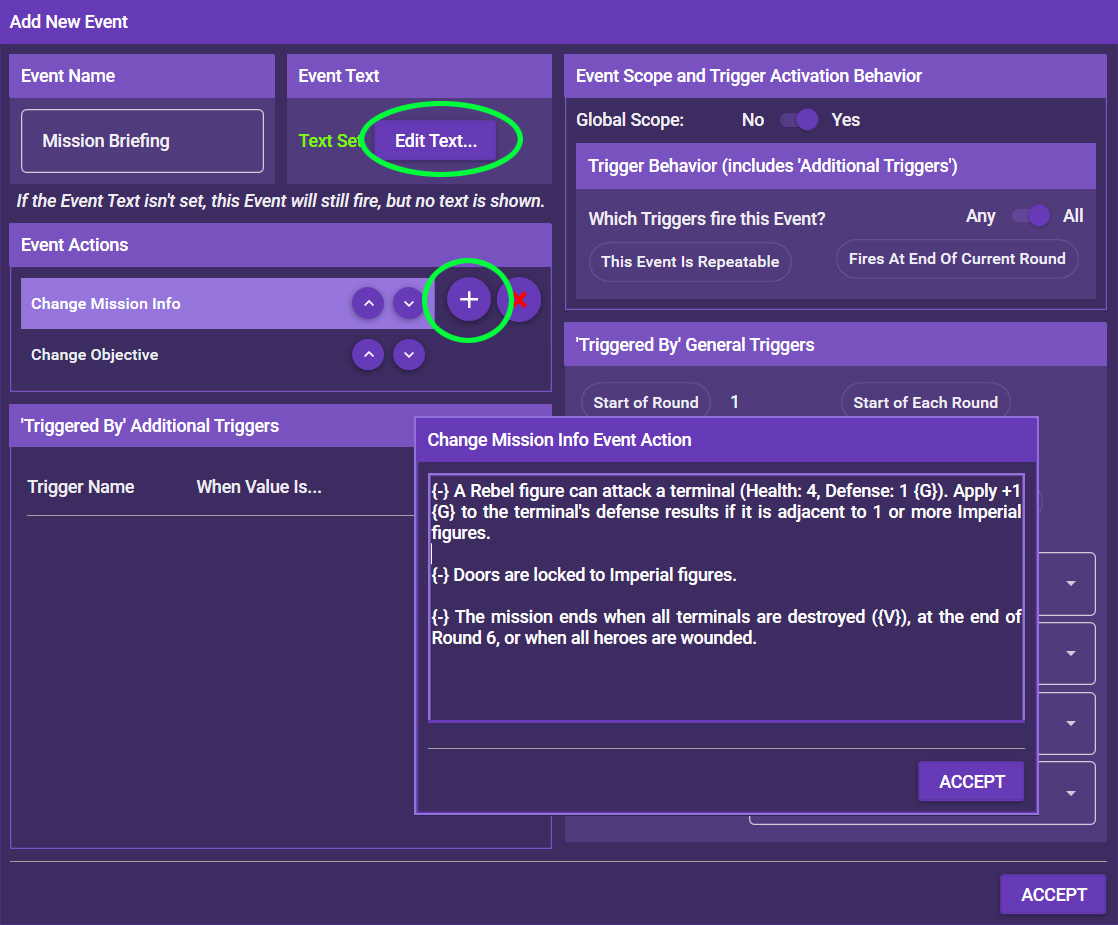
“Mission Briefing” is the start event, so it’s the one that is displayed at the beginning of the mission. Double-click the event to open it, then, under Event Text, click Edit Text and copy the following text into the box:
Arriving at the outpost, you immediately open fire upon the troops standing guard. You suspect they knew you were coming and that you're likely walking into an ambush. All the same, with the signal continuing to broadcast, there just isn't time for a more subtle approach.
{-} A Rebel figure can attack a terminal (Health: 4, Defense: 1 {G}). Apply +1 {G} to the terminal's defense results if it is adjacent to 1 or more Imperial figures.
{-} Doors are locked to Imperial figures.
{-} The mission ends when all terminals are destroyed ({V}), at the end of Round 6, or when all heroes are wounded.
This is the text that is displayed when the event starts. It tells the players a bit of the background and then sets some mission parameters. To make sure they don’t forget what they’re supposed to do, however, you should also set the Objective and the Mission Info. The Objective is a short overview about the Rebels’ goals in the mission. The Mission Info is additional information behind a button the players can click.
Objectives and Mission Info can be set by event actions. Under Event Actions, click the + symbol, then General and finally Change Objective. Enter the following text:
Find and destroy the four terminals broadcasting the signal.
Next, add another event action under General called Change Mission Info. Enter the following text:
{-} A Rebel figure can attack a terminal (Health: 4, Defense: 1 {G}). Apply +1 {G} to the terminal's defense results if it is adjacent to 1 or more Imperial figures.
{-} Doors are locked to Imperial figures.
{-} The mission ends when all terminals are destroyed ({V}), at the end of Round 6, or when all heroes are wounded.
That’s all you have to do, so hit ACCEPT to save the event.
Note: Instead of setting mission information and objective in the starting event, you can also simply set the initial information and objective in the mission properties. This way here is shown to demonstrate those event actions work.
The event “Fortified” is triggered when the door opens. It first discards the door, then it reveals the second part of the map, then deploys the reserved E-Web Engineer, Imperial Officer and Stormtroopers.
Double-click the event and first set the event text to:
"They're here!" the Imperial forces shout as they scramble their defenses. "Keep them away from the transmitters!"
There's a crackle from your comlink. "Imperial forces on approach!" your pilot contacts you from your transport, now circling overhead. "The place is going to be crawling with them soon, so get the Job done quick!"
{-} Deploy groups as indicated. The E-Web Engineer becomes Focused.
The app will tell the players where to deploy the groups, so you don’t have to worry about describing it. You need to tell the app what to do, though. First, add an event action under Map and Tokens called Modify Map Entity. Select the door, click the + symbol and toggle it to Yes. This discards the door.
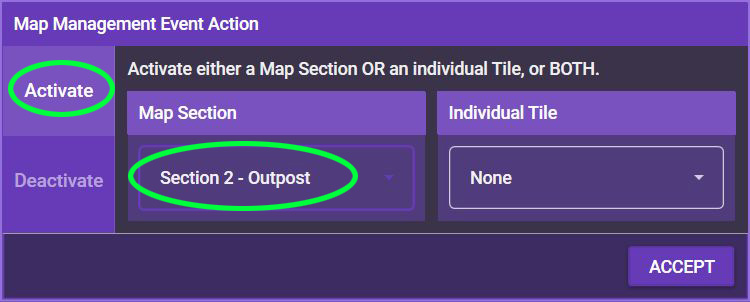
Next, you need to reveal the map section. Under Map and Tokens, select the event action Map Management. Under Activate, select “Section 2 – Outpost” and hit Accept.
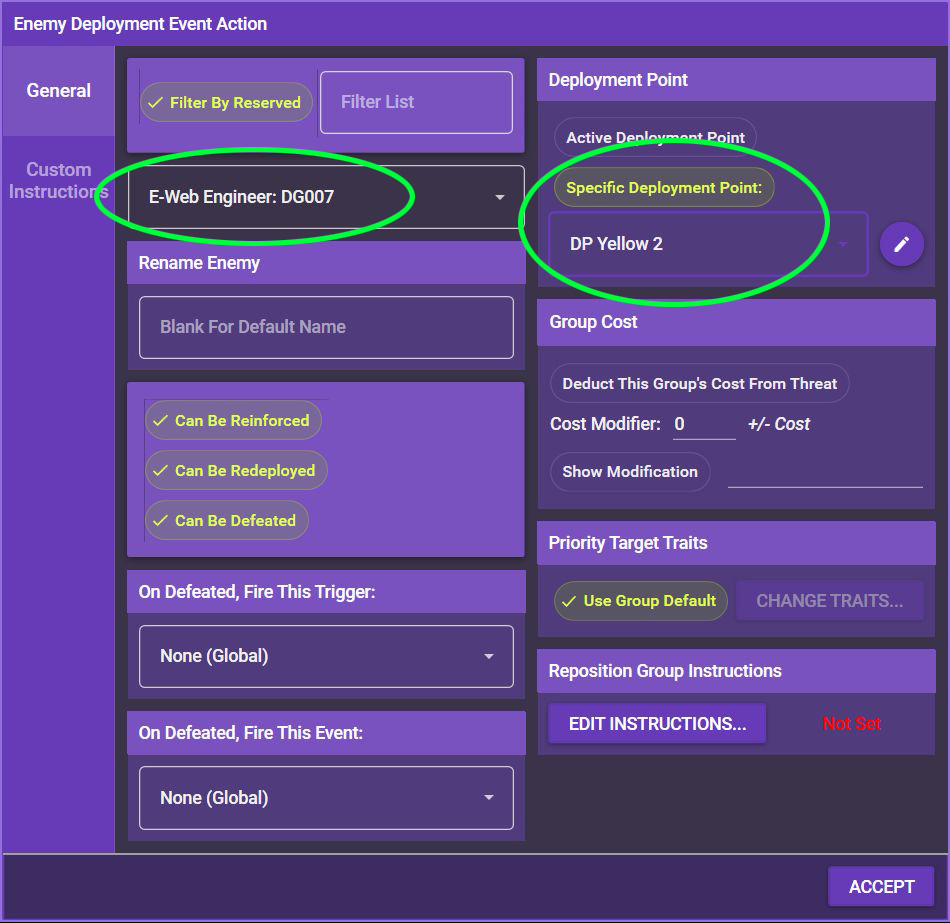
Finally, you need to deploy the reserved groups. Let’s start with the E-Web Engineer. Under Deployment, select the event action Enemy Deployment, then select the E-Web Engineer from the dropdown list. The mission says to deploy it to “any yellow point”, of which there are two. We could create a selection here, but that’s a bit too much for now, so on the right, just click on Specific Deployment Point and select “DP Yellow 2”, the one in the Outpost. This ensures that the E-Web Engineer stays in action.
Repeat this for the reserved Stormtroopers and the reserved Imperial Officer. (Be careful to select the second groups, not the initial groups, so DG002 and DG005.) Since they need to be deployed to the Storage Room, select “DP Red” as their deployment point.
Your event should now look something like this:
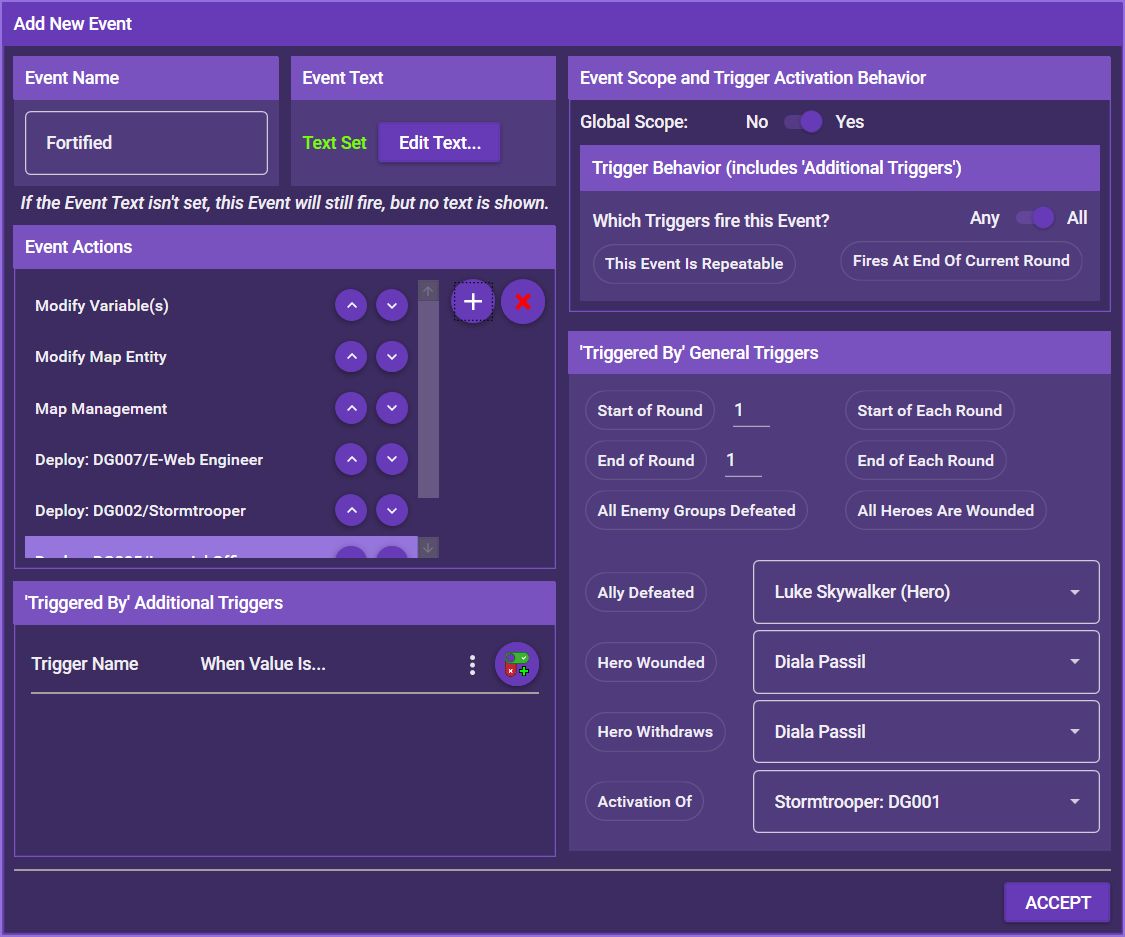
That’s it. Click ACCEPT.
The event “Lockdown” is a bit tricky, because in the mission the Imperial player has to make a decision here: Whether to strengthen the terminals or to close the door and lock any outside Rebels out. Since there is no Imperial player, you need to make the decision for it and give the players clear instructions.
In this case, it seems like a good idea to close the door if there are enough Rebels still outside the outpost. If not, it’s better to strengthen the terminals.
First, set the event text to: Shortly after you invade the outposts, Imperial security protocols activate.
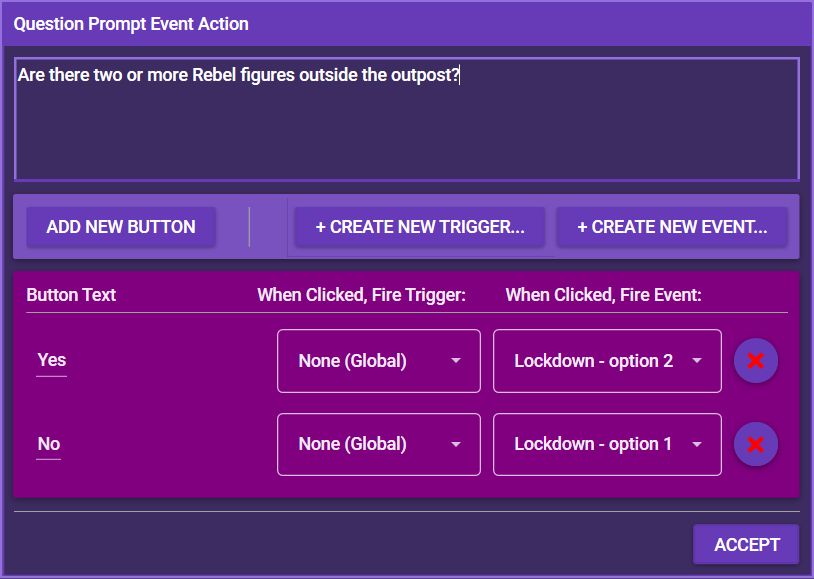
Next, we need the players to tell us something about the map state, because the app does not track Rebel positions. Add the event action Question Prompt under General. As the question, set: Are there two or more Rebel figures outside the outpost? If this question is answered yes, the app is supposed to launch the event “Lockdown – option 2” (close the door). If it is answered no, it is supposed to launch event “Lockdown – option 1” (strengthen the terminals).
From the dropdown list, select “Lockdown 2 selected” and click the + symbol, then set “Yes” as the button text. Then add “Lockdown 1 selected” with the button text “No”.
On to the next event, so click ACCEPT.
The Event "Lockdown - option 1" simply increases the Health of the remaining terminals. Double-click the event and set the following event text:
With a loud hum, energy fields activate around the remaining terminals.
Each terminal has 7 Health instead of 4.
We could leave it at that, but for good measure, let's change the mission info and the terminal descriptions, too. For the mission information, just add the event action General --> Change Mission Info. Just copy over the text from the former mission info and adjust the Health of the terminals:
{-} A Rebel figure can attack a terminal (Health: 7, Defense: 1 {G}). Apply +1 {G} to the terminal's defense results if it is adjacent to 1 or more Imperial figures.
{-} Doors are locked to Imperial figures.
{-} The mission ends when all terminals are destroyed ({V}), at the end of Round 6, or when all heroes are wounded.
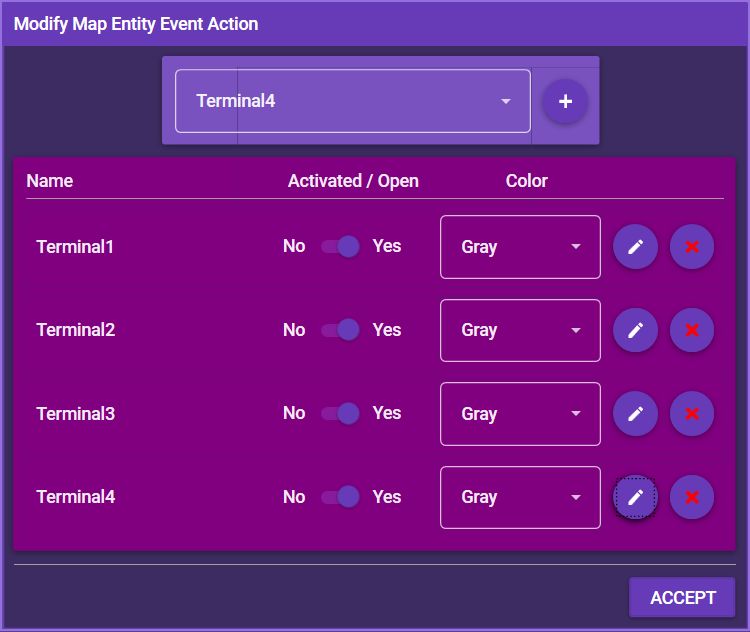
Now we also need to edit the terminal descriptions. Add the event action Map and Tokens --> Modify Entity. Click Modify, then add terminals 1-4 and edit their properties so the description now reads:
The terminal hums with electricity as it broadcasts the signal. The terminal is surrounded by an energy shield.
A Rebel figure can attack a terminal (Health: 7, Defense: 1 {G}). Apply +1 {G} to the terminal's defense results if it is adjacent to 1 or more Imperial figures.
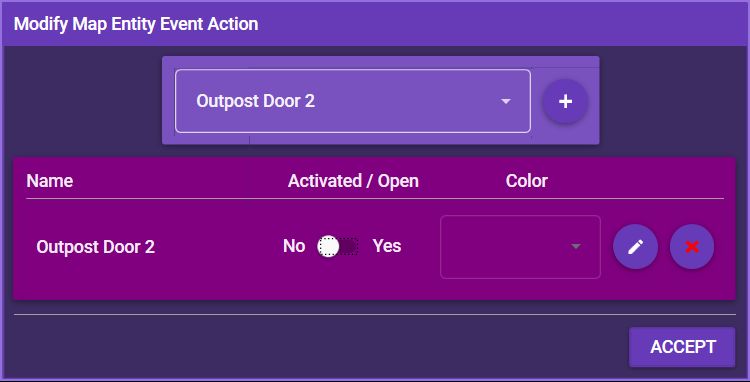
This event simply activates the second door we created earlier. Simply add the following event text: The door slams shut again.
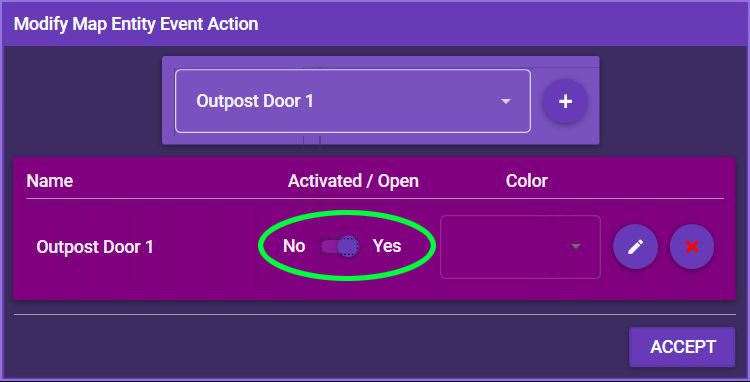
Now add the event action Map and Tokens --> Modify Map Entity. Under Activated/Open, select the "Outpost Door 2", add it and toggle it to No (closed).
This is the opposite of the previous event. Add the description text: Under your attacks, the door soon gives in.
Next, add another event action Map and Tokens --> Modify Entity as in step 17E. This time, however, toggle the Outpost Door 2 to "Yes" (open).
This event is crucial for the mission because it is the Rebels' goal to destroy the terminals. Luckily, we have already added the event action Modify Variable(s), so the mission already works. All that is left to do is add some flavor and tell the app to discard the terminal.
Set the event text to: The terminal explodes in a shower of sparks. The hum of the broadcast stops immediately.
Next, add another Map and Tokens --> Modify Map Entity event action. Select Terminal X and toggle it to No (deactivated).
Repeat this for the events "Terminal 1 destroyed", "Terminal 2 destroyed", "Terminal 3 destroyed", and "Terminal 1 destroyed".
The final events are before us! First, let's flesh out the three crate events. In Imperial Commander, in addition to drawing supply cards, the Rebel players get 1 medpac for each crate they claim. You could add some randomization to the mission by having the crate contain different things, but that's too much for this tutorial. For now, let's just leave all the crates the same.
Add the event text:
You rummage through the supplies and take whatever seems useful.
Draw a supply card. You gain 1 medpac. Claim this token.
Now, add the already familiar event action Map and Tokens --> Modify Map Entity and deactivate the respective crate. Repeat this for all three "Crate X opened" events.
And the last two events are simply there to finish the mission. Copy the end of mission text from the campaign book into the event text of the respective events, then, under Event Actions, add General --> Mission Management and check End Mission.
That's it! The mission is now fully playable. Open it in Imperial Commander 2.0 and click through it to see if everything works the way it should. If it doesn't, by now you should have a good idea of which event doesn't work. Simply change it in the editor and retry it until you have all bugs ironed out.